How to Shoot a Little Planet Photo With a Drone (Step by Step)
Dipon | October 2026
Table of Contents
- What Is a Little Planet Photo and How Does a Drone Make One?
- What Should You Check Before You Fly?
- How to Shoot a Little Planet Photo With a Drone, Step by Step
- Which Drone Do You Need?
- How Do You Turn the Panorama Into a Little Planet?
- What Mistakes Ruin Most Little Planet Photos?
- Read Next on Aero Timelapse
- FAQ
- Conclusion
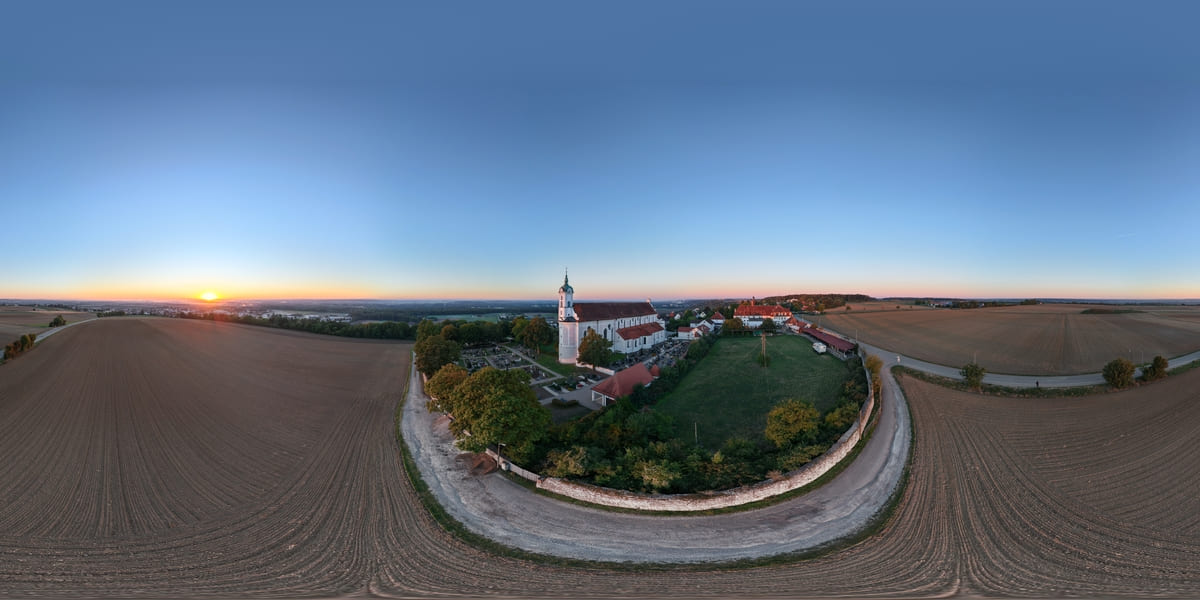
I almost drove past it. On a morning drive around the outskirts of Ulm, I spotted an old abbey on top of a village hill. It was Kloster Oberelchingen, a historic site where part of the Napoleonic Wars was fought in 1805.
The light was soft and golden, so I sent the Air 3S up. I placed the Kloster on the horizon instead of under the drone, and shot a Sphere panorama. About a minute later I had a photo that became a tiny planet with the abbey standing on its rim.
This guide shows you how to shoot a little planet photo with a drone, the way I did it. You will learn the capture steps, the one choice that changes the whole look, and how to avoid the mistakes that ruin most first tries. By the end you can go out, shoot one, and get a result you want to post.
Key Takeaways
- A little planet photo starts as a full 360° Sphere panorama, not a normal photo.
- You choose where the subject goes. Below the drone puts it in the centre. On the horizon puts it on the rim of the planet.
- Keep the drone still and the wind light. Movement is the main cause of stitching errors.
- Stay under 120 m, the EU open category limit.
- Sphere mode takes around 30 photos on recent DJI drones. Check your own model.
- Finish with a projection tool and export a square image.
Affiliate Disclosure
This guide contains affiliate links. Purchases made through these links support Aero Timelapse Studio at no additional cost to you. I only recommend products I personally use or carefully research. As an Amazon Associate I earn from qualifying purchases.
What Is a Little Planet Photo and How Does a Drone Make One?
A little planet photo is a 360° panorama bent into a circle. The ground forms a round world, and the sky wraps around it like an atmosphere. The technical name is a stereographic projection.
Your drone does the hard part. It hovers, turns and tilts, and takes overlapping photos in every direction. Then it stitches them into one flat image with a 2:1 ratio, called an equirectangular panorama.
What Is a Nadir Drone Panorama?
A nadir drone panorama is a sphere panorama where the area straight below the drone is clean and well stitched. The nadir is simply the point directly under you. In a little planet, that point sits at the centre of the circle.
This matters because the centre is where the eye lands first. A clean field, a tidy road or a neat roof looks great there. A blurry patch or a doubled car does not.
How Does a Drone Panorama Become a Little Planet?
The drone gives you a flat image that looks stretched, like a world map. A projection tool turns your view to face the ground and wraps everything into a circle. The sky ends up around the edge and the land in the middle.
You then choose how tight or wide the planet looks. A wider field of view shows more sky and a smaller world. A tighter one fills the frame with ground. It is worth trying both, because the same panorama can give you several very different pictures.
What Should You Check Before You Fly?
Check the wind, the light and the rules. It takes five minutes and saves the shoot. Skipping it is how most failed panoramas happen.
Is the Wind Light Enough?
A sphere panorama takes about a minute of hovering. The drone rotates and tilts through dozens of shots, and each one has to line up with its neighbours. If the drone drifts, the stitching software cannot match the edges.
I only shoot in calm conditions, and I skip the panorama if DJI Fly warns about wind. A strong breeze also makes the drone work harder, which drains the battery faster. Check conditions first with our Drone Weather Checker.
What Light Works Best?
Soft light keeps the exposure even across the whole sphere. A panorama includes the sky and the ground at the same time, so harsh contrast is hard to handle. One side of the planet will be too bright while the other is too dark.
Morning golden hour worked well at the Kloster, because the low sun gave warm tones without harsh shadows. Keep the sun to the side or behind you where possible. The Golden Hour Planner helps you find the right time, and the best time to fly a drone explains more.
What Are the Rules in Germany and the EU?
In the EU open category, you can fly up to 120 m above ground. In Germany you must register with the LBA, put your e-ID on the drone and carry liability insurance. These rules apply to hobby pilots too.
Also check the official DIPUL drone map for restricted zones. This matters near historic or sensitive sites, because they can sit inside or beside protected areas. Our Drone Laws & Regulations guide has the full breakdown.
⚠️ Warning: Do not fly over people, roads or crowds. Pick a quiet spot and keep the drone in line of sight.
How to Shoot a Little Planet Photo With a Drone, Step by Step
This is the exact process I follow. It works on any DJI drone with a Sphere panorama mode.
Step 1: Decide Where the Subject Goes
This choice changes the whole picture, so make it before you take off. You have two options. Neither is wrong, but they look very different.
If the subject is directly below the drone, it sits in the centre of the planet. This works for a lone tree, a roundabout or a small building. The planet looks like a map with your subject in the middle.
If the subject is on the horizon, it ends up standing on the rim of the planet. That is what I did with the Kloster. The abbey looks like a building on the edge of a tiny world, with the land curving around it.
I prefer the horizon version for tall subjects like towers, churches and castles. They keep their upright shape, and the eye follows the curve around to them. A centred tall building just looks like a small shape from above.
Step 2: Position the Drone
Where you hover decides where the subject lands in the final image. Your subject sits in the direction you see it from the drone. So if you want the Kloster on the horizon, hover at a distance and point the camera at it before you start.
Distance is a balance. Too far and the subject shrinks to a speck. Too close and it towers over you and loses the planet feel. I went for a spot where the abbey stayed clearly readable but still felt like part of a landscape.
Step 3: Choose Your Height
Pick a height where the ground around you fills the planet, but your subject is still clear. For the Kloster I flew at 35 m. Too low and you get a planet made of grass. Too high and a small subject turns into a dot.
Height also changes how the land curves. Higher means more ground in the circle and a bigger world. Lower gives a tighter, more dramatic bend. Stay under 120 m, which is the legal limit in the open category.
Step 4: Switch to Sphere Panorama Mode
Open DJI Fly and choose the Pano option. Then pick Sphere. The drone will rotate and tilt through a full set of overlapping shots and stitch them for you.
On recent DJI drones this takes around 30 photos, so check your own model. The Air 3S and the Lito X1 both have Sphere mode. Older models take fewer shots, and the result is the same idea.
Step 5: Keep Exposure Even
Do not aim straight at the sun. A slightly darker image is easier to fix than a burnt sky, because you can lift shadows but you cannot rebuild blown highlights. I kept the sun low and to the side at the Kloster.
💡 Pro Tip: If your drone lets you lock white balance, do it before you start. It stops colours from shifting between shots, which can make the stitched image look patchy.
Step 6: Hover Still and Keep Your Hands Off
Wait for a solid GPS lock. Start the panorama, then do not touch the sticks. Any input moves the drone, and that can break the stitch.
When the shots finish, the drone spends a few more seconds joining them. Wait for that to finish before you move it. If you fly away early, you can lose the whole panorama.
Step 7: Check It on the Spot
Open the image and zoom in. Look for ghost people, warped lines and a broken subject. If something looks wrong, shoot again now. It is far easier than coming back another day.
I check the centre first, then the subject. If both look clean, the edges rarely matter.
Should You Use Sphere or Free Panorama?
Use Sphere for a little planet. Free Panorama on the Air 3S can shoot at full sensor resolution, but it only covers a chosen area, not a full sphere. You need the full 360° to make the planet.
Some owners find the in-drone stitch slightly soft. It is great for social media, but softer than a careful manual stitch. If you want maximum sharpness, shoot RAW and stitch yourself, and accept the extra work.
Which Drone Do You Need?
Any drone with a Sphere panorama mode will work. I shot the Kloster with my DJI Air 3S, and the DJI Lito X1 also has Sphere mode. Most recent DJI camera drones do, so look for Pano in the shooting menu.
Stability matters more than sensor size for this job. A drone that hovers still gives cleaner stitches, and a bigger sensor just adds detail. So you do not need an expensive drone to start.
If you are still choosing, start with Best Drones for Beginners 2026 or Best Drones Under 500 Euro 2026. You can also read my Lito X1 vs Mini 5 Pro comparison.
How Do You Turn the Panorama Into a Little Planet?
Load the flat panorama into a projection tool and set the view to look straight down. I use the free little planet tool on Aero Timelapse because it runs in the browser and needs no software.
Copy the file to your computer first. Phone screens hide the small flaws that show up when you export large.
What Settings Make the Planet Look Good?
Your tool may name these slightly differently, but the steps are the same.
- Point the view straight down.
- Rotate until your subject stands upright where you want it. For the Kloster, I rotated until the abbey sat on the rim and pointed outward.
- Widen the field of view until the horizon forms a clean ring.
- Export as a square.
Rotation is the step that most beginners skip. A small turn changes which part of the landscape sits at the top of the planet. Try a few angles before you settle.
Which Crop Works Best for Social Media?
Use 1:1 for a perfect circle. Use 4:5 for Instagram feed posts if you want more sky around the planet. Use 9:16 for Stories and Reels, with extra sky above.
The sky area is a good place for text or a logo. I leave space there when I plan to post the image.
💡 Pro Tip: Export at full resolution, then resize afterwards. You can shrink a sharp image, but you cannot fix a small one.
What Mistakes Ruin Most Little Planet Photos?
Most failures come from movement, a busy scene or a messy centre. You can avoid all of them with a little planning.
| Problem | Why it happens | Quick fix |
|---|---|---|
| Wavy or broken lines | The drone drifted | Reshoot in calmer air |
| Ghost people or cars | Things moved during capture | Pick a quiet spot |
| Subject looks tiny | Flew too high or too far | Come closer and reshoot |
| Dark or blown-out sky | Sun in frame | Shoot in soft light |
| Soft, blurry planet | Small export | Export at full resolution |
Why Does My Planet Look Squashed?
Your view is either tilted or too narrow. A tilted view pushes the ground off centre, and a narrow one crops the curve. Both make the planet look flat.
Reset the view to straight down, then widen the field of view slowly. Stop when the horizon forms a clean ring.
Can I Fix Stitching Errors in Post?
Small ones, yes. Use a clone tool to patch a doubled branch or a small seam. It takes a minute and is usually invisible.
Large errors need a reshoot. If the subject itself is warped, no edit will save it. That is why I always check on the spot.
Read Next on Aero Timelapse
- Free Little Planet Generator: turn your panorama into a finished planet.
- Best Drones for Beginners 2026: safe, easy first-drone picks.
- Best Drones Under 500 Euro 2026: solid cameras on a budget.
- DJI Lito X1 vs Mini 5 Pro: which ultralight fits you.
- Drone Laws & Regulations: the EU and German rules.
- Drone Weather Checker: check conditions first.
- Drone Pre-Flight Checklist Generator: a clean list for every flight.
- Golden Hour Planner: find the best light.
- Best Time to Fly a Drone for Photography: pick your moment.
FAQ - How to Shoot a Little Planet Photo With a Drone
How do you shoot a little planet photo with a drone?
Hover still, switch to Sphere panorama mode and let the drone capture a full 360° set of photos. Then load the stitched panorama into a projection tool, point the view straight down and export a square image. The capture takes about a minute.
Does the subject have to be directly below the drone?
No. Below the drone puts the subject in the centre of the planet. On the horizon puts it on the rim, where tall subjects like churches and towers stand upright. Both work, and the horizon version often looks more dramatic.
Which drone setting creates a little planet photo?
Sphere panorama mode. The drone takes overlapping photos in every direction and stitches them into one 360° image, which is the source for the planet.
What is a nadir drone panorama?
A sphere panorama where the point straight below the drone is clean and well stitched. That point becomes the centre of the little planet.
Can I shoot a little planet photo with a cheap drone?
Yes. The DJI Lito X1 has Sphere panorama mode, as do most recent DJI camera drones. Look for Pano in the shooting menu.
Why does my little planet photo look distorted?
Drift during capture, a tilted view or a narrow field of view cause most distortion. Reshoot in calm air, then reset the view to straight down and widen the field of view slowly.
Do I need a licence to shoot drone panoramas in Germany?
You need LBA operator registration, an e-ID on the drone and liability insurance. Whether you also need the EU-Kompetenznachweis A1/A3 depends on your drone’s weight class and use. See the Drone Laws & Regulations guide.
Conclusion
The best way to shoot a little planet photo with a drone is simple. Pick a quiet spot, decide whether your subject goes below you or on the horizon, hover still and shoot a Sphere panorama. Then let the projection do the rest.
Do one thing today. Find a landmark near you, like my Kloster, and shoot one sphere with the subject on the horizon. Then run it through the Free Little Planet Generator and see your own tiny world.
Dipon is a drone and timelapse cinematographer based in Ulm, Germany, with over 15 years of experience turning real spaces and projects into cinematic visuals. With a background in digital marketing, every shot is planned with a clear purpose — where it will appear, who will see it, and what it should help them decide.
You May Also Like
How to Shoot Milky Way Photos for Stacking
Best Drones for Beginners (2026): Safe, Easy Picks + Buying Guide
Why Sensor Size Matters When You’re Buying a Drone
Timelapse vs Hyperlapse : What’s the Difference?
How Weather Affects Timelapse & Drone Shoots
DJI Lito X1 vs Mini 5 Pro: Which Ultralight Drone Belongs in Your Camera Bag?
DJI Mavic 4 Pro vs DJI Air 3S
DJI Air 3S Review: The Sweet-Spot Drone for Creators and Professionals
DJI Mavic 4 Pro Review: Is It Worth It for Professional Work? (2026)

Best Prime Week Drone Deals for Creators and Beginners
Drone Laws & Regulations — The Complete Legal Guide for EU Pilots (2026)
DJI Lito X1 Review: The Ultimate Pocket-Sized B-Cam for Creators?
Need help capturing aerials for your next project but not ready to invest in the gear yet? Check out our Drone Videography to see how Aero Timelapse Studio can help elevate your production.