
Table of Contents
Affiliate Disclosure
This guide contains affiliate links. Purchases made through these links support Aero Timelapse Studio at no additional cost to you. I only recommend products I personally use or carefully research. As an Amazon Associate I earn from qualifying purchases.
I get some version of the same message a few times a month: someone has one flickery timelapse and doesn’t want to buy a €141.61 € licence to fix a sequence they might only touch once. That’s a fair position. LRTimelapse is the right tool when you shoot RAW regularly, do Holy Grail transitions, or run a serious workflow. It’s overkill for a single sequence from a weekend hike, and it’s more than most JPEG shooters ever need.
So I built a free browser-based deflicker tool that handles the case LRTimelapse is often overkill for: JPEG or PNG sequences with ordinary exposure flicker. No install, no upload, no account. RAW shooters can use it too, with one extra step. This guide walks through exactly when it’s the right call, when it isn’t, and how to use it.
Quick Answer
If your timelapse has frame-to-frame exposure flicker from aperture hunting or auto-exposure drift, Deflicker fixes it for free, entirely in your browser, with a full-resolution export. It reads JPEG and PNG directly; if you shoot RAW, export a JPEG proxy sequence first, run correction on the proxies, then apply the resulting CSV offsets back to your RAW originals in Lightroom, non-destructively. What it isn’t built for is Holy Grail day-to-night ramps, which need keyframed, multi-parameter interpolation rather than a single brightness curve. For those, LRTimelapse is still the right tool, see the full Timelapse Flicker Fix guide for that workflow.
Who This Free Tool Is For (And Who Still Needs LRTimelapse)
I want to be direct about this before you spend ten minutes on the wrong tool.
Use the free tool if:
- Your frames are JPEG or PNG, or you’re shooting RAW and are willing to export a JPEG proxy sequence, run correction on the proxies, and apply the resulting CSV offsets back to your RAW originals in Lightroom, this is genuinely non-destructive, you’re not losing anything by taking this path
- The flicker is ordinary frame-to-frame exposure variation, aperture hunting or auto-exposure drift, not a deliberate day-to-night transition
- You want a one-off fix without installing anything or learning a new interface
Stick with LRTimelapse if:
- You want deflicker running natively inside your RAW develop pipeline, without the extra JPEG-proxy export step, especially if you shoot often enough that the extra step becomes real time lost
- You’re fixing a Holy Grail sequence: LRTimelapse’s Wizard uses keyframes you place at each exposure adjustment and interpolates white balance and tonal changes alongside brightness, none of which this tool can do
- You shoot timelapse often enough that the €141.61 € licence pays for itself across many sequences
Neither of these really comes down to “RAW vs JPEG.” It comes down to whether you want the extra export step, and whether you need keyframed, multi-parameter interpolation or just ordinary flicker correction.
Why the JPEG Proxy Path Works for RAW Shooters Too
The tool doesn’t discriminate against RAW footage, it just can’t read RAW files directly, because browsers can’t decode CR3, NEF or ARW formats. That’s a platform limitation, not a design choice.
The workaround is straightforward and doesn’t cost you anything: export a JPEG proxy sequence from your RAW files (most editors batch-export this in seconds), run the proxies through the tool, then take the CSV correction curve it gives you and apply those per-frame EV offsets to your original RAW files using Lightroom’s exposure slider, one offset per frame. You end up with the same non-destructive RAW workflow you’d have with LRTimelapse, just with one extra export step in the middle. For a one-off sequence, that’s a fair trade for a free tool. For a regular RAW workflow, that extra step every single time is exactly why LRTimelapse’s native RAW support earns its price.
How to Deflicker a Timelapse Without LRTimelapse
The full walkthrough with screenshots lives on the tool page itself, here’s the short version:
Step 1 - Load your sequence
Drop your JPEG or PNG frames onto the tool, in order. If you’re starting from RAW, export your JPEG proxies first. Name your files so they sort correctly by filename, frame_0001.jpg, frame_0002.jpg, and so on, the tool sorts naturally by number rather than by upload order.
Step 2 — Let it analyse the sequence.
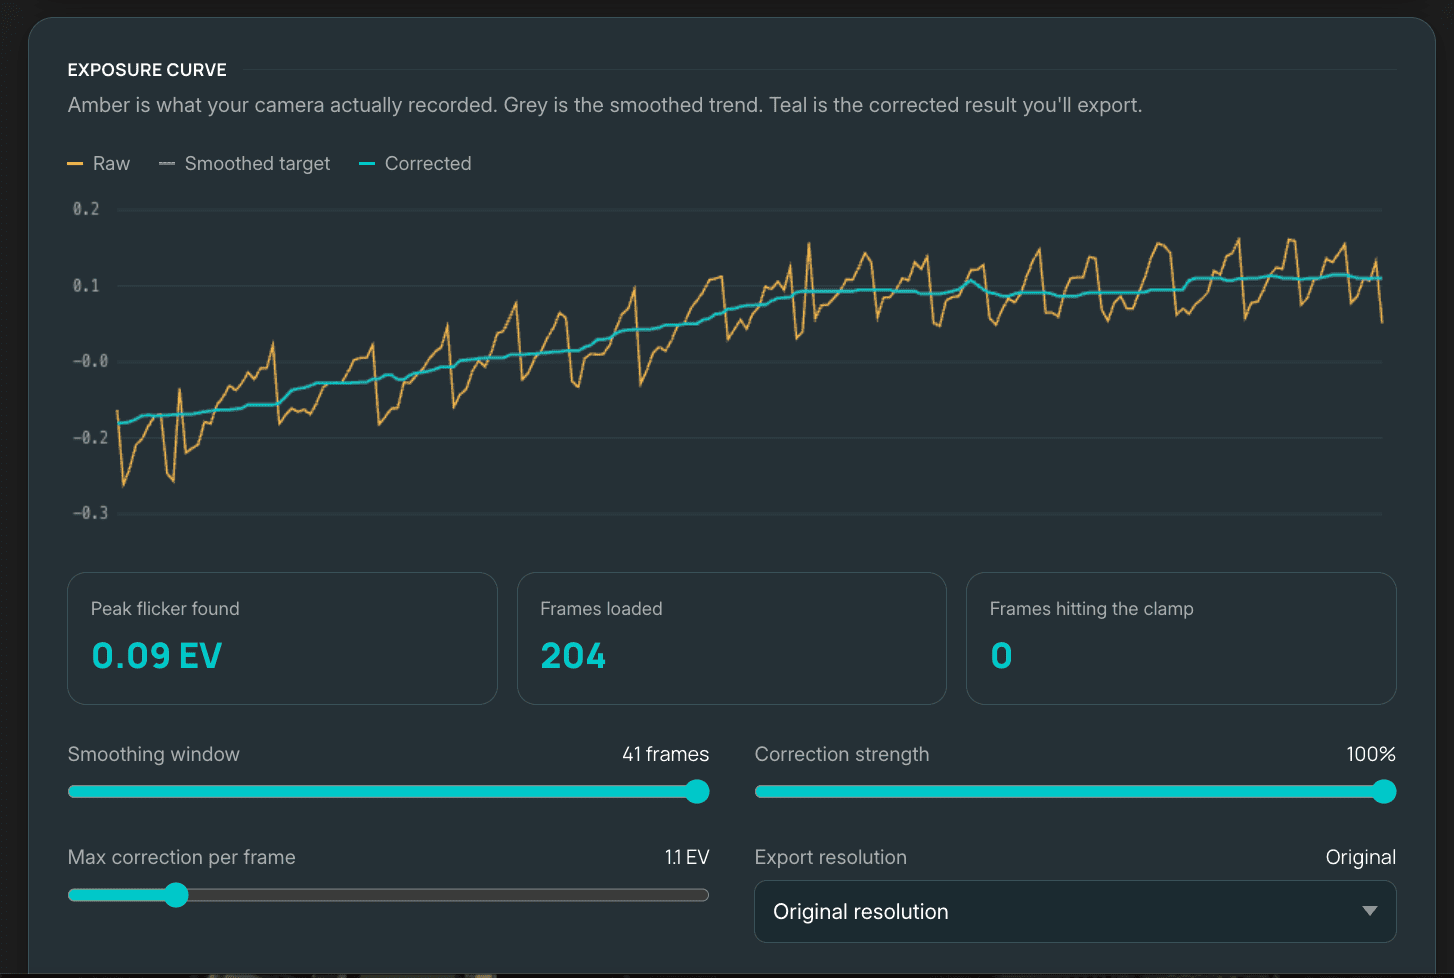
Every frame is read locally and measured for median luminance, nothing uploads anywhere. You’ll see a raw exposure curve, a smoothed target curve, and a corrected curve plotted together.
Step 3 — Set your smoothing window.
A narrow window (5–9 frames) tracks fast flicker closely. A wide window (25+ frames) is better for slower drift like cloud cover, since it won’t mistake genuine scene changes for flicker.
Step 4 — Tune correction strength and the per-frame clamp.
Start correction strength at 100% and back off if it looks over-applied. Watch the “frames hitting the clamp” counter, if it stays high no matter what you adjust, the flicker is probably too large for smoothing alone, see the limitations section below.
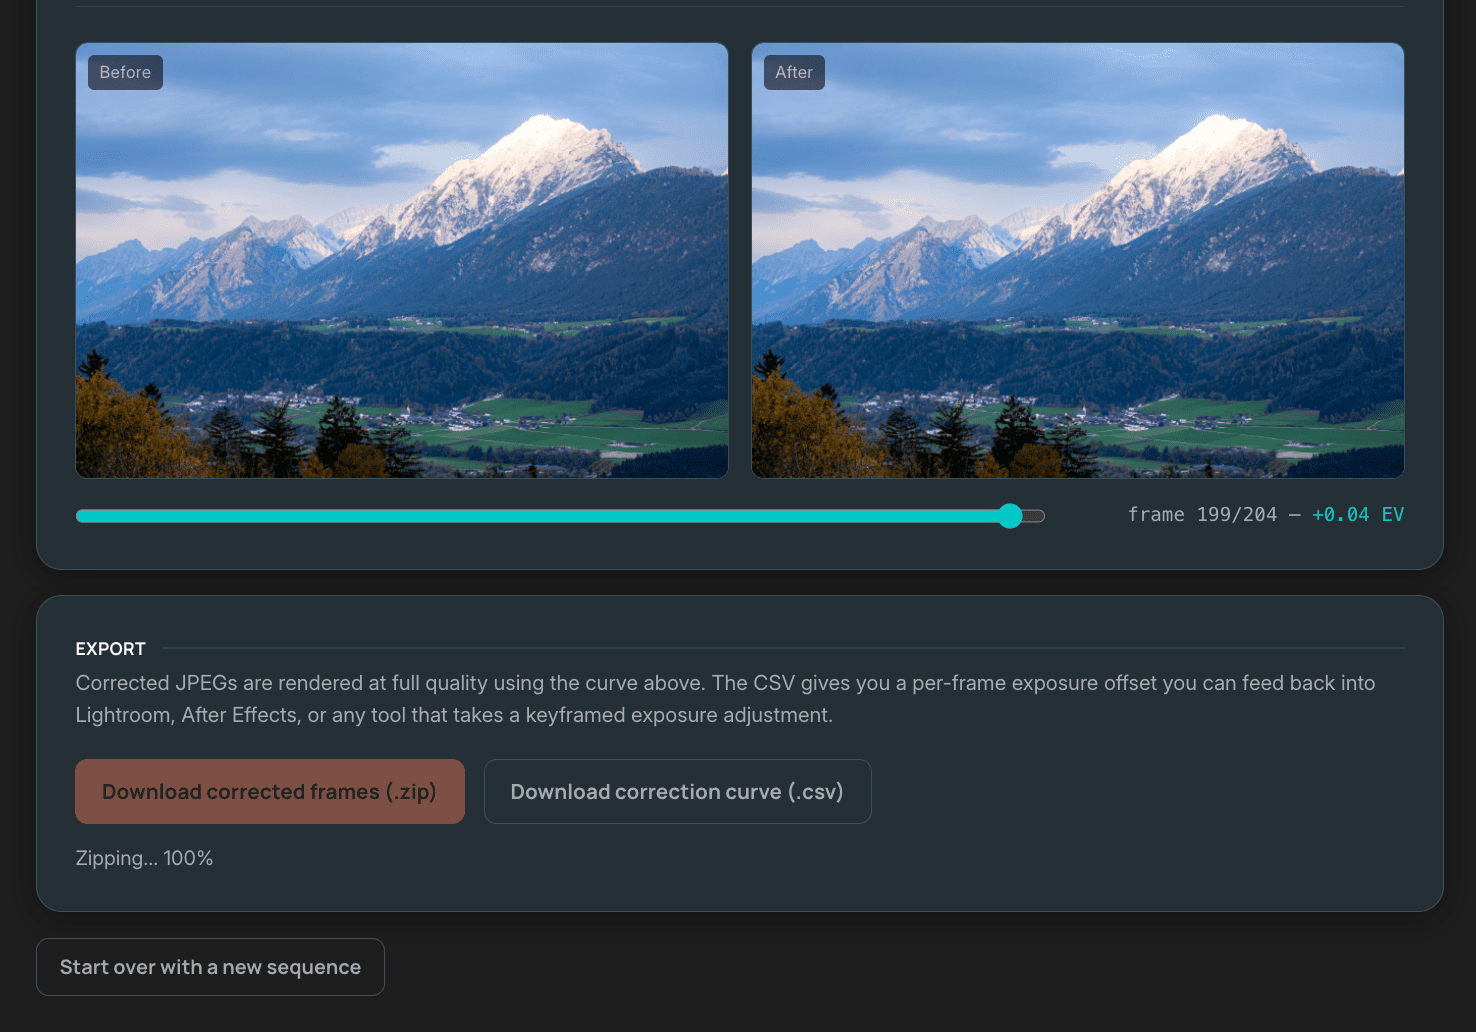
Step 5 — Scrub the before/after preview
Use it to sanity-check individual frames before committing.
Step 6 — Export
Download the corrected sequence as a full-resolution ZIP, or download the CSV correction curve if you shot RAW and want to apply the same per-frame offsets to your originals instead.
💡 Pro Tip: If you’re not sure whether your flicker is aperture-related or exposure-drift-related, a narrow smoothing window plus a low clamp is the safer starting point. Widen the window only once you’ve confirmed the tool isn’t chasing real scene changes, like a cloud passing, as if they were flicker.
What This Tool Can't Fix
Holy Grail transitions
This isn’t because smoothing “fights” a deliberate ramp, a wide enough smoothing window can actually track a slow intentional trend just fine. The real gaps are more specific:
- No keyframe control. LRTimelapse’s Holy Grail Wizard lets you mark the exact frames where you changed ISO or shutter, so it knows precisely where an intentional step happens versus where flicker happens. This tool has one global window size across the whole sequence and no way to tell the two apart.
- Brightness-only correction. A real day-to-night sequence isn’t just exposure, white balance shifts from daylight toward warmer tones as the sky darkens, and sometimes highlight/shadow recovery changes too. LRTimelapse interpolates all of that across keyframes in RAW. This tool computes a single EV gain per frame and applies it to already-rendered pixels, it can’t touch white balance or tonal curve at all.
- Banding risk at scale. A Holy Grail sequence spans many stops of total change. Pushing a JPEG’s already-quantized 8-bit shadow data up by several stops in post reveals banding and noise that RAW’s extra bit depth would absorb cleanly. Ordinary flicker correction stays well under a stop per frame, so this isn’t a problem there, it’s specifically a Holy Grail-scale issue.
See the Holy Grail Timelapse guide for that full workflow.
Lighting-frequency banding
If your clamp-hit rate stays high no matter how you adjust the sliders, and you shot under LED or fluorescent lighting, you’re likely dealing with banding from a shutter speed that doesn’t match your local mains frequency, not exposure flicker. No amount of median-based smoothing removes banding baked into individual frames, the fix is a matched shutter speed next time you shoot. Correct shutter speeds for 50Hz Europe are covered in the Timelapse Flicker Fix guide.
Free Tool vs LRTimelapse: The Honest Comparison
| Feature | Free Deflicker Tool | LRTimelapse |
|---|---|---|
| File formats analysed | JPEG, PNG (RAW via JPEG proxy) | RAW, DNG, JPEG natively |
| Cost | Free | 141.61 € |
| Install | None, browser only | Desktop app + Lightroom plugin |
| Non-destructive correction on RAW originals | Yes, but manual, apply each frame’s CSV offset by hand | Yes, one click, natively applied |
| Holy Grail keyframed transitions | No | Dedicated Wizard |
| White balance / tonal interpolation | No, brightness only | Yes |
| Ordinary exposure flicker | Yes | Yes |
| One-off single sequence | Ideal | Overkill |
| Frequent RAW shooter | Works, but adds a step each time | Native, no extra step |
Worth being upfront about that CSV row: applying it isn’t quite “export and done.” You’re matching a few hundred per-frame EV offsets to a few hundred Lightroom frames, doable, and genuinely non-destructive, but noticeably more hands-on than LRTimelapse’s one-click keyframe apply. For a single sequence it’s a fair trade for free. For every sequence you shoot, it stops feeling like a trade and starts feeling like a second job.
If you’re somewhere in between, shooting RAW but only occasionally, the JPEG-proxy path genuinely covers you without paying anything. If you’re shooting RAW regularly enough that the extra export step starts to feel like a tax on every sequence, the licence is probably worth it sooner than you’d think.
Read Next on Aero Timelapse
For the full picture on flicker: → Timelapse Flicker Fix: Causes, Prevention & Post-Processing Solutions — every cause, in-camera prevention settings, and the LRTimelapse workflow for RAW and Holy Grail sequences.
For day-to-night sequences: → Holy Grail Timelapse: Complete Day-to-Night Settings & Workflow
Free tools: → Use the Deflicker Tool 🔧 — the tool this article is about. → ND Filter Calculator 🔧 — prevent aperture flicker at the source instead of fixing it after. → Timelapse Interval Calculator 🔧 — plan your next shoot’s cadence.
FAQ - Deflicker a Timelapse Without LRTimelapse
Is there a free alternative to LRTimelapse?
For ordinary exposure flicker, yes, our free Deflicker tool runs entirely in your browser with no cost and no install, and it works for both JPEG shooters directly and RAW shooters via a JPEG proxy export. For Holy Grail day-to-night transitions, no, LRTimelapse’s keyframed Wizard does things this tool genuinely can’t: interpolating white balance and tonal changes alongside brightness across a deliberate ramp.
Can I use this free tool if I shoot RAW?
Yes. Export a JPEG proxy sequence from your RAW files, run the proxies through the tool, then apply the resulting CSV correction curve to your RAW originals using Lightroom’s exposure slider, one offset per frame. This keeps your RAW workflow non-destructive, it just adds one export step that LRTimelapse’s native RAW support skips.
Why doesn't the free tool support RAW files directly?
Browsers can’t decode camera RAW formats like CR3, NEF or ARW, that’s a platform limitation, not a design choice. The JPEG proxy workaround above gets RAW shooters the same result with one extra step.
Why can't the free tool fix a Holy Grail sunset timelapse?
Not because smoothing “fights” the transition, a wide smoothing window can track a slow intentional ramp just fine. The real gaps are that the tool has no keyframe system to distinguish an intentional exposure change from flicker, it only corrects brightness and can’t interpolate the white balance and tonal shifts a real day-to-night sequence needs, and pushing a large multi-stop correction onto baked 8-bit JPEG data risks visible banding at that scale. LRTimelapse’s Holy Grail Wizard was built specifically to handle all three.
How much does LRTimelapse cost compared to the free option?
LRTimelapse runs around €141.64 for a personal licence. The Deflicker tool on this site is free with no account required. If you’re fixing occasional sequences, even RAW ones via the proxy path, the free tool covers it. If you shoot RAW regularly or need Holy Grail transitions often, the licence pays for itself quickly, see the full LRTimelapse workflow breakdown for what that €99 actually buys you.
Conclusion
Not every flickery timelapse needs a €99 tool and a new workflow to fix, and that includes RAW sequences, not just JPEG ones. If your flicker is ordinary exposure drift, the free Deflicker tool handles it in a couple of minutes: directly if you shot JPEG, via a quick proxy export if you shot RAW. Where it genuinely can’t help is a Holy Grail day-to-night transition, that needs the keyframed, multi-parameter interpolation LRTimelapse was built for, and the complete flicker guide walks through that workflow in full.
Know which case you’re in before you start, and you’ll spend your time on the right tool the first time.
Dipon is a drone and timelapse cinematographer based in Ulm, Germany, with over 15 years of experience turning real spaces and projects into cinematic visuals. With a background in digital marketing, every shot is planned with a clear purpose — where it will appear, who will see it, and what it should help them decide.
You May Also Like

Timelapse vs Hyperlapse : What’s the Difference?
How Weather Affects Timelapse & Drone Shoots

Best Timelapse Cameras Under €1,000 in 2026
Timelapse for Social Media: Instagram, YouTube & TikTok Settings

Holy Grail Timelapse: Complete Day-to-Night Settings & Workflow
How to Plan Storage for Drone Footage — The Complete Pre-Flight Guide
How to Make a Star Trail Timelapse: From Camera Settings to Online Stacking
How to Shoot a Hyperlapse on Foot: Step-by-Step Guide
Timelapse Flicker Fix: Causes, Prevention & Post-Processing Solutions
Cloud Timelapse Photography: How to Capture Dramatic Moving Skies

Milky Way Timelapse: Settings, Gear & Locations
Best ND Filters for Timelapse: Strength Guide & Picks
Need help capturing professional timelapse for your next project but not ready to invest in the gear yet? Check out our Timelapse Video Production service to see how Aero Timelapse Studio can help elevate your production.