Table of Contents
Affiliate Disclosure
This guide contains affiliate links. Purchases made through these links support Aero Timelapse Studio at no additional cost to you. I only recommend products I personally use or carefully research. As an Amazon Associate I earn from qualifying purchases.
The Earth never stops moving. You just can’t feel it — until you point a camera at the night sky, leave the shutter open, and let physics do the work. What comes back is one of the most quietly astonishing things a camera can record: hundreds of stars, each one drawing a long curved arc across the frame, every trail a visible record of the planet turning beneath your feet. No simulation. No composite trickery. Just the actual rotation of the Earth, written in light across your sensor over the course of a single night. This guide gives you the exact settings, shooting plan, and stacking workflow to capture it yourself — using a free browser-based tool with nothing to install and no files ever leaving your device. One clear night is all it takes.
Key Takeaways
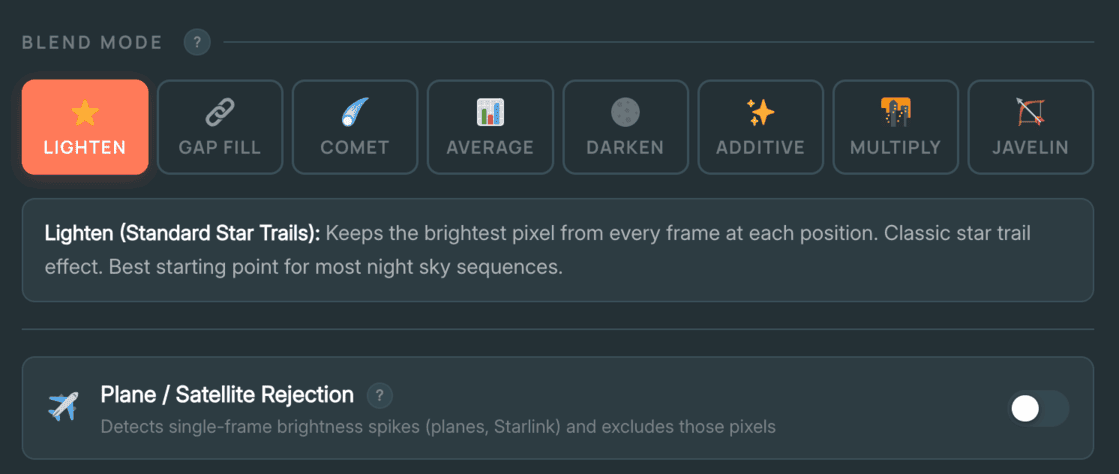
- The browser-based stacker at aerotimelapse.com runs locally on your device with no install — 8 blend modes, plane rejection, dark frame subtraction, and progressive PNG sequence export for video.
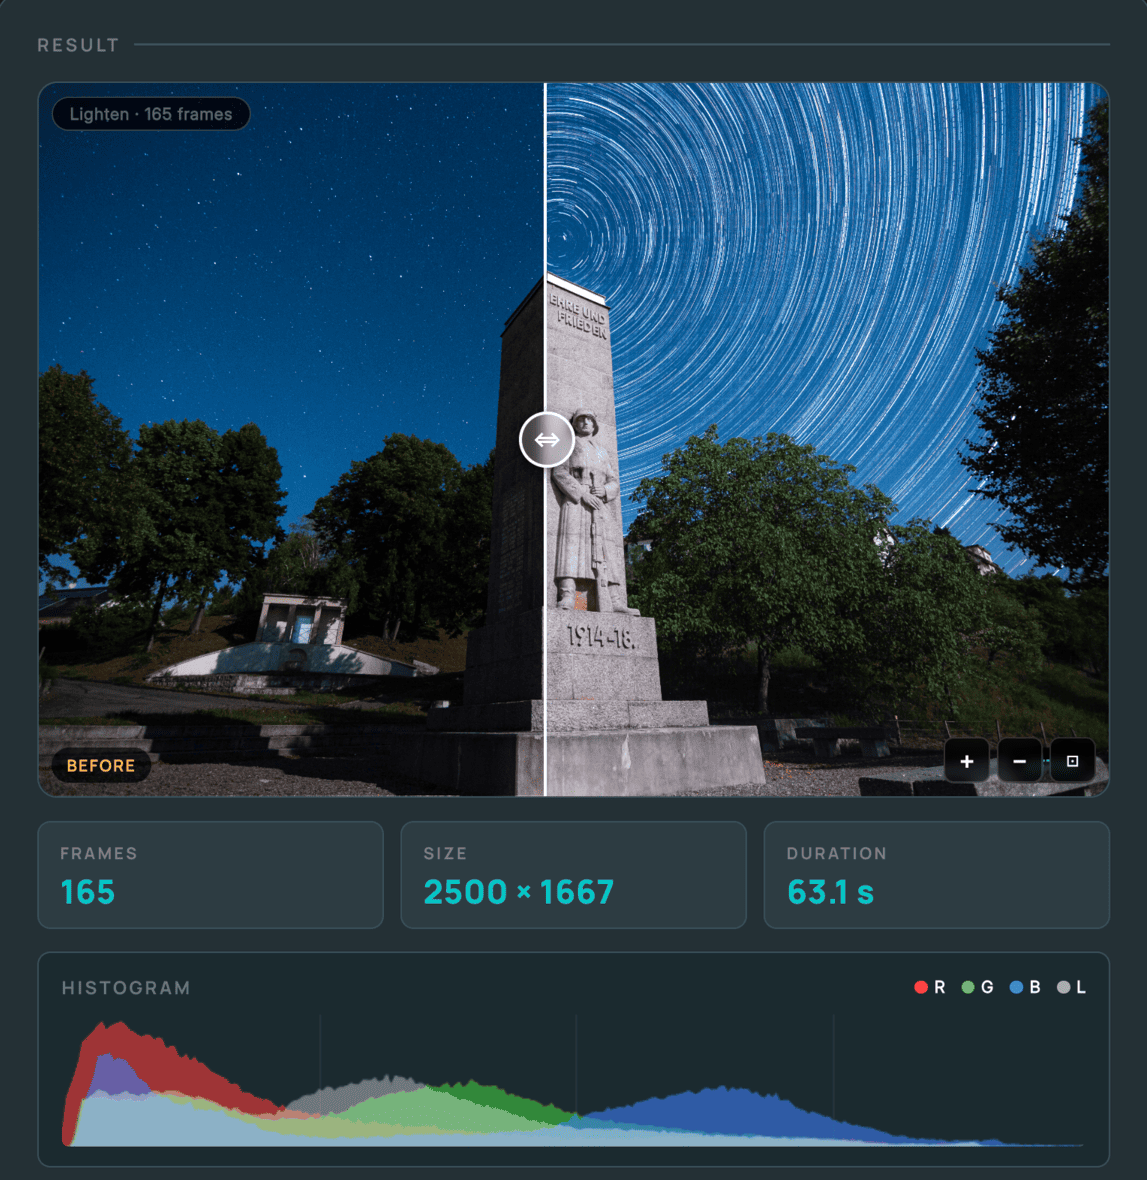
- You need a minimum of 60–80 frames to see visible trail arcs; around 180 frames over 90 minutes produces approximately 21 degrees of arc — enough for a dramatic composite and a usable stock video clip.
- The best camera settings for star trails: 25 – 30 seconds, f/2.8, ISO 800 – 1600, fixed white balance at 3800–4200K, manual focus, Long Exposure NR off.
- To create a progressive star trail timelapse video, enable “Save PNG every 1 frames” during stacking — this outputs a numbered image sequence you import directly into DaVinci Resolve or Premiere Pro.
- Dew is the most common reason a star trail session fails silently — a USB lens heater running off a power bank costing under €15 is the complete fix.
- Shooting with the moon behind you lights your foreground for free while keeping your shooting sky genuinely dark — one of the most effective compositional techniques in night photography.
What Is a Star Trail Timelapse?
A star trail timelapse is a sequence of photographs — typically 100 to 400 individual exposures — taken at regular intervals throughout the night and then combined into a single composite image that shows the apparent movement of stars across the sky as continuous arcs of light. Because the Earth rotates on its axis, stars appear to curve around a fixed central point: Polaris, the North Star, in the northern hemisphere. Shooting from Southern Germany at around 48° North latitude, that rotation becomes clearly visible in the final image after 30–40 minutes of continuous shooting — and dramatic after 60–90 minutes.
Star trail stacking is the process of combining those frames. A stacking algorithm works through your image sequence one frame at a time, comparing each incoming frame to everything accumulated so far. In the standard Lighten mode, it retains whichever pixel is brighter at every position. Stars — brighter than the surrounding sky — accumulate into unbroken arcs across the composite. The sky background stays dark because it never wins the brightness comparison.
You can present the final result two ways: as a still composite photograph, or as a timelapse video where the trails build progressively across the frame in real time as the video plays — revealing the rotation of the Earth over 85 minutes in under 7 seconds of footage. That progressive build video is what this guide focuses on producing.
Gear You Actually Need
You do not need a lot of gear for star trails. You need the right gear. Four things are non-negotiable: a camera with full manual control, a fast wide-angle lens, a stable tripod, and an intervalometer. One thing is strongly recommended and almost nobody mentions until it’s too late: a lens heater.
Camera Body
Any mirrorless or DSLR with manual mode and a fixed timed shutter works. Full-frame sensors produce cleaner high-ISO files — I use the Canon R6, which handles ISO 1600 cleanly and ISO 3200 respectably — but APS-C cameras like the Sony A6700 or Nikon Z50 are entirely capable. The critical feature is not sensor size. It is the ability to lock your exposure settings and fire the shutter repeatedly, automatically, without touching the camera.
Lens
A fast wide-angle prime is the single most impactful gear choice you can make for star trail photography. You want f/2.8 or wider and a focal length between 14mm and 24mm full-frame equivalent. This captures the widest arc of sky, lets in the most light per frame, and gives you the longest safe shutter speeds under the NPF rule before stars start to trail within individual frames.
For wide astro work, I recommend the Samyang 14mm f/2.8 — it is the lens I used on the Aach session and on most of my night shoots across Southern Germany and the Alps. Sharp stars at f/2.8, minimal coma at the edges for a 14mm prime, and nothing competes at this price point. Best For: Hobbyists and photographers who want excellent optical quality without spending €1,000+ on a native system lens.
Tripod
Your tripod must stay completely motionless for the entire session — 85 minutes in the Aach case, potentially three hours on longer shoots. Wind, soft ground, and lightweight travel tripods are all risks. Any micro-movement between frames produces wobble or jumps in the trail arcs that no stacker can correct after the fact. For heavy-duty stability, I use the Manfrotto MT055XPRO3 Aluminium Tripod. The aluminium build absorbs vibration better than carbon fibre for ground-based work, and the centre column locks solid on uneven terrain. Best For: Photographers shooting in open fields, cobblestone historic town centres, or rocky alpine terrain where stability is non-negotiable.
Intervalometer
An intervalometer fires your shutter at set intervals automatically so you never need to touch the camera during the session. Many newer cameras have a built-in interval timer — check your menu before buying a separate one. If yours does not, the Pixel TW-283 Intervalometer is reliable, available in Canon, Nikon, Sony, and Pentax mounts, and costs under €30. Best For: Any camera body without a built-in interval timer.
Lens Heater — the Piece of Gear You Will Wish You Had Sooner
⚠️ Warning: Dew is the most common way a star trail session fails completely — and it fails silently. The lens fogs over somewhere between frame 80 and frame 150 and you don’t notice until you are home reviewing files. I shot several sessions before adding a lens heater to my kit. The first time dew hit mid-session I lost the second half of an 85-minute shoot. A USB heater strip running off a small power bank keeps the front element just above ambient temperature all night. It costs under €15 and prevents the single most frustrating outcome in night photography. Clear autumn nights near Bodensee regularly drop below 8°C with high humidity — exactly the conditions where dew forms fast and silently.
💡 Pro Tip: Bring at least two fully charged batteries. Cold temperatures reduce battery capacity by 30–40% — at 5°C in the Alps I get noticeably fewer shots per charge than in summer. Keep a third battery in an inside jacket pocket where body heat keeps it warm and ready.
Best Settings for Star Trail Photography
The single biggest mistake beginners make is attempting one very long exposure — 30 minutes, an hour — instead of stacking many short ones. A single long exposure accumulates thermal sensor noise continuously, produces hot pixels that cannot be removed in post, and gives you no recovery options if something goes wrong partway through. Stack short frames instead. Here are the exact settings that work.
Shutter Speed
Use 20 – 30 seconds per frame. Long enough to capture sufficient star light per individual exposure; short enough to keep sensor noise low and manageable. At 30 seconds with a 1-second gap between shots, an 85-minute session yields 166 frames — enough for a dramatic stacked composite and a 7-second progressive build video at 24fps.
Aperture
Shoot wide open or one stop down. On the Samyang 14mm f/2.8 that means f/2.8 to f/3.2. Stopping down to f/4 or f/5.6 noticeably reduces the number of faint stars captured per frame — and faint stars are what give a star trail composite its density and depth.
ISO
Start at ISO 800 for full-frame cameras. The Canon R6 handles this cleanly with well-controlled noise. APS-C cameras typically perform best between ISO 400 and ISO 1600. Before your main shoot, take a single test frame and review it at 100% zoom on your camera screen. If noise is heavy and the sky looks muddy, drop to ISO 400. If stars are too dim, push to ISO 3200.
White Balance
Set a fixed white balance — never Auto. A colour temperature of 3800K–4200K produces a natural dark-blue night sky. Auto white balance can shift slightly between frames, creating a colour flicker in the final video sequence that is very difficult to correct uniformly in post.
Focus
Switch to manual focus and set to infinity — not beyond infinity. On the Samyang 14mm, the infinity mark on the barrel is reliable. On many other lenses, the hard stop extends slightly past true infinity. Use live view, zoom in to 10x magnification on a bright star, and adjust until the star resolves to the smallest, sharpest point you can achieve. Tape the focus ring with gaffer tape before the session starts so it cannot drift overnight — temperature changes cause lens barrels to contract slightly, and even a small focus shift ruins an entire sequence.
| Setting | Recommended Value |
|---|---|
| Mode | Manual (M) |
| Shutter Speed | 30 seconds |
| Aperture | f/2.8 (wide open) |
| ISO | 1600 (full-frame) / 800–1600 (APS-C) |
| White Balance | Fixed — 3800K–4200K |
| Focus | Manual — infinity, taped |
| File Format | RAW preferred / JPEG acceptable |
| Image Stabilisation | OFF |
| Long Exposure NR | OFF |
| Interval Gap | 1 second between frames |
How to Plan and Shoot Your Session
Good star trail results are 50% planning. Most failed sessions come from poor location choice or timing — not from bad camera settings.
Find a Dark Sky Location
Light pollution is your biggest enemy. Even moderate suburban glow washes out faint stars and produces an orange sky that post-processing only partially corrects. In Southern Germany, the Swabian Alps south of Ulm and the Bodensee region both offer relatively dark, accessible skies. The Dolomites and the hills above Lake Como are exceptional. Use lightpollutionmap.info before committing to a location — the difference between Bortle 4 and Bortle 6 skies is immediately visible in a stacked result, and no amount of Light Pollution Removal in the stacker fully compensates for shooting under a Bortle 7 orange dome.
Use the Moon as a Tool, Not an Enemy
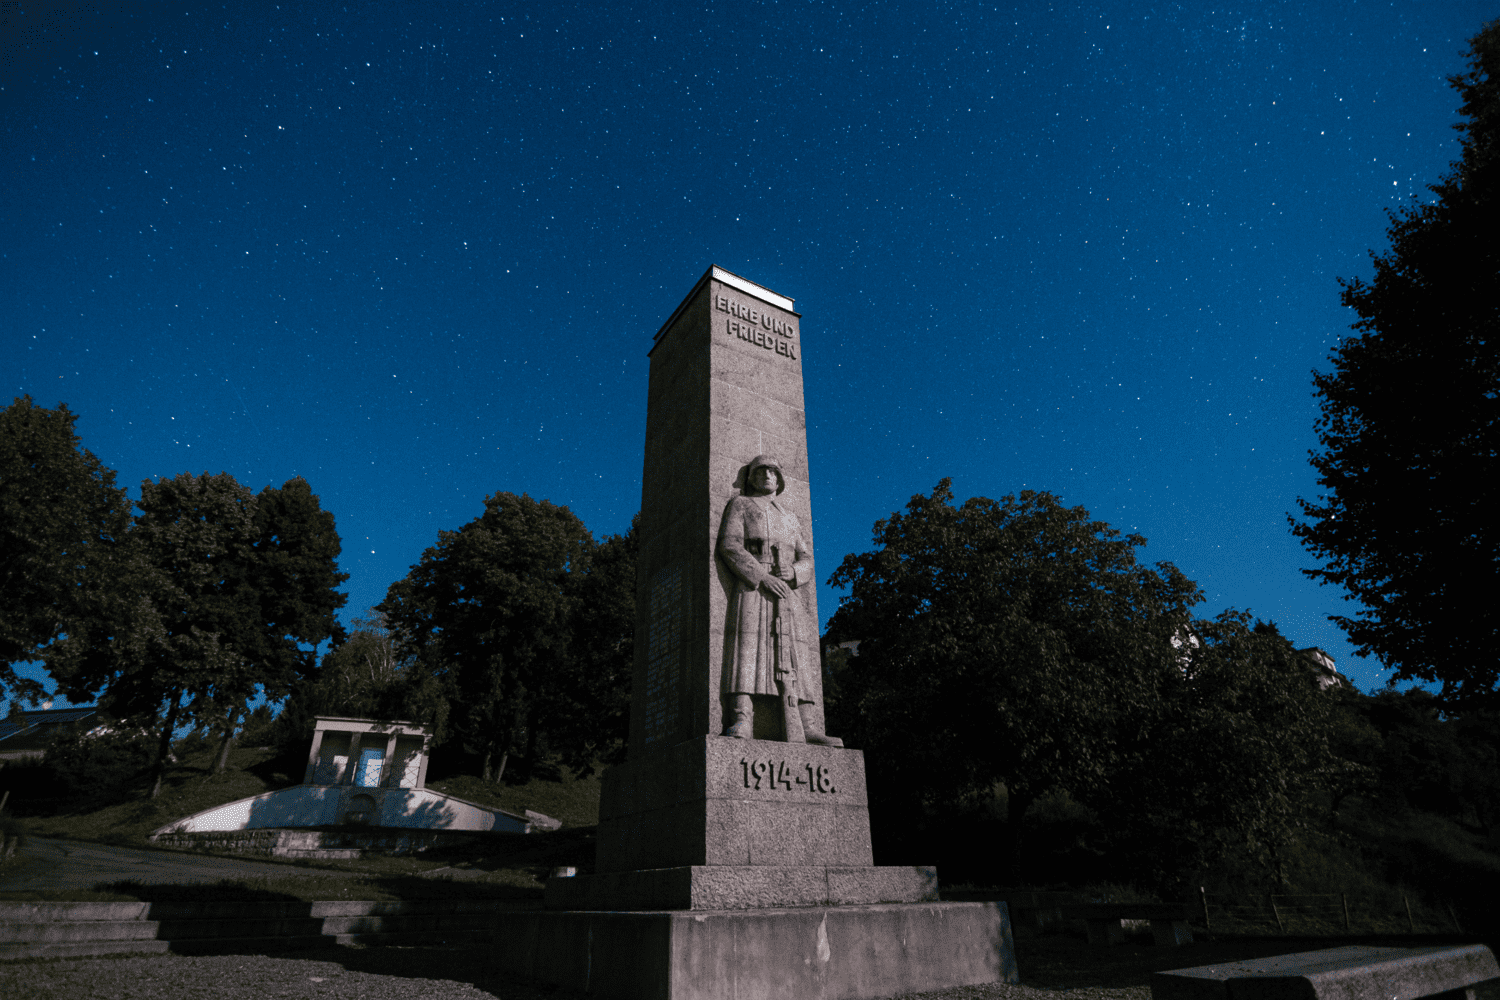
A full moon overpowers faint stars — that part is widely known. What is less discussed is that a partial moon positioned behind you (opposite your composition direction) does something genuinely useful: it lights your foreground for free. On the Aach session, I pointed north toward Polaris with the old stone monument in the foreground. The moon was rising behind me in the opposite direction, and it gave the stonework a soft, directional silver light that would have taken hours to replicate artificially. The northern sky I was shooting remained completely dark. The result looked like a carefully lit composite — it was a single uninterrupted 85-minute sequence. Moon phase matters less than moon position.
Compose Your Shot
Star trails work best with a strong, recognisable foreground — a castle, a church tower, a tree line, a lake shore, a historic monument. Point north to get circular arcs centred on Polaris. Point east or west for diagonal streaks across the frame. Point south in summer for shorter, more curved arcs through the Milky Way core. The more identifiable your foreground subject, the higher the commercial value if you plan to sell the footage. A technically perfect star trail over a blank field competes with thousands of identical images; a star trail over Hohenzollern Castle or the Bodensee shoreline does not.
Use the Timelapse Interval Calculator at aerotimelapse.com/timelapse-interval-calculator/ to confirm your interval timing before you leave the house. For star trails, a 31-second total interval (30-second exposure plus 1-second gap) is the standard starting point that the Aach session used.
Capture Dark Frames
At the very end of your session — while the sensor is still at shooting temperature — put the lens cap on and shoot 10–20 frames at exactly the same ISO and shutter speed you used all night. On the Aach session I shot 15 dark frames after the 166 light frames. These capture the camera’s own noise signature: hot pixels, thermal noise, and fixed-pattern glow. The stacker averages them and subtracts the result from every light frame before processing begins, removing noise sources that would otherwise appear as persistent bright dots running through every arc in the composite. This step costs five minutes and makes a material visible difference at ISO 1600 and above.
Execute the Shoot
Set your intervalometer to a 31-second interval (30-second exposure, 1-second gap), confirm all settings match the table above, start the sequence, and leave the camera completely alone. Check in every 30–45 minutes to confirm it is still firing and the battery is holding. When you finish, shoot your dark frames before you pack up. Transfer everything to your computer — light frames and dark frames in separate labelled folders — before you start stacking.
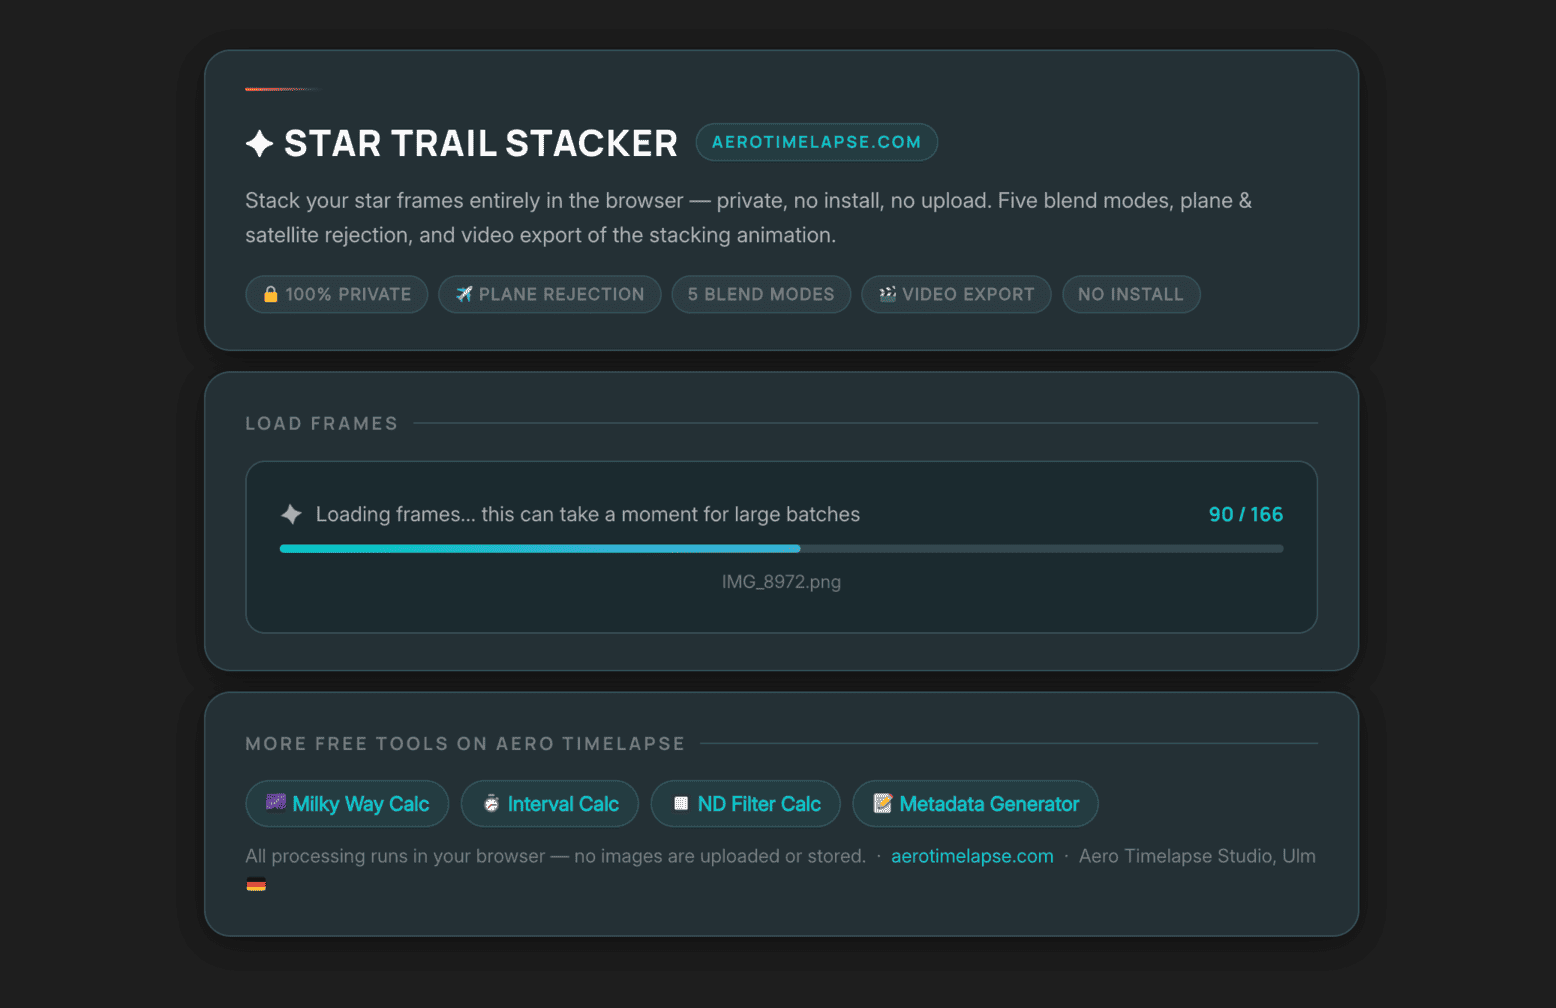
How to Stack Star Trail Images — Free, Browser-Based
Stacking is where your folder of flat, unremarkable night frames becomes the image you came home for. Traditionally this meant downloading desktop software, configuring file paths, and waiting. The Browser Star Trail Stacker at aerotimelapse.com/star-trail-stacker/ does the entire job inside your browser — no install, no account, and no files ever sent to any server. Your images stay on your device throughout the entire process.
Browser Stacker vs Desktop Software — Full Comparison
Before choosing a workflow, it helps to know exactly what you are comparing. Here is how the browser stacker stacks up against the most common free desktop alternatives:
| Feature | Browser Stacker (aerotimelapse.com) | StarStaX | Sequator | Siril |
|---|---|---|---|---|
| Cost | Free | Free | Free | Free |
| Platform | Any browser, any device | Mac / Win / Linux | Windows only | Mac / Win / Linux |
| Install required | No | Yes | Yes | Yes |
| Blend modes | 8 | 3 | 2 | Advanced |
| Plane / satellite rejection | Yes (3 levels) | No | No | Manual |
| Dark frame subtraction | Yes | Yes | Yes | Yes |
| Light pollution removal | Yes (built-in gradient tool) | No | Partial | Yes |
| Live preview during stacking | Yes | Yes | No | No |
| Progressive PNG sequence export | Yes | No | No | No |
| Direct video export | Yes (MP4 / WebM) | No | No | No |
| Mobile and tablet friendly | Yes | No | No | No |
| Files uploaded to server | Never | N/A | N/A | N/A |
For hobbyists, timelapse creators, and stock sellers who want results quickly without a software learning curve, the browser tool covers everything. Siril is the right choice if you are doing fully calibrated deep-sky imaging with bias frames, flat frames, and astrometric solving — that is a different workflow entirely and outside the scope of star trail photography.
What the Stacker Actually Does
The tool loads your frames, sorts them by filename, and processes them one at a time. At each step it compares the incoming frame to the accumulated stack so far. In Lighten mode it retains whichever pixel is brighter at every position. Stars accumulate into arcs; the sky stays dark. After 166 frames from the Aach session, the tool had built 21 degrees of arc over the monument — the cumulative rotation of the Earth across 85 minutes of real time, compressed into a single image.
Which Blending Mode Should You Use?
| Your situation | Best mode |
|---|---|
| Standard star trail, clean dark sky | Lighten |
| Gaps visible between trail segments | Gap Fill |
| Creative fading-tail effect | Comet |
| Trail tapers from both ends, spindle shape | Javelin |
| Noise reduction, static deep-sky subject | Average |
| Very short sequence or faint star field | Additive |
| Heavy light pollution, orange sky background | Multiply |
| Dark-subject creative composite | Darken |
For the overwhelming majority of shoots — including every hobbyist and stock seller session — Lighten is the correct choice. If you see dark gaps between trail segments in your first test stack, switch to Gap Fill and use the live preview overlay (affected pixels shown in green on the canvas) to dial in the threshold before committing to a full-resolution run.
Step-by-Step: Stacking With the Browser Tool
Step 1
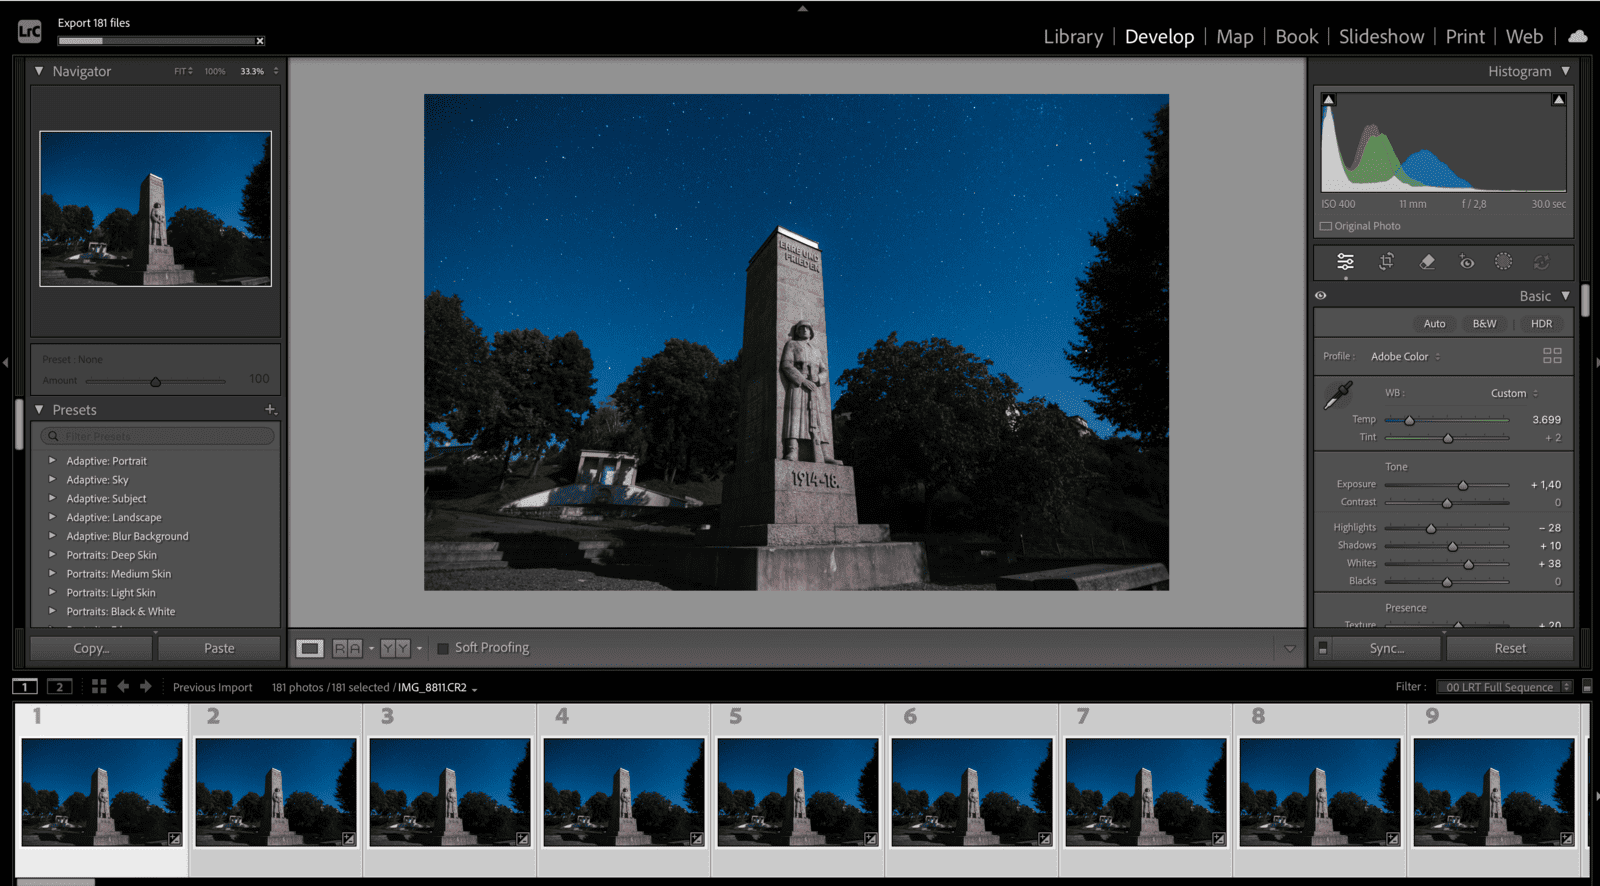
Export your RAW files from Lightroom or Capture One as full-quality JPEGs. Develop a base grade on one representative frame, sync those settings across the entire sequence, then batch export. If you shot JPEG in-camera, upload directly. The stacker accepts JPEG, PNG, and WebP.
Step 2
Step 3

Open the Dark Frames panel and load your 15 (or however many you captured) dark frames. The stacker averages them and subtracts the result from every light frame before processing begins.
Step 4
Select your blending mode using the decision table above.
Step 5
Enable Plane and Satellite Rejection if your session coincided with busy air traffic or a Starlink pass. Medium sensitivity is the right starting point for most locations.
Step 6
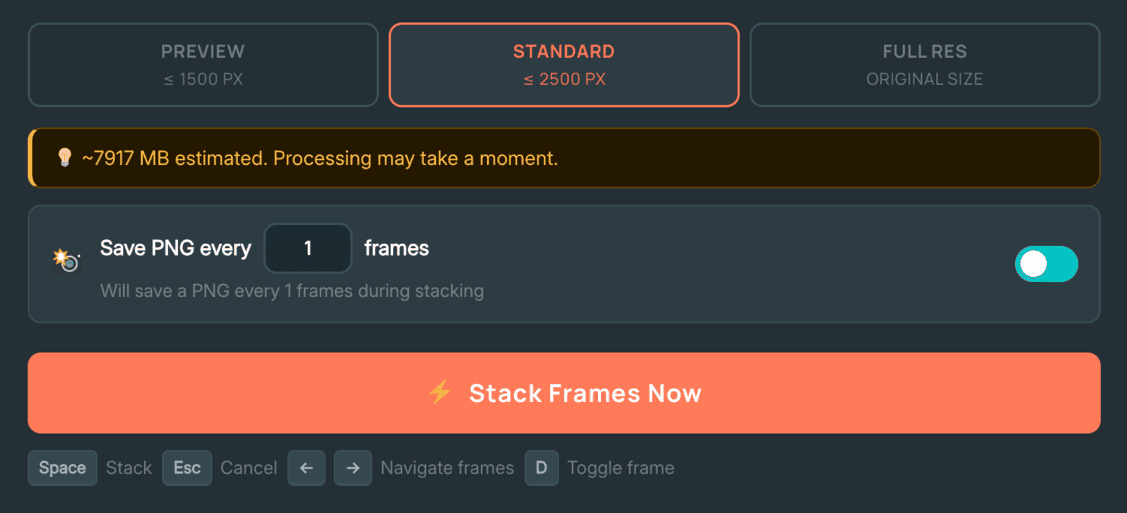
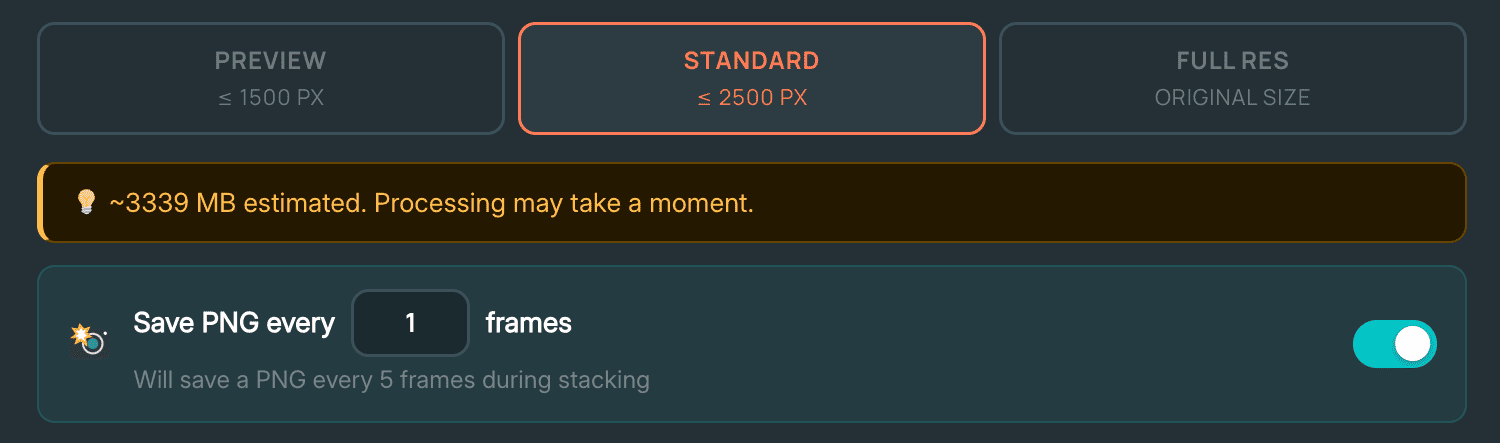
Set processing resolution. Standard (≤ 2500px) covers most cameras up to around 36MP. Full Res processes at native pixels — the tool shows a RAM usage estimate before you commit, so you can judge whether your device can handle it.
Step 7
Click Stack Frames Now. A progress bar shows the current frame, the plane rejection percentage, and elapsed time. Watch the composite build in the preview canvas in real time. Press Esc to cancel at any point.
The Progressive Build Method — Getting Your Image Sequence for Video
This is the feature that separates this tool from every other free stacker available, and it is the step you need if your goal is a timelapse video rather than a still photograph.
Before you click Stack, enable the “Save PNG every X frames” toggle and set the number to 1. With this active, the stacker automatically downloads one PNG file after every single frame is processed:
- PNG 001 = frame 1 only (stars as sharp points, no visible trails)
- PNG 002 = frames 1+2 stacked (the very beginning of arc formation)
- PNG 050 = 50 frames accumulated (short but clearly visible arcs)
- PNG 166 = all 166 frames stacked (complete 21-degree arc composite)
By the time stacking finishes, you have a complete numbered image sequence on your device — a folder of 166 progressive composite PNGs where the star trails grow visibly from one file to the next. This folder is your timelapse video material. Import it into DaVinci Resolve or Premiere Pro as an image sequence and you have the progressive build video: the full 85-minute rotation of the Earth playing out in 6.6 seconds at 25fps.
💡 Pro Tip: Before committing to a full-resolution stack of all frames, run a test pass on your first 20–30 frames at Preview resolution (≤ 1500px). Confirm focus is sharp, exposure is consistent, and your chosen blend mode is producing the result you expect. Catching a soft-focus issue on frame 5 takes 2 minutes to fix at this stage. Discovering it after processing 166 full-resolution PNGs and waiting for the download does not.
Direct Video Export
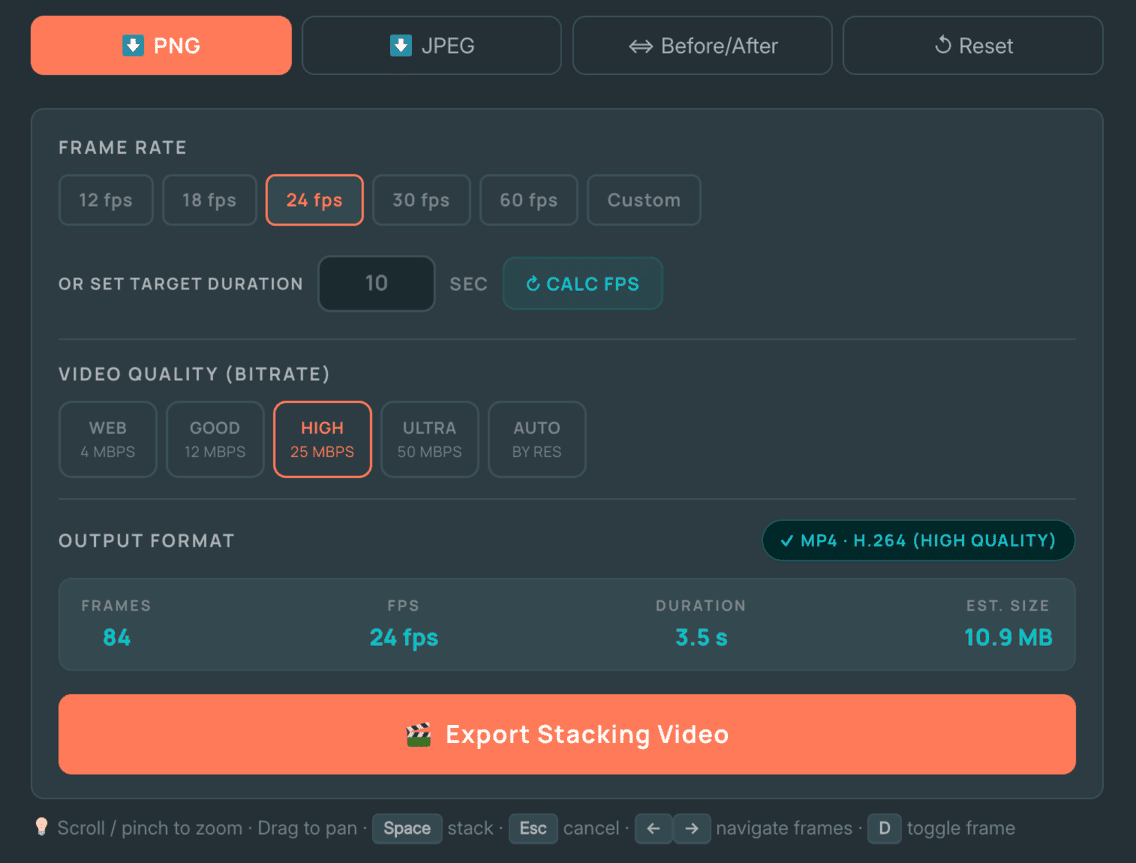
If you want a finished video file without importing an image sequence into an NLE, use the built-in Export Stacking Video button. Set your frame rate (12–60fps or custom), choose quality tier, and select your output format — MP4 via WebCodecs on Chrome, Edge, and Safari; WebM via MediaRecorder as a fallback on other browsers. The tool captures up to 120 snapshots during stacking at regular intervals to keep browser RAM manageable. For a 166-frame session this samples roughly every 1–2 frames, so the output quality is very close to the full PNG sequence. For social media posts, portfolio previews, or a quick client turnaround, direct video export is the faster path. For commercial stock footage where maximum quality matters, use the PNG sequence workflow and bring it into your NLE.
Common Stacking Mistakes to Avoid
⚠️ Watch out for these before you commit to a full stack:
- Stacking RAW files directly — the tool accepts JPEG, PNG, and WebP only. Export from Lightroom first or the files will not load.
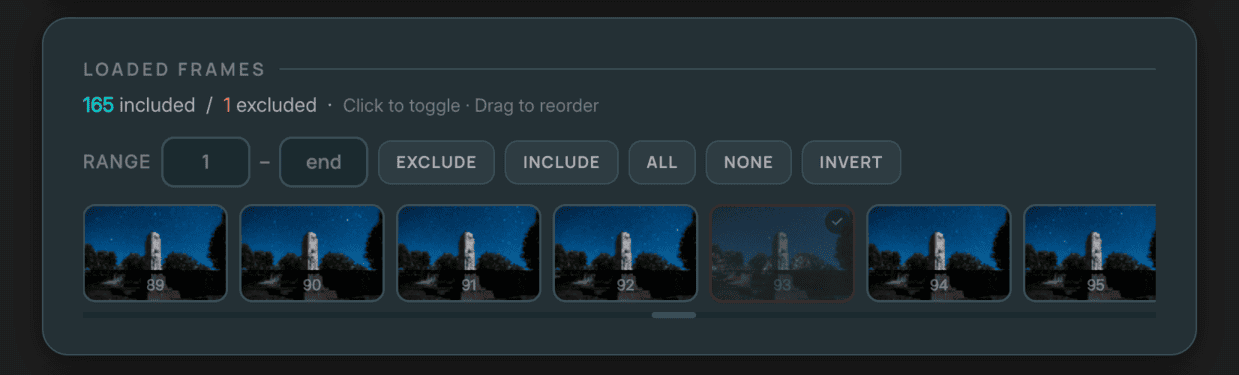
- Files loading in the wrong order — the stacker auto-sorts by filename, but if you renamed files manually, check that alphabetical order matches chronological shooting order. A single out-of-sequence file produces a visible jump in the arcs.
- Skipping the test stack — 166 full-resolution frames takes real time and RAM. Always run 20 frames at Preview resolution first.
- Inconsistent JPEG export settings — if half your sequence was exported at one sharpening level and half at another, you will see a visible brightness jump partway through the stack. Sync all Lightroom develop settings before exporting.
- Long Exposure NR left on at source — no stacker can close gaps that were created in-camera. This must be turned off before the shoot.
How to Edit Star Trails for Video
If you used “Save PNG every 1 frames” during stacking, you now have a folder of 166 sequentially numbered PNG files on your device. Each file is one frame further along the progressive build. This is your NLE input.
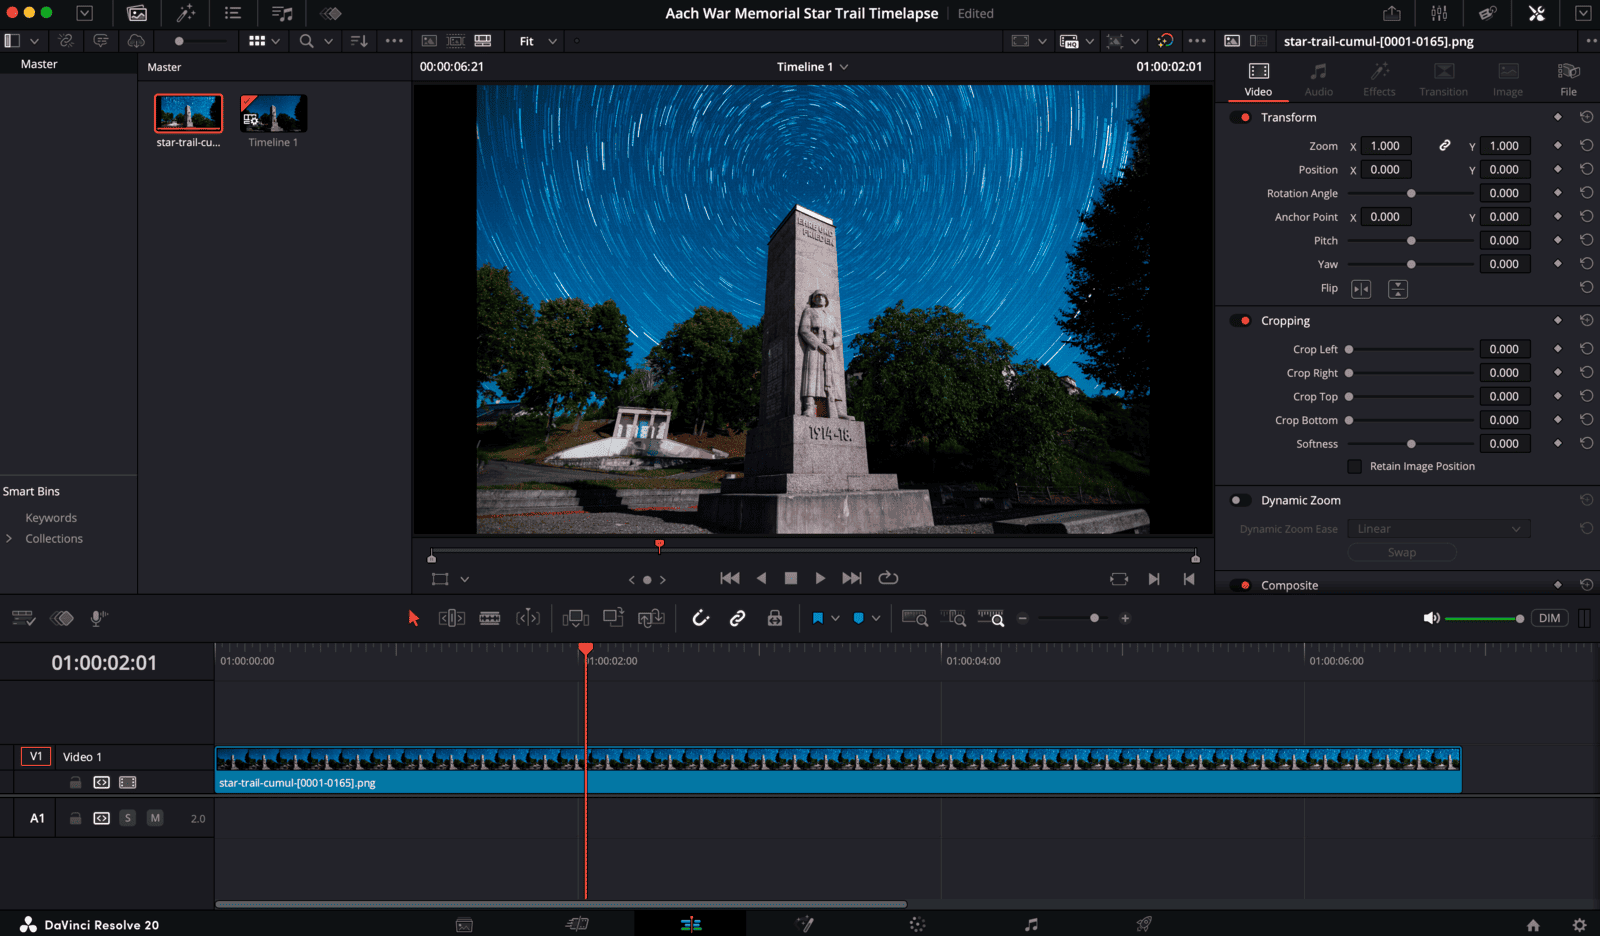
Importing Your Image Sequence
In DaVinci Resolve: open the Media Pool, navigate to your PNG sequence folder, right-click and select “Add as New Timeline Using Selected Clips.” Resolve recognises the numbered sequence automatically and treats it as a single video clip. In Adobe Premiere Pro: go to File → Import, select the first file in the sequence, and check “Image Sequence” at the bottom of the import window. Set your timeline to 25fps. At 25fps, 166 frames produces 6.6 seconds of video — a complete arc build from empty sky to full 21-degree trails over the Aach monument.
Colour Grading for Night Footage
Start with a slightly cool temperature shift toward blue to reinforce the night atmosphere, lift the shadows gently to reveal foreground detail without washing out the sky, and add a soft vignette to draw the eye toward the rotation centre of the arcs. Avoid heavy noise reduction passes on star trail sequences — they soften trail edges and remove the fine colour variation in individual star points that makes a stacked image feel natural and alive rather than processed. The Milky Way Exposure Calculator at aerotimelapse.com/milky-way-exposure-calculator/ helps you dial in your base exposure before the shoot, which reduces the amount of correction needed in grade.
Related Guides on Aero Timelapse
→ Milky Way Timelapse: Settings, Gear & Locations — the natural next step after star trails. Same gear, same dark sky locations, entirely different technique and a different kind of result.
→ 7 Timelapse Mistakes Beginners Make — most of the errors that ruin a star trail session before it starts are covered here: wrong interval, IS left on, Auto WB, Long Exposure NR, forgetting dark frames.
→ Ultimate Timelapse Photography Tutorial — the complete foundation guide for anyone building their timelapse skills from the ground up.
→ Timelapse Interval Calculator 🔧 — confirm your interval timing for any session in seconds before you leave the house.
→ Milky Way Exposure Calculator 🔧 — calculate your maximum safe shutter speed using the NPF rule and plan star trail session duration for any target arc length.
→ Browser Star Trail Stacker 🔧 — stack your frames directly in the browser, export a progressive build image sequence or video, no download required.
→ Make Money Selling Timelapse Stock Footage — turn your star trail sequences into passive income on stock platforms.
Frequently Asked Questions
How do I make a star trail timelapse step by step?
Shoot 100–300 frames in manual mode at 30 seconds, f/2.8, ISO 1600, fixed white balance at 3800–4200K, using an intervalometer set to a 31-second interval (30s exposure plus 1s gap). At the end of the session, shoot 15 dark frames with the lens cap on at the same settings while the sensor is still warm. Export your RAW files from Lightroom as full-quality JPEG with synced settings. Go to aerotimelapse.com/star-trail-stacker/, load your light frames, load your dark frames separately, select Lighten mode, enable “Save PNG every 1 frames,” and click Stack. Import the resulting numbered PNG folder into DaVinci Resolve or Premiere Pro as an image sequence at 25fps and export your video.
How many photos do I need for star trails?
A minimum of 60–80 frames (around 30–40 minutes of shooting at 30-second intervals) produces visible arcs in the final composite. 166 frames over 85 minutes — as in the Aach session — produces approximately 21 degrees of arc, which is clearly dramatic in both print and video form. 300 frames over approximately 2.5 hours gives you very long, sweeping trails and a video clip of around 12 seconds at 25fps, which is a strong commercial stock length. Stars near the celestial equator move approximately 0.25 degrees per real minute, so you can calculate your target arc length against your available shooting time before committing to a location.
Why does my stacked image show gaps between trail segments?
Gaps appear when the interval between frames is long enough for stars to move a visible distance without being recorded. The most common causes are: interval set too long (more than 2–3 seconds beyond your shutter speed), Long Exposure Noise Reduction left on in-camera silently doubling the interval, or a slow SD card causing buffer delays between shots. Fix at source for future sessions: 1-second gap, Long Exposure NR off, V60-rated card. For an existing sequence with gaps, enable Gap Fill mode in the browser stacker and use the live preview threshold overlay — affected pixels shown in green — to close them before running the full stack.
Should I shoot RAW or JPEG for star trails?
Shoot RAW if storage and processing time allow. RAW files give significantly more latitude to recover foreground detail, correct white balance uniformly across the sequence, and apply a consistent grade before stacking. For pure star trail stacking where grading is minimal and speed matters, JPEG at the highest in-camera quality setting is entirely usable and faster to process. The browser stacker accepts JPEG, PNG, and WebP — export your RAW files from Lightroom at full resolution with synced develop settings before uploading.
Can I use the moon for star trail photography?
Yes — and used correctly, the moon is an asset. A partial moon positioned behind you (opposite your composition) lights your foreground naturally while leaving your shooting sky genuinely dark. On the Aach session, the moon rising behind the camera lit the historic stone monument with a soft silver directional light while the northern sky toward Polaris remained dark enough for clean, dense star trails. The result looks like a multi-light composite. It was a single uninterrupted 85-minute sequence with no artificial lighting. Moon position matters more than moon phase.
What focal length is best for star trail photography?
14mm to 20mm full-frame equivalent is the standard range. Wider lenses capture a larger arc of sky, make the circular pattern around Polaris more visually prominent, and give you more compositional flexibility with foreground subjects. The Samyang 14mm f/2.8 () is the most popular choice in this range — fast aperture, sharp stars across the frame, and well under €400 new. On an APS-C body, a 10mm f/2.8 gives a comparable field of view.
What does "Save PNG every 1 frames" do and why does it matter for video?
With this option enabled and set to 1, the stacker downloads one PNG file after every single frame is processed — giving you a complete image sequence where each file shows one more frame of star motion accumulated. Import that numbered folder into DaVinci Resolve or Premiere Pro as an image sequence and you have the progressive build timelapse video: trails growing across the sky in real time as the video plays. At 25fps, a 166-frame sequence produces 6.6 seconds of footage — the full 85-minute rotation of the Earth compressed into under 7 seconds. This workflow is not possible with any other free stacking tool currently available.
Can I sell star trail photos and videos commercially?
Yes, and both formats have strong market demand. Star trail photographs sell as fine art prints and stock images; star trail timelapse videos sell on Pond5, Adobe Stock, and Shutterstock. Recognisable foregrounds — Zugspitze, Neuschwanstein, Bodensee shoreline, historic old town silhouettes — command significantly higher prices than generic landscape backgrounds. Ensure your sequence is technically clean (no gaps, no dew fog frames, consistent exposure throughout) and keyword it precisely. The Stock Footage Metadata Generator produces upload-ready metadata for all major platforms automatically.
Conclusion: Upload Your First 20 Frames Tonight
How to make a star trail timelapse comes down to four things executed correctly: a dark sky, the right settings, a motionless camera, and a stacker that gets out of your way. The settings in this guide — 30 seconds, f/2.8, ISO 1600, fixed white balance, Long Exposure NR off — work on every modern camera. They produced a clean 21-degree arc over a moonlit monument in Aach on an 85-minute session, and they will work on your next clear night wherever you are in Southern Germany or beyond.
The stacking step that used to take the most time is now a browser operation. Go to aerotimelapse.com/star-trail-stacker/, upload your first 20 frames, run a Preview-resolution test stack, and confirm your focus, exposure, and blend mode are right before you commit to the full sequence. That single test run — five minutes of work — is the most useful thing you can do before processing a full shoot.
When you’re ready for the next level — Milky Way combined with star trails, longer sessions across the Swabian Alps and the Dolomites, or shooting locations worth putting in a commercial portfolio — the Milky Way timelapse guide at aerotimelapse.com/milky-way-timelapse-settings-gear-locations/ is the natural next step. The gear is identical. The sky gets even better.

Dipon is a drone and timelapse cinematographer based in Ulm, Germany, with over 15 years of experience turning real spaces and projects into cinematic visuals. With a background in digital marketing, every shot is planned with a clear purpose — where it will appear, who will see it, and what it should help them decide.
You May Also Like

Best Timelapse Cameras Under €1,000 in 2026

Best Time to Fly a Drone for Photography
Timelapse for Social Media: Instagram, YouTube & TikTok Settings

Holy Grail Timelapse: Complete Day-to-Night Settings & Workflow
How to Plan Storage for Drone Footage — The Complete Pre-Flight Guide
How to Shoot a Hyperlapse on Foot: Step-by-Step Guide
Timelapse Flicker Fix: Causes, Prevention & Post-Processing Solutions

Cloud Timelapse Photography: How to Capture Dramatic Moving Skies
Milky Way Timelapse: Settings, Gear & Locations
The Complete Drone Videography Guide (2026)
Best ND Filters for Timelapse: Strength Guide & Picks

Stock Footage Metadata for Timelapse Contributors: How to Title, Tag & Describe Your Clips
Need help capturing professional timelapse for your next project but not ready to invest in the gear yet? Check out our Timelapse Video Production service to see how Aero Timelapse Studio can help elevate your production.