Table of Contents
Affiliate Disclosure
This guide contains affiliate links. Purchases made through these links support Aero Timelapse Studio at no additional cost to you. I only recommend products I personally use or carefully research. As an Amazon Associate I earn from qualifying purchases.
A real estate developer in Ulm commissioned a six-week construction timelapse. I set up on a scaffolding platform, shot every weekday morning for six weeks, captured 2,400 frames of a building going up from slab to roof — and delivered a final cut that pulsed in brightness every four seconds like someone was flicking a dimmer switch. I’d left ISO on Auto for the first three days and not caught it until the edit.
That cost me a full weekend of manual frame correction in Lightroom, a very uncomfortable client call, and a lesson I have not forgotten once since.
Timelapse flicker is not a random bad-luck problem. It has specific, diagnosable causes — and once you understand them, it becomes one of the most preventable failures in the craft.
This guide covers every cause in plain language, the exact in-camera settings that eliminate it at the source, and the complete post-processing workflow for sequences you’ve already captured. Whether you’re here before a shoot or staring at a flickery sequence at midnight, you’re going to be fine — here’s exactly what to do.
Quick Answer
The Short Version:
Timelapse flicker is caused by three things: aperture blade variation (the blades don’t land in the exact same position on every shot), automatic exposure adjustments between frames, or artificial light sources cycling at 50/60Hz out of sync with your shutter. To prevent it: shoot in full manual mode, lock aperture, ISO, and white balance, use an ND filter to keep your aperture wide (f/2.8–f/4), and — on DSLR bodies only — use the lens twist technique to physically lock the aperture blades open. If you already have a flickery sequence, LRTimelapse’s deflicker algorithm fixes most cases in under 10 minutes and handles Holy Grail (sunrise/sunset) transitions with its dedicated Wizard.
What Actually Causes Timelapse Flicker
Flicker looks random. It isn’t. Every case has a specific cause — and once you identify which one you’re dealing with, the fix is straightforward.
Aperture Blade Flicker
Every time your camera fires, the aperture blades close down to your set f-stop, expose, then return to wide open. The problem is mechanical tolerance: the blades never land in exactly the same position twice.
At f/2.8, the difference is tiny — the blades travel a short distance and the variation is negligible. At f/8 or f/11, the blades travel much further, and a variation of even 0.1 stops becomes visible across 300+ frames. The result is a brightness pulse every 3–5 frames — that characteristic stroboscopic flicker you can’t ignore once you see it.
Where you’ll see it most: Clear blue skies, fog, flat grey overcast — any uniform surface where subtle brightness differences between frames are obvious.
Automatic Exposure Adjustments
If your camera is in Aperture Priority, Shutter Priority, Program, or any Auto ISO mode, it evaluates each frame independently and adjusts exposure to compensate for changing light.
A cloud passes. The camera brightens. The cloud moves on. The camera darkens. Each adjustment is maybe 1/3 of a stop — but across 500 frames it creates a strobing effect that’s nearly impossible to remove cleanly in post.
This is the most common beginner mistake. It looks fine on your LCD at the time of shooting. It’s catastrophic in playback.
Artificial Light Flicker
LED and fluorescent lights don’t emit continuous light — they pulse at 50Hz in Europe and 60Hz in North America. If your shutter speed doesn’t align with this cycle, some frames catch the light at peak brightness, others at the dimming phase.
This is why shooting a construction site interior at 1/200s in Germany produces inconsistent brightness every few frames. The fix: use a shutter speed that’s a multiple of your local power frequency. In a 50Hz country (all of Europe), that means 1/50s, 1/100s, or 1/200s — and never 1/125s or 1/250s under artificial light.
How to Prevent Timelapse Flicker Before You Hit Record
Prevention is always faster than post-processing. These five steps eliminate 95% of flicker before you ever press the intervalometer.
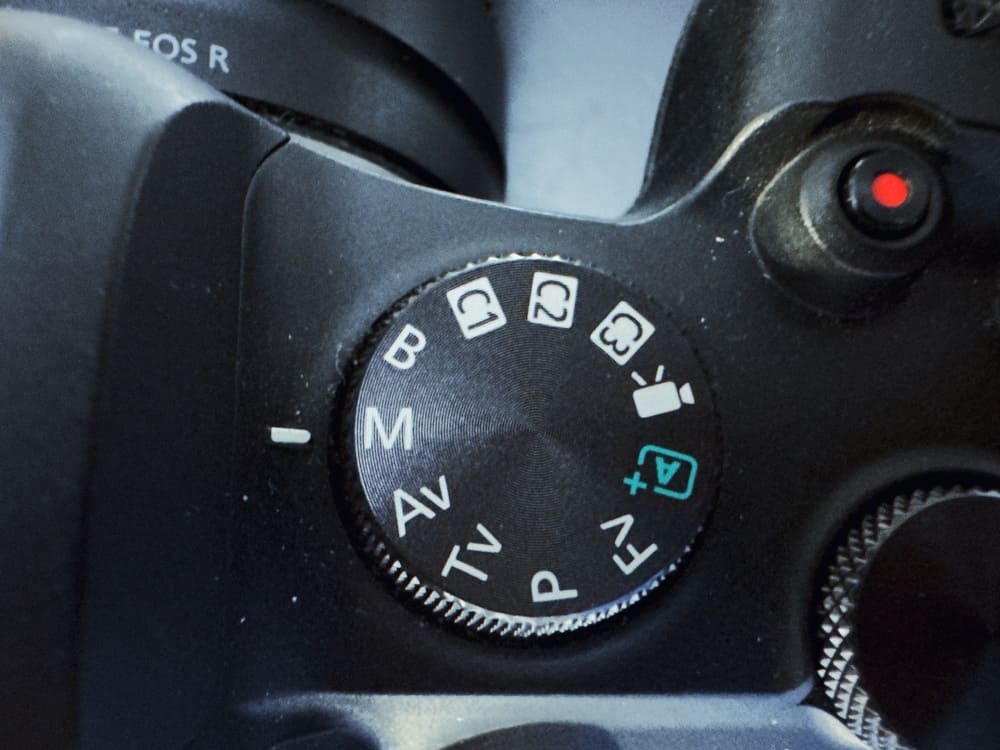
Step 1 — Lock Every Setting to Manual
Switch your camera to full Manual (M) mode before every timelapse.
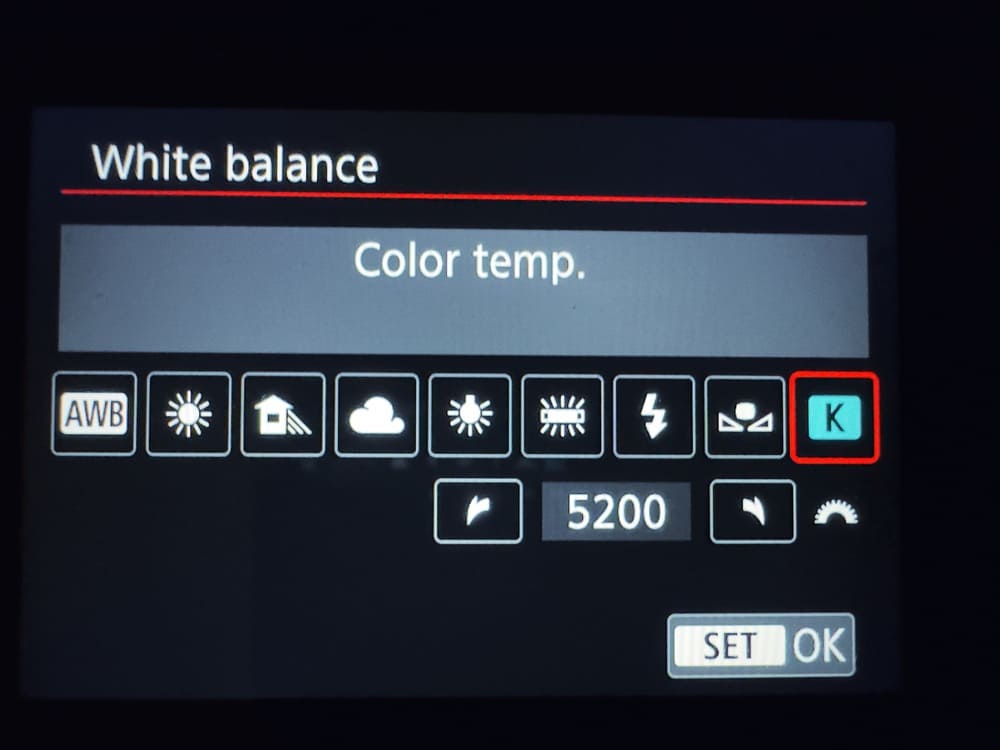
Manually set shutter speed, aperture, and ISO. Manually set white balance to a fixed Kelvin value — never Auto WB, even on a cloudy day. I use 5500K for daylight, 4500K for golden hour, 3200K for artificial light.
The camera must make zero decisions between frames.
💡 Pro Tip: After locking your settings, fire 10 test frames and check them side by side at 100% zoom on your LCD. If you see brightness variation in those 10 frames, you have a flicker problem — fix it on location, not in Lightroom at midnight.
Step 2 — Keep Your Aperture Wide. Use ND Filters to Manage Exposure.
The single most effective prevention for aperture flicker is shooting at f/2.8–f/4 instead of stopping down.
Wide apertures mean the blades barely move. Mechanical variance is negligible. The flicker essentially disappears.
The problem: at f/2.8 in bright daylight, your shutter speed will be 1/4000s or faster — which freezes motion completely and gives you choppy, stroboscopic footage instead of a cinematic timelapse. The solution is an ND filter. A 6-stop ND brings 1/4000s down to 1/60s, putting you squarely in the 180° shutter rule range with natural motion blur on every frame.
For my landscape timelapse work I carry the PolarPro Vario ND 2–5 Stop and PolarPro Vario ND 6–9 Stop for overcast and variable conditions. It covers everything from mild haze to full cloud cover with no colour cast — and it’s what keeps me at f/4 all day without ever touching the aperture ring. Use the free ND Filter Calculator → to find exactly which filter you need for your frame rate and current exposure.
Step 3 — The Lens Twist Technique (DSLR Bodies Only)
⚠️ This technique is for DSLR lenses with electronic aperture control only. Mirrorless lenses — Sony FE, Nikon Z, Canon RF — have electronic aperture rings that don’t respond the same way. Do not attempt this on a mirrorless body without first testing on a spare sequence. Confirm it works on your specific body and lens combination before relying on it at a location.
With that established: on compatible DSLR systems, this technique physically locks the aperture blades at your set f-stop, bypassing blade movement entirely and eliminating aperture flicker at the mechanical level.
How to do it:
- Attach your lens. Set your desired aperture on the camera (e.g. f/5.6).
- Hold the depth-of-field preview button to close the blades to f/5.6.
- While holding the button, slightly twist the lens as if starting to remove it — just enough to break the electronic connection, but not enough to detach it.
- Release the DoF preview button. The blades stay physically locked at f/5.6 because the camera can no longer command them.
- Begin your timelapse. Aperture is now mechanically fixed — zero blade variation.
A cleaner long-term solution: lenses with a physical manual aperture ring make this trick unnecessary. The Samyang/Rokinon 14mm f/2.8 and 12mm f/2.0 have fully manual aperture control with zero electronic actuation during shooting.
Step 4 — Block the Viewfinder
Light leaking through an optical viewfinder can affect the metering sensor even in full manual mode on certain bodies — most commonly older Canon DSLRs during long daytime sequences.
Cover the eyepiece with the built-in viewfinder cover (Canon bodies have a sliding cover on the strap lug) or tape it with gaffer tape. Five seconds of prevention on location.
Step 5 — Fix Artificial Light Timing
Shooting inside a building, at a construction site, or near street lighting at night?
Use these shutter speeds for 50Hz countries (all of Europe): 1/50s, 1/100s, or 1/200s. Never use 1/125s, 1/250s, or 1/500s in an artificial light environment. If daylight mixes with LED (a large window into a lit interior, for example), the 50Hz-aligned shutter speeds are still the safer choice — the daylight component is stable, the artificial light is the variable.
How to Fix Timelapse Flicker in Post-Processing
You followed every prevention step and still got flicker. Or you’ve already shot a sequence and you need to save it. Either way — here’s the workflow.
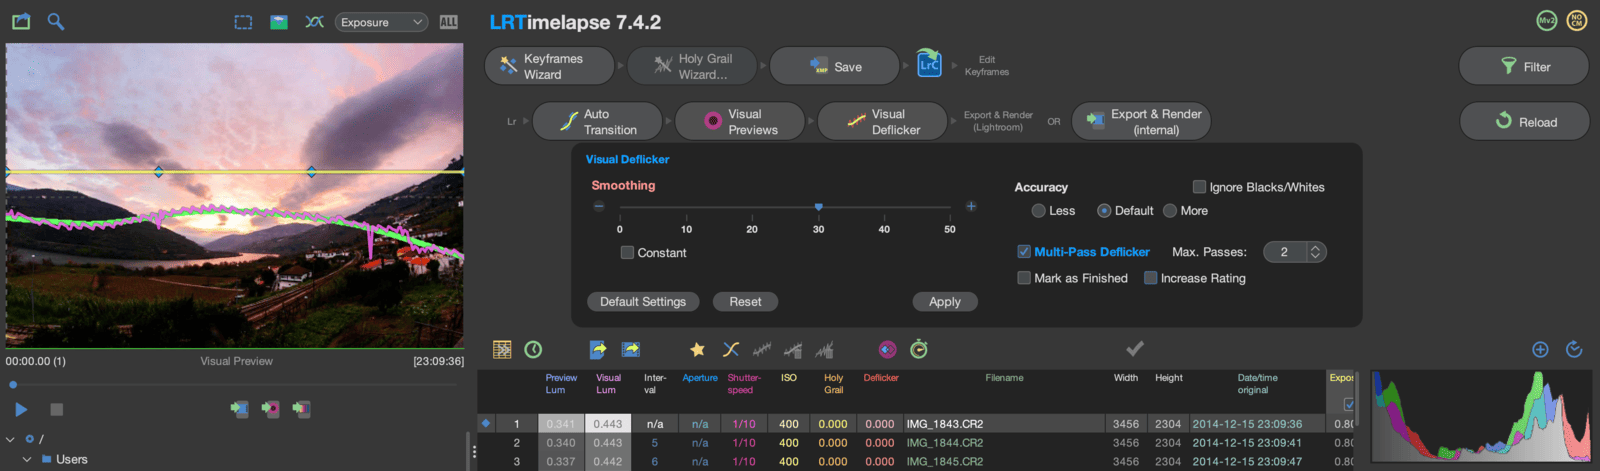
LRTimelapse — The Professional Standard
LRTimelapse is the deflicker tool I use on every serious sequence. There is no other tool at its level for RAW timelapse work.
Its deflicker engine analyses the luminance of each frame in the sequence, identifies the flickering pattern, and applies frame-by-frame brightness corrections that are completely invisible in the final video. The result looks like it was shot clean in camera.
Best For: Anyone shooting RAW timelapse who needs professional-grade deflicker, smooth Holy Grail transitions, and a Lightroom-integrated processing pipeline.
Price: ~€99 personal licence. (Worth it after the first properly deflickered sunset sequence — more on this in the FAQ below.)
Deflicker workflow in LRTimelapse:
- Open LRTimelapse. Navigate to your sequence folder.
- Select all frames → click Initialise.
- Click Visual Deflicker → set smoothing radius to 15 for moderate flicker, 25 for heavy flicker.
- Click Deflicker to apply.
- Export the corrected XMP files.
- In Lightroom: synchronise the XMP metadata across all frames.
- Grade and render as usual.
💡 Pro Tip: Always deflicker before colour grading. Deflickering on already-graded frames produces less accurate corrections because the algorithm reads tonal values that include your grade on top of the exposure variation. Run deflicker on the neutral RAW output first.
Adobe Premiere Pro — Warp Stabilizer Flicker Removal
Premiere’s Lumetri Creative → Faded Film slider is not a real deflicker engine. For actual flicker removal in Premiere, use the Warp Stabilizer effect instead:
- Apply Warp Stabilizer to your timelapse clip.
- Under Advanced, uncheck Stabilize.
- Enable only the Flicker Reduction option and set it to 20–40.
- Render.
This is not as precise as LRTimelapse, but it works adequately on JPEG or rendered MP4 sequences where you no longer have RAW files to process.
DaVinci Resolve — Deflicker Node
In DaVinci Resolve (free version), apply the ResolveFX Flicker Addition effect under OpenFX → Effects. Set the Flicker Reduction slider between 20–40 for most sequences.
Resolve handles this well on rendered video files. For RAW still sequences, run LRTimelapse deflicker first, export a rendered clip, then bring that into Resolve for colour grading — that two-step approach produces the cleanest results.
Holy Grail Flicker — Fixing Sunrise and Sunset Transitions
The Holy Grail timelapse — a continuous sequence from full daylight through sunset into night, or vice versa — is the hardest flicker challenge in the craft. It’s also the most satisfying to get right.
The difficulty: as light fades, you need to progressively increase ISO and slow the shutter. Each adjustment is a step change in exposure. Without careful technique, those steps read as flicker — not the mechanical kind, but visible brightness jumps at every point where you touched the camera.
In-Camera Holy Grail Technique — The Exact Process
The goal is to make exposure changes so small and so gradual that the steps become invisible.
The workflow:
- Start in full manual. Set your aperture at f/2.8–f/4 and keep it there for the entire sequence. Never adjust aperture during a Holy Grail transition — aperture changes create the most visible step changes of the three exposure variables.
- Every 8–10 minutes, assess the scene. If the sky is visibly darker, it’s time to adjust.
- Adjust shutter speed first — move it by one 1/3-stop increment (e.g. 1/100s → 1/80s). Wait for the next few frames to confirm the exposure is now correct.
- Once shutter speed reaches your lower limit (around 1/15s–1/8s depending on your interval), begin increasing ISO — again in 1/3-stop steps: ISO 200 → 250 → 320 → 400.
- The total transition from daylight to night takes 60–90 minutes. That’s 6–9 adjustments. Keep each one small, keep the time between them consistent.
The critical rule for adjustments: use the Pixel TW-283 Intervalometer to confirm your interval timing before and after each adjustment. Change your camera settings between shots — never during the exposure and never while the buffer is writing. Touching the camera during an active shot introduces shake that can look like flicker in the final sequence, even on a heavy tripod.
What shutter speed is too slow? Your shutter speed must always be shorter than your interval, with enough buffer for the camera to write to the card. A general rule: keep shutter speed at no more than 60–70% of your interval. On a 5-second interval, your maximum shutter speed is around 3 seconds. Beyond that, your frames start stacking before the next interval fires and your sequence stutters.
In Post — LRTimelapse Holy Grail Wizard
Even with perfect in-camera technique, Holy Grail sequences usually have some residual brightness stepping that needs post-processing smoothing.
LRTimelapse’s Holy Grail Wizard was built specifically for this. The process:
- Load your sequence into LRTimelapse.
- In the Holy Grail section, identify and mark keyframes at each point where you made an exposure adjustment during the shoot.
- The Wizard analyses the luminance at each keyframe and interpolates a smooth exposure curve between them, eliminating the step-change artefacts.
- Export corrected XMPs → synchronise in Lightroom → render.
The result is a brightness ramp from daylight to night that looks completely continuous — as if the camera adjusted itself invisibly throughout the sequence.
For more on why automatic exposure adjustments during a Holy Grail shoot destroy the sequence in post, see 7 Timelapse Mistakes Beginners Make — the exposure section covers exactly this failure mode.
Anti-Flicker Settings Quick Reference
| Scenario | Aperture | Shutter Speed | ISO | White Balance | ND Filter |
|---|---|---|---|---|---|
| Sunny daylight | f/2.8–f/4 | 1/50–1/100s | 100 | Fixed Kelvin 5500K | 6–9 stop |
| Overcast / cloudy | f/2.8–f/4 | 1/50–1/100s | 100–200 | Fixed Kelvin 6000K | 2–5 stop |
| Golden hour | f/2.8–f/4 | 1/50s | 200–400 | Fixed Kelvin 4500K | 2–3 stop |
| Blue hour / dusk | f/2.8 | 1/25–1/13s | 400–1600 | Fixed Kelvin 4000K | None |
| Night / astro | f/2.8 | 15–30s | 1600–6400 | Fixed Kelvin 3800K | None |
| Indoor / LED (EU) | f/2.8–f/4 | 1/50s or 1/100s | Manual | Fixed Kelvin | As needed |
The rule across all scenarios: aperture stays wide and fixed. Shutter speed and ISO absorb the exposure changes. The camera decides nothing.
Before you leave for a shoot, use the free Timelapse Interval Calculator → to confirm your frame count and storage requirements alongside these settings.
Read Next on Aero Timelapse
Start here for the full picture: → The Ultimate Timelapse Photography & Videography Guide — the complete framework this article sits within.
Go deeper on related topics: → 7 Timelapse Mistakes Beginners Make (And Fix Fast) — flicker is mistake #4. All seven are covered with specific fixes. → Timelapse Interval Guide — once your flicker is fixed, interval is the next variable to dial in.
Free tools: → ND Filter Calculator 🔧 — find the exact ND filter for your frame rate and shutter speed in seconds. → Timelapse Interval Calculator 🔧 — plan frame count, storage, and interval before you leave the house. → Stock Footage Metadata Generator 🔧 — once your deflickered clip is export-ready, generate optimised stock titles and keywords.
Timelapse Flicker Fix - Frequently Asked Questions
What causes flicker in timelapse photography?
Timelapse flicker is caused by three main factors: aperture blade variation (the blades don’t stop at exactly the same position on every shot, producing brightness changes up to 1/3 stop per frame), automatic exposure adjustments (any auto mode causes the camera to re-evaluate each frame and adjust independently, creating visible brightness steps across the sequence), and artificial light cycling (LED and fluorescent lights pulse at 50Hz or 60Hz, and certain shutter speeds catch frames at different phases of this cycle). In most outdoor timelapse sequences, flicker is caused by a combination of the first two factors and can be eliminated by shooting in full manual mode with a wide aperture.
How do I fix timelapse flicker in post-processing?
The most effective tool is LRTimelapse, which includes a Visual Deflicker engine that analyses each frame’s luminance, identifies the flickering pattern, and applies per-frame corrections through Lightroom. The process takes roughly 10 minutes for a standard sequence: initialise the folder, run Visual Deflicker with a smoothing radius of 15–25 depending on severity, export the corrected XMPs, and synchronise them in Lightroom before rendering. For rendered video files without RAW originals, Premiere Pro’s Warp Stabilizer (with stabilisation disabled and Flicker Reduction set to 20–40) or DaVinci Resolve’s ResolveFX Deflicker effect provide a workable alternative.
Is LRTimelapse worth it for beginners?
Yes — if you are shooting RAW and planning to do any sequence longer than a few minutes, LRTimelapse is worth the €99 licence after your first serious shoot. The Visual Deflicker engine alone saves hours of manual frame correction that beginners often attempt in Lightroom. More importantly, the Holy Grail Wizard makes day-to-night transitions achievable for any skill level — it smooths the brightness stepping that would otherwise make a 90-minute sunset sequence unwatchable. If you only ever shoot short, static, midday sequences in unchanging light, you can delay the purchase. But for anyone shooting sunrise, sunset, fog, or variable cloud, the licence pays for itself quickly.
What is the best ND filter to prevent timelapse flicker?
The best ND filter for preventing timelapse flicker is one that lets you shoot at f/2.8–f/4 in your lighting conditions — because wide apertures produce far less blade movement variation per frame. For overcast and variable light, the PolarPro Vario ND 2–5 Stop covers most daylight scenarios without colour cast. For bright midday sun, a 6–9 stop ND is required to bring shutter speed into the cinematic 1/50–1/100s range at f/2.8–f/4. A variable ND is more practical for timelapse than a fixed set because light conditions change over a long sequence — you can dial in the exact density without swapping filters between shots. Use the free ND Filter Calculator to confirm which strength you need for your current shutter speed and frame rate.
Does shooting in manual mode completely eliminate timelapse flicker?
Full manual mode eliminates flicker caused by automatic exposure adjustments, which is the most common cause. It does not eliminate aperture blade flicker, which is a mechanical issue independent of exposure mode. To address blade flicker alongside manual mode: shoot at f/2.8–f/4 (shorter blade travel, smaller variation), use an ND filter to maintain that aperture in bright conditions, or use the lens twist technique on compatible DSLR lenses to physically lock the blades in position. For most outdoor landscape and cityscape timelapse sequences, full manual mode combined with a wide aperture will produce flicker-free results without any post-processing correction needed.
What is Holy Grail timelapse and why does it flicker?
A Holy Grail timelapse is a continuous sequence that spans a major light transition — typically daylight through sunset into night — without a cut. Flicker occurs because the photographer must manually increase ISO and slow the shutter in increments as light fades, and each incremental adjustment creates a visible step change in brightness. In-camera, the technique involves making very small 1/3-stop adjustments every 8–10 minutes, changing only shutter speed and ISO (never aperture), and always adjusting between shots rather than during them. In post, LRTimelapse’s Holy Grail Wizard smooths any remaining step-change artefacts by setting keyframes at each adjustment point and interpolating a continuous brightness curve across the full sequence.
How do I prevent flicker when shooting timelapse under LED lights?
Flicker is one of the most preventable problems in timelapse — and one of the most fixable when it does show up.
Do this right now: check your camera settings and confirm everything is in full manual mode. Set a fixed Kelvin white balance. Confirm your aperture is at f/2.8–f/4. If you’re shooting in daylight, you need an ND filter to hold that aperture — the ND Filter Calculator tells you exactly which one in under a minute.
Every sequence you shoot from this point forward can be flicker-free before you reach the edit. That’s the standard, and it’s entirely within reach.
Conclusion
Flicker is one of the most preventable problems in timelapse — and one of the most fixable when it does show up.
Do this right now: check your camera settings and confirm everything is in full manual mode. Set a fixed Kelvin white balance. Confirm your aperture is at f/2.8–f/4. If you’re shooting in daylight, you need an ND filter to hold that aperture — the ND Filter Calculator tells you exactly which one in under a minute.
Every sequence you shoot from this point forward can be flicker-free before you reach the edit. That’s the standard, and it’s entirely within reach.

Dipon is a drone and timelapse cinematographer based in Ulm, Germany, with over 15 years of experience turning real spaces and projects into cinematic visuals. With a background in digital marketing, every shot is planned with a clear purpose — where it will appear, who will see it, and what it should help them decide.
You May Also Like

Best Timelapse Cameras Under €1,000 in 2026

Best Time to Fly a Drone for Photography
Timelapse for Social Media: Instagram, YouTube & TikTok Settings

Holy Grail Timelapse: Complete Day-to-Night Settings & Workflow
How to Plan Storage for Drone Footage — The Complete Pre-Flight Guide
How to Make a Star Trail Timelapse: From Camera Settings to Online Stacking
How to Shoot a Hyperlapse on Foot: Step-by-Step Guide

Cloud Timelapse Photography: How to Capture Dramatic Moving Skies

Milky Way Timelapse: Settings, Gear & Locations

The Complete Drone Videography Guide (2026)
Best ND Filters for Timelapse: Strength Guide & Picks

Stock Footage Metadata for Timelapse Contributors: How to Title, Tag & Describe Your Clips
Need help capturing professional timelapse for your next project but not ready to invest in the gear yet? Check out our Timelapse Video Production service to see how Aero Timelapse Studio can help elevate your production.