Step 1: Decide your final video length
Aim for 10–15 seconds per timelapse clip. At 30fps, this equals 300–450 frames.
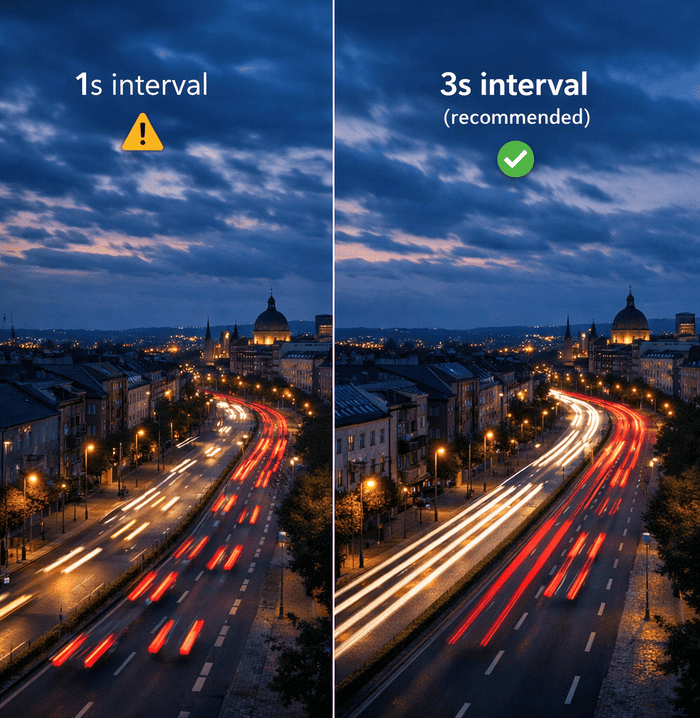
Different subjects move at very different speeds: Fast clouds or traffic: 1–3 second intervals Slow clouds, shadows, or construction: 10–30 second intervals
Step 3: Calculate total shooting time
Multiply the interval by the number of frames.
Example: 360 frames × 3-second interval = 18 minutes of shooting (360 frames = 12 seconds of video at 30fps)Set your shutter speed to roughly 60% of your interval to create natural motion blur and avoid stiff, staccato movement.
Step 5: When in doubt, choose a shorter interval
You can always speed up a timelapse in post-production, but you can never recreate motion that wasn’t captured.
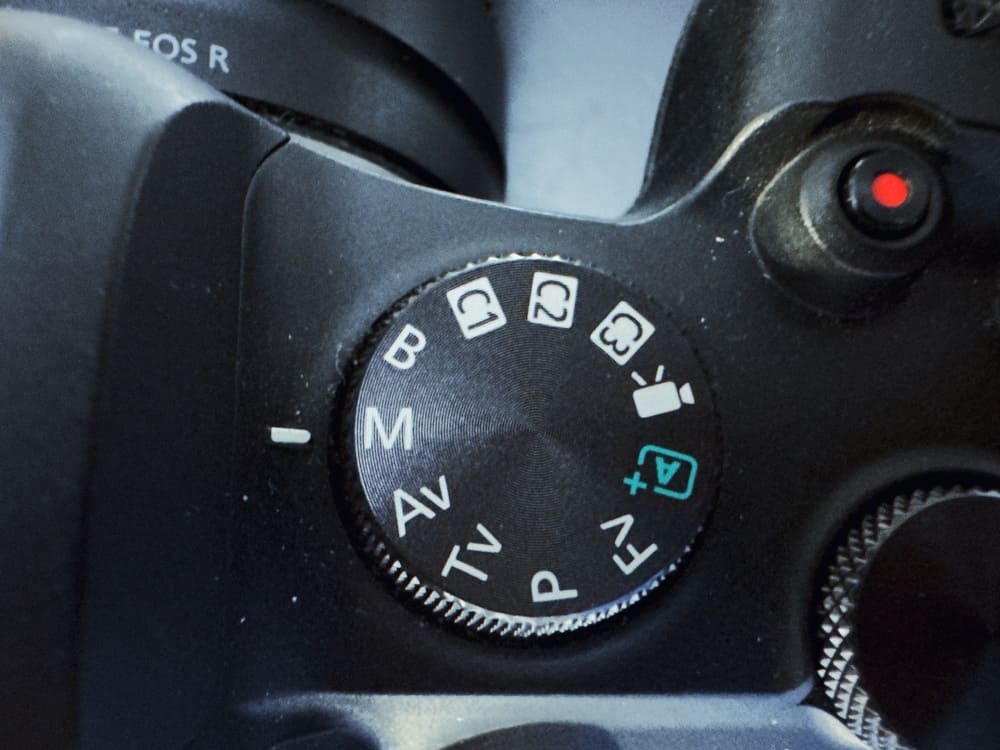
Set aperture, shutter speed, and ISO manually. Avoid auto and semi-auto modes entirely when shooting timelapse.
2. Use a long shutter relative to your interval
Longer shutter speeds help smooth exposure inconsistencies and produce natural motion blur. This also reduces the visibility of minor aperture variations between frames.
Aperture flicker comes from physical blade movement.
Best practices:
Use lenses with manual aperture rings when possible
Avoid stopping down unless depth of field truly requires it
Prefer wider apertures to reduce blade movement
(Camera-specific methods vary.)Light leaking through the viewfinder can influence exposure readings and introduce flicker. Use the built-in viewfinder cover or simply block it with tape.
5. Shoot wide and control light with ND filters
Shooting at f/2.8–f/4 significantly reduces aperture flicker.
Use ND filters to manage exposure instead of stopping down.6. For changing light (sunrise / sunset)
Use the Holy Grail approach:
Make small, controlled exposure adjustments every few minutes
Or use dedicated timelapse software to smooth exposure transitions in post-production

Avoid lightweight travel tripods when shooting timelapse, especially outdoors. A sturdy tripod should be your first serious investment.
Hang your camera bag or a weight from the tripod’s center hook. Even 2–3 kg can dramatically improve stability.
Turn off:
Lens image stabilization (IS / VR / OSS)
In-body image stabilization (IBIS)
These systems can cause frame-to-frame drift in timelapse sequences.4. Eliminate mirror movement (DSLRs)
Enable mirror lock-up or shoot in Live View mode to prevent mirror slap.
5. Protect the setup from wind
Use your body, a bag, or a natural barrier as a windbreak. Even light gusts can affect long exposures.
6. Don’t touch the camera during capture
Use a wireless remote or intervalometer. Pressing buttons transfers vibration directly into the system.
Loose intervalometer or power cables can pull on the camera. Tape cables to a tripod leg to remove tension.
Include elements such as rocks, trees, railings, or architecture to create depth. Moving shadows across foreground elements add subtle but powerful motion.
2. Introduce slow camera movement
A motorized slider moving 1–2 meters over several hours can dramatically increase production value while staying subtle and cinematic.
3. Use gentle pan or tilt motion
Motorized pan/tilt heads allow slow 30–60 degree movements across the entire sequence, adding direction and flow.
Frame the shot so the most interesting light, color, or action happens mid-sequence, not immediately. The shot should feel like it’s going somewhere.
Recording in 4K or higher allows for cropping and simulated motion in post-production without quality loss.
Position the camera so foreground and background elements move at different speeds. Parallax instantly adds depth and a cinematic feel.
7. Adapt intervals during peak action
Slightly shorter intervals during moments of increased activity can help maintain energy and viewer engagement.
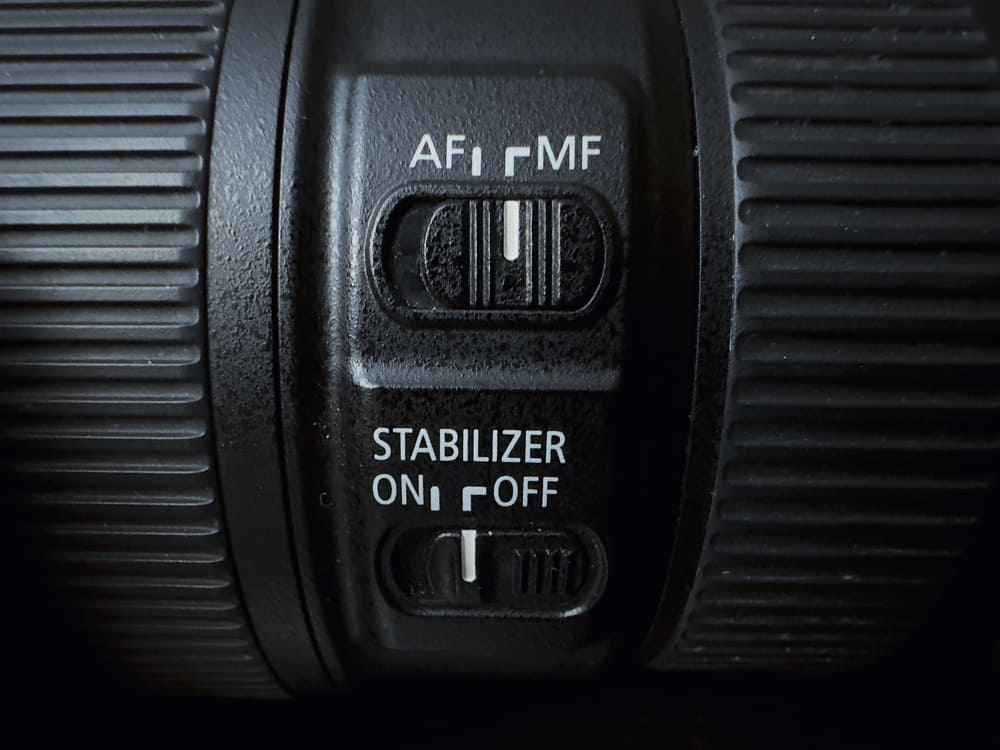
Set the lens to MF and manually focus on your intended subject. Never rely on autofocus for timelapse sequences.
Zoom the live view to 5× or 10× to achieve critical focus with precision.
Use a small piece of gaffer tape to prevent accidental movement of the focus ring.
Dial in focus before attaching ND filters, intervalometers, or power cables to avoid touching the camera later.
Ensure the AF-ON button cannot trigger focus changes during the sequence.
6. Use hyperfocal distance when appropriate
For landscapes, focusing roughly one-third into the scene maximizes depth of field and tolerance for minor shifts.
7. Verify focus before walking away
Review the first 5–10 frames at 100% zoom to confirm consistent sharpness before leaving the setup.
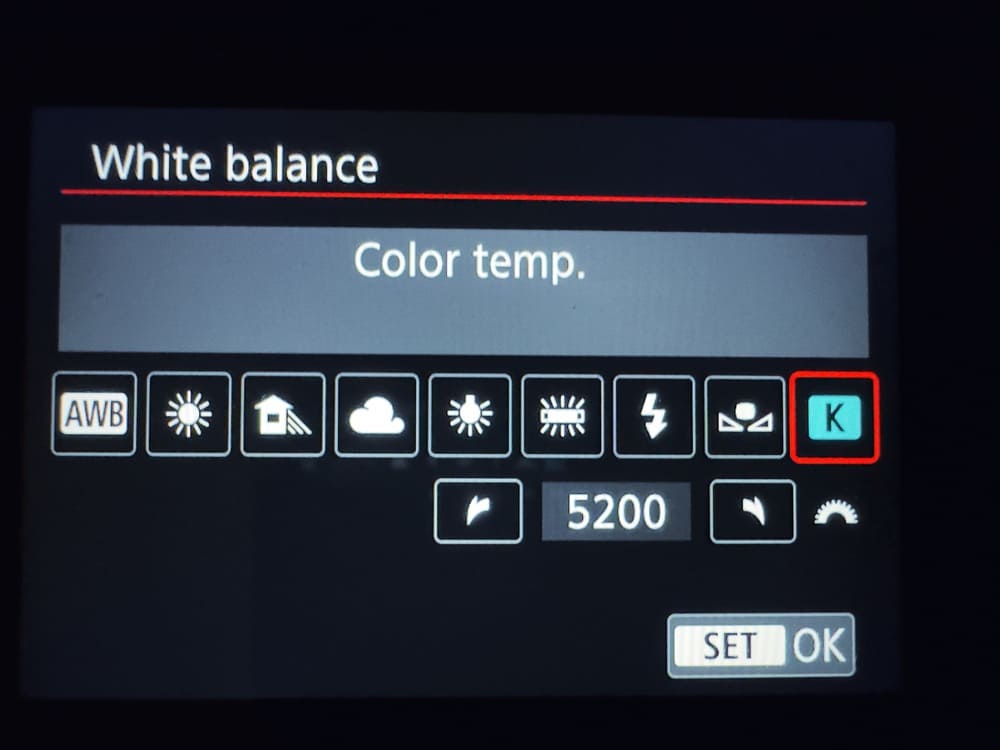
Choose a white balance that fits the scene and lock it:
• Daylight (≈5200K) for golden hour and daylight scenes
• Tungsten (≈3200K) for city nights
Manual 5000K as a safe starting point if unsure2. Never use Auto White Balance
Auto WB is the cardinal sin of timelapse photography. If it’s on, color flicker is almost guaranteed.
RAW files preserve full color data, allowing you to batch-correct white balance in post without degrading image quality.
For scenes with changing light, set white balance for the start and end of the sequence, then interpolate between them in post-production.
5. Use a gray card when precision matters
Capture a reference frame with a gray card to accurately match white balance later.
6. Lock white balance before shooting
On some cameras, setting white balance in video mode and then switching back to photo mode helps ensure the setting stays locked.
7. Avoid mixed lighting when possible
Compose your shot so natural and artificial light sources don’t compete within the same frame.
1. Calculate the required number of frames
Decide your final clip length first. Example: 15 seconds × 30fps = 450 frames Add a 10% safety margin whenever possible.
2. Compute total shooting time
Multiply the frame count by your interval.
Example:
450 frames × 4-second interval = 30 minutes minimum3. Bring at least three times the battery power
Cold weather can reduce battery life by up to 50%. Use a battery grip or external power bank for longer sessions.
Know your average RAW file size (typically 25–45MB).
Example: 450 RAW files × 35MB ≈ 16GB minimum
Use cards with:
64GB or more capacity
95MB/s or faster write speed
Always format cards before leaving.Plan to arrive at least 45 minutes before optimal light:
• Scout composition
• Level tripod
• Set focus and exposure
• Start the sequence before peak conditions beginApps like PhotoPills or Sun Surveyor show:
• Exact sun and moon positions
• Golden hour and blue hour duration
• Alignment for celestial events7. Test exposure before committing
Shoot a few test frames at your expected settings to confirm exposure and focus before starting the sequence.
8. Monitor remotely when possible
Use a smartphone app or remote trigger to check progress without touching or disturbing the camera.

You May Also Like