Table of Contents
- What Is a Holy Grail Timelapse?
- Holy Grail Timelapse Settings: What to Dial In Before You Shoot
- Auto-Ramping Methods: Which One Actually Works?
- What You Need for This
- The LRTimelapse Workflow Step by Step
- Post-Processing the Holy Grail Timelapse
- Read Next on Aero Timelapse
- Frequently Asked Questions
- Conclusion
Affiliate Disclosure
This guide contains affiliate links. Purchases made through these links support Aero Timelapse Studio at no additional cost to you. I only recommend products I personally use or carefully research. As an Amazon Associate I earn from qualifying purchases.
It was a cold October evening on the ridge above Hechingen, Hohenzollern Castle sitting perfectly in the frame, and I was ninety minutes into what should have been my cleanest holy grail sequence. Then I checked my LCD and saw it: the white balance had drifted. Not auto-ISO, not the shutter — the one setting every tutorial tells you to lock and I had forgotten to lock. Frames 1 through 600 were warm amber. Frames 601 onward: cool blue. The transition was a nauseating flicker-jump right in the middle of golden hour. I packed up in the dark and drove back to Ulm with a hard drive full of unusable footage, knowing exactly what I’d do differently next time.
That mistake is why this guide exists. The holy grail timelapse — a single continuous sequence from bright daylight to a star-filled night sky — is the most technically demanding shot in timelapse photography, and every photographer who attempts it blind fails in the same predictable ways. This guide gives you the complete system: the settings, the ramping order, the LRTimelapse workflow, and the post-processing fixes. You are going to be fine — here is exactly what to do.
Quick Answer
The Short Version: A holy grail timelapse is a day-to-night (or night-to-day) timelapse where exposure is continuously ramped to keep the image properly exposed as ambient light drops by 10–15 stops. The best approach is to shoot in full Manual mode using an intervalometer, with only ISO and aperture changing in-camera, then use LRTimelapse to apply smooth keyframe-based exposure ramping in post — eliminating flicker entirely. Set your starting shutter to 1/500s on a sunny afternoon, fix your aperture at f/5.6–f/8, start ISO at 100, and let ISO climb toward 6400 as the light fades. The critical rule: never change more than one setting at a time, and make changes in increments of 1/3 stop or less.
What Is a Holy Grail Timelapse?
A holy grail timelapse is a continuous shot that captures the full transition between dramatically different lighting conditions — most commonly day-to-night or night-to-day — in a single, unbroken sequence. The name comes from how long it was considered the “impossible” shot in timelapse: a challenge so technically demanding that even experienced photographers avoided it.
The core difficulty is dynamic range. From bright midday sun to a dark, star-lit sky, the scene loses approximately 10 to 15 stops of light. Your camera’s sensor can only handle 12–14 stops at once — so exposure must be continuously adjusted across every frame without introducing the step-changes that cause visible flicker.
There are three methods to handle this ramping: full Auto mode (fast, unreliable, flicker-prone), deflickering in post (workable but lossy), and the keyframe method in LRTimelapse (the professional standard). This article covers the third — it’s the only one worth your time for serious output.
💡 Pro Tip: The holy grail is not just sunset-to-night. The reverse — night-to-day — is equally spectacular and often easier to control because the light is rising, giving you a more predictable ramp direction. For fog timelapse sequences above the Swabian Alps or sunrise shots in the Dolomites, a reverse holy grail frequently outperforms sunset in the edit because the drama is building, not fading.
For a thorough grounding in timelapse fundamentals before diving into holy grail, start with the Ultimate Timelapse Photography Tutorial.
Holy Grail Timelapse Settings: What to Dial In Before You Shoot
Your settings before the first frame determine everything. Get this wrong and no amount of post-processing saves you.
Starting Exposure: The 2-Hour-Before-Sunset Rule
Arrive at least 90 minutes before sunset and lock in your starting exposure manually. Meter the sky (not the ground), and dial in a shutter speed that gives you a properly exposed frame in Manual mode with Auto ISO off. A typical starting point on a clear afternoon:
| Setting | Value | Notes |
|---|---|---|
| Shutter Speed | 1/500s – 1/1000s | Freeze fast-moving clouds; keeps motion natural |
| Aperture | f/5.6 – f/8 | Sharp across the full frame, enough depth for city + sky |
| ISO | 100 | Cleanest baseline; you’ll ramp this up later |
| White Balance | Fixed (Daylight / 5500K) | NEVER auto — colour shift kills the sequence |
| Picture Style | Neutral or Flat | Preserve dynamic range in RAW |
| Format | RAW | Non-negotiable for a 10-stop grade in post |
⚠️ Warning: Auto White Balance is the single fastest way to ruin a holy grail timelapse. It will shift from warm orange to cool blue during twilight, creating a colour flicker that is almost impossible to fix cleanly in post. Fix your WB before frame one and leave it there.
The Ramping Order — ISO, Shutter, Aperture
As light drops, change settings in this exact order to minimise visible jumps:
- First, raise shutter speed to 1/30s — go from 1/500s down to 1/30s in 1/3-stop increments over the first 60–90 minutes.
- Then, raise ISO — begin at ISO 100 and let it climb to ISO 3200–6400 depending on your camera body’s high-ISO performance.
- Finally, open aperture — only if you’ve exhausted shutter and ISO options; moving aperture shifts depth of field and can affect focus.
Never touch aperture first. The depth-of-field shift is visible on-screen and creates a flicker effect that’s purely optical — it can’t be corrected in LRTimelapse.
Interval Settings
Your interval determines how smooth the motion looks and how long your finished clip runs. For a 3–5 hour holy grail sequence targeting a 24fps output:
| Scene | Interval | Total Frames (3 hrs) | Final Clip Length (24fps) |
|---|---|---|---|
| Slow cloud movement | 8s | ~1,350 | ~56s |
| Moderate movement | 5s | ~2,160 | ~90s |
| Fast storm / active sky | 3s | ~3,600 | ~2.5 min |
Use the Timelapse Interval Calculator to work out your exact interval before you shoot — don’t guess on location.
For ND filter selection during the bright phase of a holy grail shot, the ND Filter Calculator will save you from chasing values manually.
Auto-Ramping Methods: Which One Actually Works?
There are three approaches photographers use to handle the exposure ramp. Here’s an honest breakdown of each:
Method 1: Full Auto / P-mode (Not Recommended)
Let the camera do everything. Fast to set up, essentially unusable for professional output. The camera makes step-changes in exposure — jumping 1/3 stop every few frames — which creates a rapid flicker pattern that’s nearly impossible to remove cleanly. Acceptable only for personal test shots.
Method 2: Aperture-Priority with Post-Deflicker
Shoot in Av mode, fix your aperture, let the camera adjust shutter and ISO. Then use deflicker tools in post to smooth the jumps. This works for short transitions but fails during rapid light changes like the 10-minute window around nautical twilight. Flicker patterns become complex and deflickering introduces ghosting. For more on fixing flicker, see Timelapse Flicker Fix: Causes, Prevention & Post-Processing.
Method 3: Manual Mode + LRTimelapse Keyframing (Recommended)
Shoot fully Manual. Make your own deliberate exposure adjustments every 10–15 minutes. Then in LRTimelapse, set keyframes at each adjustment point and let the software interpolate smooth, per-frame exposure curves across the entire sequence. Zero flicker. Full control. This is the method the rest of this article teaches.
The one thing this method cannot fix retroactively — as a cold evening above Hechingen once confirmed — is Auto White Balance drift. That has to be solved before you press the shutter for the first time. Everything else, LRTimelapse handles.
💡 Pro Tip: Some photographers use an external ramping controller (like a Ramper Pro or qDslrDashboard on a laptop) to automate the in-camera adjustments. These are excellent but add complexity and failure points. For most holy grail scenarios — including construction timelapse projects in Ulm or event coverage at the Hohenzollern — a manual ramp with LRTimelapse post-processing is faster to set up and just as clean.
What You Need for This
You don’t need expensive gear to shoot a holy grail timelapse — but a few specific items make the difference between a clean sequence and one that falls apart mid-ramp.
Intervalometer
You need a reliable intervalometer. Every DSLR and mirrorless camera has a built-in interval shooting mode now, but dedicated external units offer better flexibility for changing intervals mid-sequence and work with cameras that don’t have built-in timelapse modes.
For intervalometer use, I recommend the Pixel TW-283 — it handles long sequences without drift, works with most Canon, Nikon, and Sony bodies via interchangeable cables, and survives cold evenings on exposed locations like the Gesäuse or high-altitude Dolomite ridgelines. Best For: Beginners and intermediate shooters who want a reliable, affordable trigger with no learning curve.
Tripod
For a 2–5 hour session, your tripod stability matters more than for any other timelapse type. A single vibration during a 1/4s exposure at dusk ruins frames you can’t re-shoot.
For stability-critical long shoots, I recommend the Manfrotto MT055XPRO3 Aluminium Tripod — the centre column locks solid, the leg angles are genuinely useful for rooftop setups with uneven surfaces, and it handles a full camera-plus-heavy-lens rig without flex. Best For: Photographers who shoot from architecture, rooftops, or elevated viewpoints where stability is non-negotiable.
Software
For post-processing, there is genuinely no better solution than LRTimelapse — it is specifically designed around the keyframe workflow described in this article and works natively with Lightroom Classic. The free version handles up to 400 frames; the full licence starts at around €99 and unlocks unlimited frame counts, audio sync, and the holy grail wizard. Best For: Any timelapse photographer shooting sequences they plan to sell, publish, or use professionally.
The LRTimelapse Workflow Step by Step
This is the workflow that saved the Hohenzollern sequence — not on the night I shot it, but two weeks later when I reshooted it correctly and had the files to process. Follow these steps in order and your holy grail sequence will come out clean.
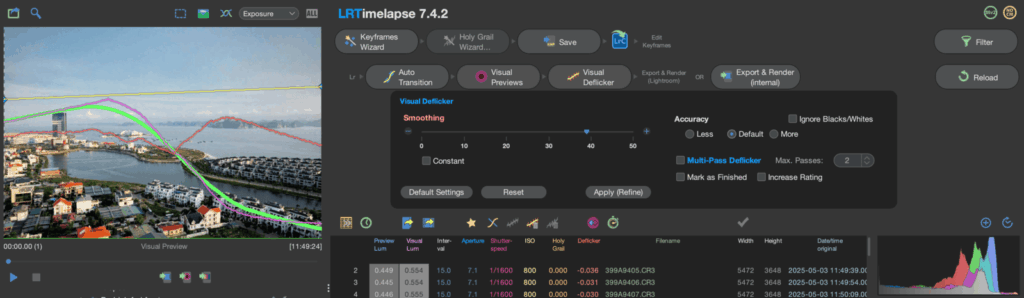
Step 1 — Load Your Sequence and Read the Exposure Graph
Open LRTimelapse and use the folder browser on the left to navigate to your RAW sequence. Click the folder and hit “Reload” — LRTimelapse reads the EXIF data from every single frame and plots your ISO, shutter speed, and aperture values as a live graph across the top of the screen. You will immediately see the exposure adjustments you made in-camera as sharp vertical steps on the graph. Those steps are the problem LRTimelapse is about to solve.
If your graph looks like a smooth slope, your in-camera adjustments were clean. If it looks like a staircase, don’t worry — that’s exactly what keyframing is for.
Step 2 — Set Keyframes at Every Adjustment Point
Click on the first frame where you made a deliberate exposure change in-camera. In the top toolbar, click “Set Keyframe” (the star icon). Do this at every adjustment point throughout your sequence — typically every 10–15 minutes during the active transition period. For a 3-hour holy grail, you’ll end up with roughly 12–18 keyframes total.
You do not need a keyframe on every frame. LRTimelapse’s job is to interpolate the smooth curve between your keyframes — the fewer, cleaner keyframes you set, the smoother the result.
⚠️ Warning: Don’t set keyframes in the middle of a rapid light-change window, like the 8 minutes around nautical twilight when the sky drops two full stops. Place keyframes at the edges of that window — one before it begins, one after it stabilises — and let LRTimelapse bridge the gap.
Step 3 — Run the Holy Grail Wizard
This is the step most tutorials skip explaining properly. In LRTimelapse, go to Workflow → Holy Grail Wizard. The wizard analyses the exposure steps between your keyframes and calculates the per-frame EV adjustment needed to make the brightness curve mathematically smooth. It writes these values as XMP metadata directly into your RAW files — no pixels are modified, just instructions for Lightroom to read.
Run the wizard, review the output graph (it should now show a smooth curve, not a staircase), and if it looks right, click “Save” to write the XMP data to disk.
Step 4 — Synchronise with Lightroom Classic, Grade Keyframes Only
Open Lightroom Classic, navigate to your sequence folder, and hit “Synchronise Folder” — Lightroom reads the XMP metadata LRTimelapse just wrote and applies it as Develop settings across every frame. Open your first keyframe and do your colour grade: adjust exposure, highlights, shadows, and colour temperature. Then move to each subsequent keyframe and refine.
The critical discipline: grade keyframes only. Never touch a non-keyframe directly. LRTimelapse will propagate your grades between keyframes as a smooth interpolation when you return to it — any edits on non-keyframe images will break the sequence continuity.
Step 5 — Return to LRTimelapse, Apply Auto Transition, Export
Back in LRTimelapse, click “Workflow → Auto Transition”. This is the final magic: LRTimelapse reads the grades you applied to your keyframes in Lightroom and interpolates smooth per-frame Develop settings for every frame between them — colour, exposure, tone, everything moves as one continuous curve. Hit “Save” again to write the updated XMP values.
Export the full sequence from Lightroom as full-resolution JPEGs or TIFFs — not as a video. Back in LRTimelapse, use the Video Encoder panel to render your final file: 4K ProRes 422 at 24fps for stock or broadcast delivery, H.264 at maximum quality for web.
💡 Pro Tip: On sequences of 1,000+ frames, run LRTimelapse’s Deflicker function as a final pass after the auto transition step — not before. Set strength between 20–30% to catch any residual optical flicker from aperture changes or lens breathing without over-smoothing the intentional exposure ramp.
For the mistakes that derail sequences before you even open LRTimelapse, 7 Timelapse Mistakes Beginners Make is the fastest diagnosis guide available.
Post-Processing the Holy Grail Timelapse
Colour Grading Across the Transition
The holy grail presents a unique colour challenge: daylight, golden hour, blue hour, and night sky are four completely different colour palettes, and they need to feel like one continuous, intentional sequence. The key is to grade in HSL rather than global temperature shifts — hold your blues consistent through twilight, and resist the urge to crush blacks during the night segment, where shadow detail in buildings and landscapes matters.
A practical starting point per phase:
| Phase | Temperature | Tint | Highlights | Shadows | Notes |
|---|---|---|---|---|---|
| Afternoon | 5500K | +3 | –30 | +10 | Neutral, clean baseline |
| Golden Hour | 5800K | +8 | –50 | +20 | Warm, protect highlights |
| Blue Hour | 4800K | 0 | –20 | +30 | Cool, lift shadows |
| Nautical Dusk | 4200K | –5 | 0 | +40 | Transition to night palette |
| Night | 3800K | –10 | +10 | +50 | Lift blacks, protect stars |
Noise Reduction on Night Frames
Once you’re past ISO 3200, noise becomes visible — especially in flat areas like clear sky gradients. Apply noise reduction selectively to the night-phase keyframes only; LRTimelapse will propagate it. Lightroom’s AI Denoise (Denoise button in the Detail panel) is the current best option for single-frame noise reduction with minimal detail loss. Set it between 40–60 for ISO 3200–6400 frames.
⚠️ Warning: Don’t apply aggressive noise reduction to the entire sequence uniformly. Applying it during the sharp, clean daylight frames softens detail unnecessarily and creates a visible quality shift mid-sequence that’s as distracting as flicker.
Final Export Settings for Delivery
Your interval determines how smooth the motion looks and how long your finished clip runs. For a 3–5 hour holy grailFor stock footage platforms (Pond5, Artgrid, Shutterstock): export at native resolution (minimum 4K), H.264 at 100Mbps, 24fps, Rec.709 colour space. For broadcast or client delivery: ProRes 422 HQ, same specs. Use the Stock Footage Metadata Generator to prepare your submission metadata — it saves significant time when uploading holy grail sequences across multiple platforms. sequence targeting a 24fps output:
Read Next on Aero Timelapse
- The Ultimate Timelapse Photography & Videography Guide — the parent pillar covering every aspect of timelapse from beginner to advanced production
- Timelapse Flicker Fix: Causes, Prevention & Post-Processing — the dedicated deep-dive on eliminating every type of flicker, including aperture flicker and LED frequency flicker
- 7 Timelapse Mistakes Beginners Make — the fastest way to diagnose what went wrong on your last sequence
- Ultimate Timelapse Photography Tutorial — covers foundational settings, intervals, and composition before you attempt the holy grail
- 🔧 Timelapse Interval Calculator — calculate the exact interval for any clip length, frame rate, and shoot duration
- 🔧 ND Filter Calculator — find the right ND strength for long-exposure looks during the bright phase of your holy grail
FAQ - Holy Grail Timelapse
What is the holy grail timelapse technique?
The holy grail timelapse is a day-to-night (or night-to-day) sequence where exposure is continuously adjusted — “ramped” — to keep frames properly exposed as ambient light changes by 10 or more stops. The professional approach is to shoot in Manual mode and apply smooth keyframe-based exposure interpolation in LRTimelapse during post-processing. The result is a seamless transition from full daylight to a star-filled night sky in a single, flicker-free clip.
What camera settings do I use for a holy grail timelapse?
Start 90 minutes before sunset in full Manual mode: shutter 1/500s, aperture f/5.6–f/8, ISO 100, white balance fixed at 5500K, shooting RAW. As light drops, first raise shutter toward 1/30s in 1/3-stop increments, then raise ISO toward 3200–6400, and only open aperture as a last resort. Change one setting at a time and never in jumps larger than 1/3 stop to avoid visible exposure steps.
Do I need LRTimelapse for a holy grail timelapse?
ou don’t need it, but without it your holy grail sequence will almost certainly flicker. LRTimelapse is the industry-standard tool for keyframe-based exposure ramping — it interpolates smooth, per-frame exposure curves between your manually-set keyframes and eliminates the step-changes that auto-exposure creates. The full licence is around €99 and pays for itself after your first clean deliverable. You can get it at lrtimelapse.com.
How long should a holy grail timelapse session be?
Plan for a minimum of 2 hours, ideally 3–4. You need enough time for the light to change meaningfully and enough frames to interpolate a smooth ramp. At a 5-second interval over 3 hours, you’ll capture approximately 2,160 frames — rendering to roughly 90 seconds at 24fps. For the most dramatic transitions, start 60–90 minutes before golden hour and shoot through until at least 30 minutes after astronomical dusk.
How do I stop holy grail timelapse flicker?
Flicker in a holy grail sequence is almost always caused by one of three things: Auto White Balance shifting between frames, aperture changes creating depth-of-field flicker (optical), or step-exposure changes from auto-exposure mode. Fix them in order: lock white balance, avoid aperture changes, and use LRTimelapse’s keyframe workflow to smooth all exposure transitions. For a full diagnosis and fix workflow, see Timelapse Flicker Fix: Causes, Prevention & Post-Processing.
What interval should I use for a holy grail timelapse?
For a 24fps output, a 5-second interval is a solid default for moderate cloud movement and city scenes. Use 8 seconds for slow, contemplative sequences or calm skies, and 3 seconds for fast-moving storm transitions. The key constraint during the bright phase is motion blur consistency — if you’re using long exposures (1/15s or slower), a shorter interval risks frame overlap. Use the Timelapse Interval Calculator to confirm your numbers before shooting.
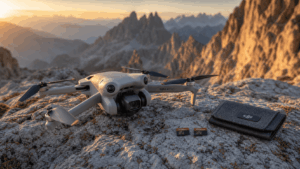
Can I shoot a holy grail timelapse with a drone?
Technically yes — a stationary hover with exposure ramping is possible — but in practice, battery life (typically 25–30 minutes per charge) makes a full 2–4 hour holy grail sequence impossible without multiple landings and relaunches, which breaks the sequence. Holy grail timelapse is a ground-based technique. Where drones excel is in shorter transitions: a 30-minute golden-hour-to-dusk ramp can work within a single battery, especially on DJI Mavic 3 or Air 3 platforms with their reliable Auto-Exposure-Bracketing modes.
Conclusion
Here is what I know from the Hohenzollern reshoot, and every holy grail I’ve shot since: the sequence that looks impossible on paper — 10 stops of light change, three hours, one unbroken clip — is completely manageable once you stop fighting the light and start working with it. Lock your white balance before frame one. Shoot Manual. Make your exposure changes small and deliberate. Then let LRTimelapse do what it was built for.
You don’t need a perfect location or perfect weather. You need a clear workflow and the willingness to set up 90 minutes before sunset. The rest takes care of itself.
If you’re ready to take timelapse production beyond solo shoots — Timelapse Production at Aero Timelapse covers commercial projects, construction documentation, and event coverage across Southern Germany and Europe. For everything else: get out there, lock that white balance, and shoot.

Dipon is a drone and timelapse cinematographer based in Ulm, Germany, with over 15 years of experience turning real spaces and projects into cinematic visuals. With a background in digital marketing, every shot is planned with a clear purpose — where it will appear, who will see it, and what it should help them decide.
You May Also Like

Best Timelapse Cameras Under €1,000 in 2026

Best Time to Fly a Drone for Photography
Timelapse for Social Media: Instagram, YouTube & TikTok Settings
How to Plan Storage for Drone Footage — The Complete Pre-Flight Guide
How to Make a Star Trail Timelapse: From Camera Settings to Online Stacking
How to Shoot a Hyperlapse on Foot: Step-by-Step Guide
Timelapse Flicker Fix: Causes, Prevention & Post-Processing Solutions

Cloud Timelapse Photography: How to Capture Dramatic Moving Skies
Milky Way Timelapse: Settings, Gear & Locations
The Complete Drone Videography Guide (2026)
Best ND Filters for Timelapse: Strength Guide & Picks

Stock Footage Metadata for Timelapse Contributors: How to Title, Tag & Describe Your Clips
Need help capturing professional timelapse for your next project but not ready to invest in the gear yet? Check out our Timelapse Video Production service to see how Aero Timelapse Studio can help elevate your production.