Table of Contents
- Intro
- Quick Answer
- Camera Settings for Milky Way Timelapse
- What Your Shutter Speed Actually Looks Like
- Focus in the Dark — Step by Step
- Interval, Frame Count & Clip Length
- Gear That Makes the Difference
- How to Plan a Milky Way Timelapse Shoot
- 10 Best Milky Way Timelapse Locations in Southern Germany, Austria & Northern Italy
- Post-Processing: What to Do With 400 RAW Files
- FAQ
- One Thing to Do Right Now
Affiliate Disclosure
This guide contains affiliate links. Purchases made through these links support Aero Timelapse Studio at no additional cost to you. I only recommend products I personally use or carefully research. As an Amazon Associate I earn from qualifying purchases.
You didn’t fail. You were given the wrong formula.
Most guides still hand you the 500 Rule for night sky exposure – divide 500 by your focal length, done. It was built for 35mm film and it doesn’t account for how many megapixels your sensor has. On any modern camera above roughly 20MP, it consistently allows too long an exposure and you come home with trailed stars.
The fix takes 60 seconds. Plug your camera body and focal length into the free Milky Way Exposure Calculator — it runs the NPF Rule for your specific sensor — and you get the exact shutter speed ceiling for your setup. Everything else in this guide builds from that number.
This guide covers everything else: how to read those settings, what gear makes the difference, how to plan the shoot, the best dark-sky locations in the Allgäu, the Austrian Alps, and the Italian coast, and what to do with your frames when you get home. I’ve shot Milky Way timelapses in all three. This is exactly what works.
Quick Answer
A Milky Way timelapse requires Manual mode, a wide-angle lens at f/1.8–f/2.8, ISO 1600–6400, and a shutter speed from the NPF Rule – not the 500 Rule. Use the free Milky Way Exposure Calculator to get your exact number for your specific camera and lens. Set your intervalometer to fire every 25–30 seconds, shoot at least 300 frames minimum for a usable clip, lock focus and white balance manually, and shoot RAW. Moon phase and location darkness matter as much as settings – always plan around a new moon and a Bortle class 4 or lower.
Camera Settings for Milky Way Timelapse
These are the settings I use as a starting point on every shoot. The shutter speed changes per camera — everything else stays the same.
Exposure Settings
| Setting | Value | Notes |
|---|---|---|
| Mode | Manual (M) | Never Auto — frames will flicker |
| Aperture | f/1.8–f/2.8 | Widest your lens allows |
| Shutter Speed | NPF Rule result | See reference table below — do not round up |
| ISO | 3200 full-frame / 1600–3200 crop | Adjust one stop after your first frame |
| White Balance | 3800–4200K manual | Never Auto — drifts between frames |
| Format | RAW | Mandatory — JPEG loses faint Milky Way structure |
| Long Exposure NR | OFF | Creates gaps between timelapse frames |
| High ISO NR | OFF | Apply in post with per-frame control |
| Focus | Manual, locked | AF will hunt in the dark |
What Your Shutter Speed Actually Looks Like
The NPF Rule gives different results depending on your camera body and lens. Here’s what to expect on common setups, pointing at the Milky Way core at f/2.8:
| Camera | Sensor | 14mm | 24mm |
|---|---|---|---|
| Canon EOS R6 Mark II | 24MP full-frame | ~44s | ~26s |
| Canon EOS R5 | 45MP full-frame | ~38s | ~22s |
| Canon EOS R7 | 32.5MP APS-C | ~28s | ~16s |
| Sony A7S III | 12MP full-frame | ~58s | ~34s |
| Sony A7 IV | 33MP full-frame | ~42s | ~25s |
These are approximate values for standard delivery (client work, stock submission). For your exact number, use the Milky Way Exposure Calculator — it handles your specific body, focal length, aperture, and declination of the sky area you’re shooting.
One rule that applies to every body: enter the result exactly. Rounding a 22-second result to 25 seconds defeats the calculation — on a high-resolution sensor, those extra seconds show as visible elongation in the corners.
Focus in the Dark — Step by Step
Autofocus fails at night. Every time. Focus manually using this sequence:
⚠️ One more thing: once you’ve locked focus with gaffer tape, cover the tape with a second strip in a contrasting colour — bright orange works well in the dark. At 2am on a mountainside, you will not notice if the first strip peels. You will notice when you review 400 frames at home.
Interval, Frame Count & Clip Length
For Milky Way timelapse, 25–30 seconds between shots is the standard. Too short and the sky motion looks jittery. Too long and stars appear to jump across the frame.
At 25 fps output, here’s what you’re committing to:
- 10-second clip → 250 frames → ~125 minutes of shooting
- 20-second clip → 500 frames → ~250 minutes (~4 hours)
A full Milky Way sequence is a full night’s work. Start before the galactic core rises, run through until dawn lifts the horizon. Use the free Timelapse Interval Calculator to calculate your exact session length before you leave home.
For triggering, use an external intervalometer — camera built-in timers drift on overnight sessions. For cold alpine conditions, I use the Pixel TW-283 Intervalometer — compatible with most Canon and Nikon bodies, backlit display readable in complete darkness, reliable through sub-zero temperatures.
Best For: Photographers running multi-hour night sessions who need a dependable trigger without paying €150+ for a branded remote.
For deeper interval guidance across different subjects, see the Timelapse Interval Guide.
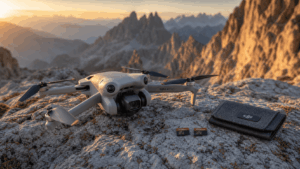
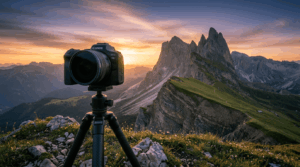
Gear That Makes the Difference
You don’t need the most expensive gear. You need the right gear for this specific type of shoot.
Lens: Fast, Wide, Purpose-Built
Your lens matters more than your camera body for Milky Way timelapse. A fast wide-angle prime collects dramatically more light than a kit zoom — and the fixed aperture eliminates the micro-variation between frames that causes flicker on zoom lenses.
I recommend the Samyang 14mm f/2.8 — one of the sharpest wide-angle primes under €300, built for astrophotography, covering full-frame sensors with well-controlled coma in the corners. On a Canon R6 II it gives you a ~44-second NPF ceiling at f/2.8, more than enough to collect serious light at ISO 3200.
If you’re on a full-frame body and don’t want to spend Zeiss money on a dedicated astrophotography lens, the Samyang 14mm f/2.8 is the honest answer. It’s been around long enough to have a proven track record in Milky Way work, covers full-frame without vignetting at f/2.8, and the fixed aperture eliminates the frame-to-frame flicker that zoom lenses introduce in timelapse.
Tripod: Mass Wins at Night
At 25–40 second exposures on an exposed alpine ridgeline, vibration is a sequence-killer. A single gust that moves your camera 2mm mid-exposure ruins that frame – and on a mountainside after midnight, gusts are not occasional. They are constant.
The Manfrotto MT055XPRO3 holds steady where lighter tripods don’t because of mass and geometry, not engineering magic. At 2.9kg it’s heavier than any carbon-fibre travel option at the same price, and that weight is what you want here – set it low, hang your bag from the centre hook if conditions are rough, and the combination of mass and low centre of gravity absorbs what a lighter tripod transmits directly to your sensor. I’ve used it at Kühtai at 2020m in September with 30-40 km/h gusts and lost no frames to vibration. The leg angle presets also allow a low shooting position on uneven mountain terrain without switching to a ground-level tripod, which is a practical advantage when you’re composing on rocky ground in the dark.
If you’re shooting exposed mountain locations – any of the Allgäu, Tirol, or Dolomite sites in this guide – this is not the place to save weight.
Star Tracker: For High-Resolution Bodies
A star tracker is not essential for Milky Way timelapse — but on high-resolution camera bodies, the NPF Rule starts working against you. On a Canon R5 at 24mm, your shutter ceiling is around 22 seconds. On a Sony A7R V at 14mm, it’s tighter still. At those exposure lengths, you’re pushing ISO harder than you need to, and the grain shows.
A tracker removes the shutter ceiling for the sky by rotating the camera in sync with Earth’s rotation. That means instead of a 22-second ceiling, you can expose for 60–90 seconds, drop ISO to 800–1600, and collect dramatically more detail in the Galactic core without trailing stars. The trade-off is that the foreground now trails instead — so tracked timelapse requires either a two-exposure blend per frame (sky tracked, foreground static) or acceptance that the foreground will show some movement. For pure sky quality, it’s the single biggest upgrade available after a fast lens.
The Sky-Watcher Star Adventurer Mini is the right entry point: compact enough to travel with, accurate to roughly 1 arcminute for focal lengths up to 35mm, and it supports cameras up to 3kg. Setup takes about 10 minutes once you’ve done it twice. If you’re on a Canon R5, Sony A7R V, or any APS-C body where the untracked NPF window is tight, this is what closes the gap.
Lens Heater: Non-Optional Above 1200m
There is one sequence-killer that almost no Milky Way guide mentions, and it will ruin your shoot silently: dew forming on your front element after midnight. You won’t see it happening. You’ll see it at home when you notice a soft haze spreading across frames 180 through 400, and there is nothing you can do about it in post.
At any Alpine location above 1200m – which includes every site in this guide – condensation is a realistic risk from June through September. When the temperature drops through the dew point during your session, which it regularly does between midnight and 3am, moisture settles on the coldest surface available. Your front element is usually that surface.
I use a simple COOWOO USB Lens Heater strap that wraps around the lens barrel just behind the front element and keeps the glass a few degrees above ambient – enough to prevent condensation from forming. It runs off USB and draws around 5W, which is low enough to run from the same power bank you’re using for the camera. It’s compatible with any lens up to 110mm diameter and fits the Samyang 14mm and most other wide-angle primes directly. Pack one any time you’re shooting above 1200m on a night with falling temperatures. It costs less than one ruined sequence.
Power Bank
A 4-hour alpine session will drain two full mirrorless batteries. At altitude in September, possibly three – cold reduces effective battery capacity significantly, and a battery that gives you 600 shots in summer may give you 250 at 5°C. Running out of power at frame 310 of a planned 500-frame sequence means your clip is too short to use and your night was wasted.
The practical fix is a high-capacity USB-C power bank that charges your camera body continuously during the session. Most current Canon R-series and Sony Alpha bodies support USB-C in-session charging – confirm this for your specific body before relying on it, as not all bodies charge while shooting. The Anker 737 at 24,000mAh has enough capacity to keep a mirrorless body charged through a full 5-hour overnight session and still have reserve for your lens heater and phone. It also supports 140W output, which means it charges back to full in under an hour at home – useful when your window is a single night and you need it ready again by dusk the following evening.
Keep the power bank in an inside jacket pocket if temperatures are below 5°C – lithium cells discharge faster in the cold, and the body heat makes a measurable difference on long sessions.
Headlamp with Red Light Mode
A headlamp is not a photography accessory — until you turn on the wrong one at the wrong moment and destroy 20 minutes of dark adaptation, or worse, sweep a white beam across someone else’s open lens mid-sequence. Both happen more often than they should.
The Petzl Actik Core has a dedicated red-light mode that switches independently from the main white beam. Red light at low intensity preserves night vision completely — you can read your intervalometer, adjust settings, check your composition, and navigate the terrain without resetting the 20-minute adaptation your eyes need to see the Milky Way structure properly. The Core also has a rechargeable battery via USB-C, which means one less AA dependency on overnight kit. At 600 lumen maximum on white it’s bright enough for trail navigation during the approach; at red it’s dim enough to use within a metre of an open camera without affecting your exposure.
One addition worth making: mark your camera’s focus tape, intervalometer buttons, and battery door with a small strip of reflective tape. Under red light at low power, these glow back at you and eliminate the fumbling that leads to accidentally nudging focus or bumping the tripod.
Memory Cards
Four hours of RAW files at a 25–30 second interval produces roughly 480–580 frames. On a Canon R6 II, a single RAW file is 25–30MB. That’s 12–17GB per session minimum – more on higher-resolution bodies. A 64GB card fills up before a 4-hour session ends, and discovering that at frame 390 at 3am on a mountainside means your session is over.
Use 256GB minimum for overnight sessions. Speed matters less for timelapse than it does for burst shooting – a V60-rated card writes fast enough that your camera never buffers between frames at a 25-second interval. SanDisk Extreme PRO V60 cards are what I use: rated for operating temperatures down to -25°C, which matters at altitude in autumn, and with a consistent write speed that has never caused a missed frame across hundreds of sessions. Bring two. Cards fail, and a second card in your jacket pocket is the kind of redundancy that costs almost nothing and saves everything.
How to Plan a Milky Way Timelapse Shoot
Five variables. Lock them all before you leave home, in this order.
1. Moon Phase
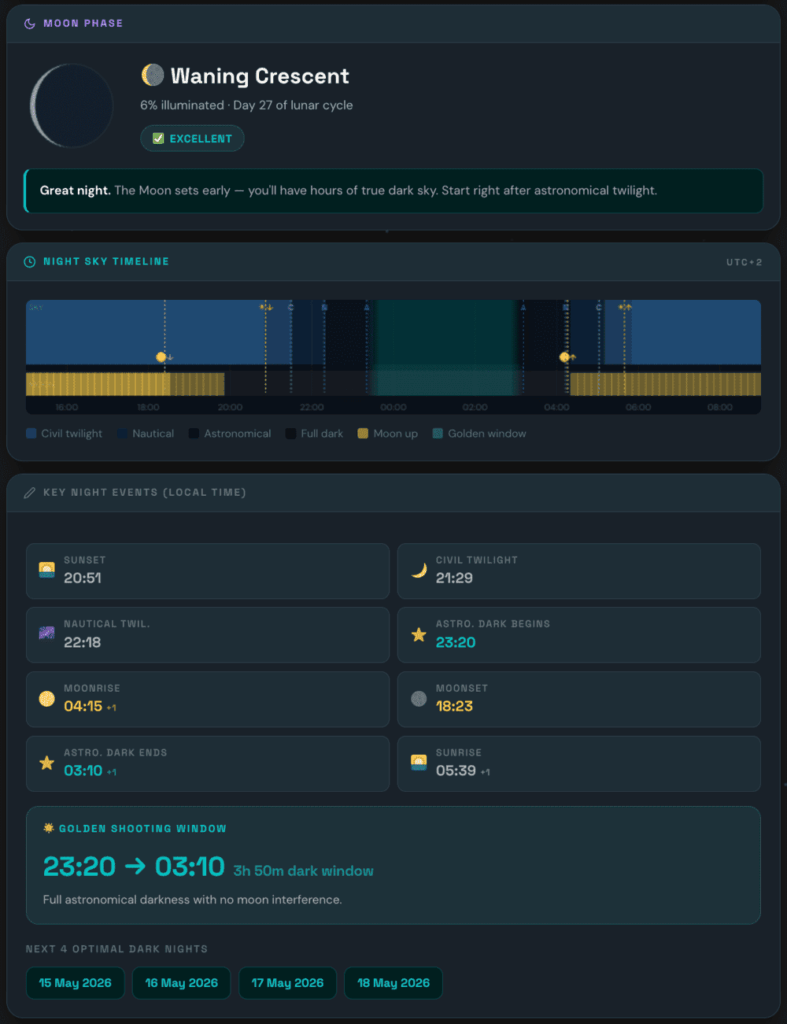
A full moon raises sky background brightness enough to completely wash out the Milky Way core from any location brighter than Bortle 2–3 — no amount of exposure compensation recovers it. Even a half-moon noticeably crushes contrast in Sagittarius, so phase percentage matters more than most beginners expect. Shoot within 3 days either side of new moon to keep illumination low enough that the moon either stays below the horizon or contributes negligible sky glow. Your usable window each month is only 5–7 days — once you factor in weather and travel, it shrinks fast, so planning ahead beats reacting. The Moon Check tab in the Milky Way Exposure Calculator shows your planned date’s illumination percentage, a suitability rating, and the next four optimal dark nights, so you can map out the entire month’s shooting windows in one step.
2. Galactic Core Visibility Window
In Central Europe, the galactic core is visible from April through September, peaking in June and July. From the Allgäu or the Austrian Alps, it clears the horizon around 22:00–23:00 CEST at peak season. Open PhotoPills and go to the Night AR view. Drop a pin on your planned location, set the date and time to 23:00 on your shoot night, and look south. The app overlays the Milky Way arc on a live camera view so you can see exactly where the galactic core will sit relative to your foreground. Rotate the view to confirm the core clears your southern horizon – mountain ridgelines can block it at lower elevations until 23:30 or later. If you don’t have PhotoPills, Stellarium on desktop is free and gives you the same arc position with horizon profile support; load your location, set the time, and use the Milky Way layer under View → Sky and Viewing Conditions.
3. Location Darkness
| Bortle Class | Description | Milky Way Visibility |
|---|---|---|
| 1–2 | Remote dark sky | Spectacular |
| 3–4 | Rural | Excellent — recommended minimum |
| 5 | Suburban / rural transition | Good — faint detail washed out |
| 6–7 | Bright suburban | Barely visible |
| 8–9 | City | Invisible |
Check lightpollutionmap.info to find the nearest Bortle 4 or darker zone before committing to a drive.
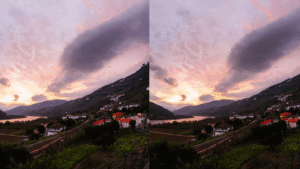
4. Atmospheric Transparency
Clear sky is necessary but not sufficient. High humidity reduces contrast even under open stars. Use Clearoutside or Meteoblue — both give transparency and seeing ratings, not just cloud cover.
5. Composition Research in Advance
Use PhotoPills or Stellarium to preview exactly where the Milky Way arc will be at your location and time. Plan your foreground before you go — a silhouetted ridgeline, an alpine hut, a lone tree — and align it with the core’s predicted position.
💡 Pro Tip: Drive to the location the afternoon before. Walk the foreground in daylight, mark your tripod position, test your compositions. When you return at midnight, you set up in two minutes instead of forty.
10 Best Milky Way Timelapse Locations in Southern Germany, Austria & Northern Italy
Before You Go — A Practical Safety Note
⚠️ Several locations in this guide involve driving to 2000m+ and shooting from exposed ridgelines alone after midnight. That’s manageable with basic preparation – and genuinely risky without it.
Tell someone your exact location and expected return time before every alpine night session. Bring a charged power bank and a headlamp with a red-light mode (white light destroys your night vision and your frames). Wear more layers than you think you need – temperature at Kühtai or Bieler Höhe at 1am in September is regularly 2–5°C with wind. Mountain rescue in Austria and Bavaria is excellent, but the best outcome is not needing it.
1. Winklmoosalm, Chiemgau Alps (Bavaria)
The only certified IDA Dark Sky Park in the Alps — and the most legitimately dark site in all of Southern Germany. Located near Reit im Winkl at 1200m elevation, it sits in a natural bowl formed by the Chiemgau mountains, which block light domes from surrounding valleys including Salzburg (40km away). On a good moonless night, up to 5,000 stars are visible to the naked eye — compared to roughly 500 from the centre of Munich. The open alpine meadow gives you a 360° unobstructed horizon, which is rare at this elevation. For timelapse, the rounded ridgeline silhouette is a clean, repeatable foreground that works in any direction. Guided stargazing events run through summer if you want to combine a recce with organised access.
Best for: The most accessible certified dark sky location from Munich or Salzburg. Drive up, park, shoot. No hiking required.
2. Allgäu Highlands — Oberstdorf / Kleinwalsertal area (Bavaria/Vorarlberg)
Above 1200m on the southern side of the Allgäu range, light pollution from the valley floor drops sharply and you’re into Bortle 3–4 territory. The terrain above the tree line offers alpine huts, open ridgelines, and mountain pastures as foreground options — all without technical access. The Kleinwalsertal valley on the Austrian side of the border pushes even darker. Core visibility window here is June through August, with the galactic centre rising south-southeast after 22:00 CEST. Scout compositions in the afternoon — the best positions above Oberstdorf face south across the Austrian mountains with no major settlements on the horizon.
Best for: The most versatile and accessible dark sky zone from Ulm, Stuttgart, or Munich. A single overnight drive with no accommodation needed.
3. Swabian Alb (Baden-Württemberg)
Often overlooked in favour of the Alps, but arguably the most accessible dark sky zone for anyone based around Ulm or Stuttgart. The plateau between the Heuberg and the eastern Alb drops to Bortle 3 in places – particularly around the Hachteler See lake, which is noted as exceptionally dark and produces reflection shots of the Milky Way in still water. The broader plateau gives you open grassland horizons without needing altitude. Not as dramatic as the Alps foreground-wise, but the accessibility means you can shoot here on short notice when conditions align and save the Alpine drives for the best nights of the season.
The eastern Alb between Münsingen and Laichingen is the strongest zone – specifically the elevated plateau around the Bürren reserve and the area south of the B313. These spots are poorly signposted and rarely appear in German astrophotography forums, which is part of what makes them useful: no one else will be there. Bring a paper OS map of the Alb in addition to your phone – the ridge access tracks don’t always appear on Google Maps at the detail you need.
Best for: Photographers based in Ulm or Stuttgart who need a realistic local option for a last-minute new moon window.
4. Bavarian Forest / Bayerischer Wald (Bavaria/Czech border)
Recognised in 2025 as a full IDA Dark Sky Reserve — the first in Bavaria. The cross-border zone with the Czech Šumava National Park creates a wide corridor of protected darkness that benefits both sides of the border. The forest landscape produces a very different aesthetic from the open Alps — the dark tree lines create layered silhouettes and the low ridge profiles keep the southern horizon relatively unobstructed. Best shooting locations are on the higher clearings above Grafenau and around the Großer Arber summit (1456m). Weather stability here is slightly lower than the Alps, so always check Clearoutside before the drive.
The clearest shooting positions in the Bayerischer Wald are the forest clearings above Freyung and the summit plateau of Großer Arber. The Arber is accessible by gondola for the first ascent but you’ll need to descend on foot — factor that into your session planning. Weather moves in from the Czech side with little warning; the Clearoutside rating for this location can drop from clear to overcast in under an hour. Always have a contingency plan.
Best for: Photographers who want a Forest foreground aesthetic rather than alpine, and a certified dark sky zone with a long track record of protection.
5. Kühtai, Tirol (Austria)
Paved road access to 2020m — the highest altitude you can reach by car in this part of the Alps. At that elevation you frequently shoot above the valley cloud inversion, putting the Inn Valley glow below you as a warm band of orange while the sky above is clean and completely black. The foreground options are dramatic: high-altitude rock, snow patches in early summer, and the dark reservoir below. No technical access required, just the drive. The core rises well clear of the southern mountains here, and the reduced atmospheric column at 2000m improves contrast noticeably compared to valley shooting.
Best for: Canon R5 or high-resolution body shooters who need the cleanest possible sky at accessible altitude. The combination of elevation and road access is hard to beat in Tirol.
6. Defereggental / Hohe Tauern, East Tirol (Austria)
The Defereggental valley in East Tirol sits inside the Hohe Tauern National Park — one of the largest national parks in the Alps, with minimal settlement density and genuine darkness. The valley itself is narrow and enclosed, but the meadows above 1500m on the surrounding slopes open up to wide southern horizons. The area is far enough from Innsbruck, Lienz, and Salzburg that no major light dome reaches the sky here. This is the location referenced consistently in Austrian astrophotography forums as one of the genuinely dark Alpine zones accessible by road. Drive distances from Southern Germany are longer (3.5–4 hours from Ulm), so plan it as a dedicated overnight.
Best for: Photographers looking for Alpine darkness without compromising on foreground options. The valley farmhouses and mountain ridgelines provide strong compositional elements.
7. Gesäuse National Park, Styria (Austria)
Part of the East Alpine Starlight Reserve — a 20,000km² protected dark sky zone in the Austrian Alps recognised by UNESCO. Sky brightness measurements here reach 21.6–21.8 magnitudes per square arcsecond, which is indistinguishable from the best astronomical sites in the world. The national park’s mountain topography shields an 80km-wide corridor from Central European light pollution. The Gesäuse gorge itself — the Enns River cutting through vertical limestone walls — is one of the most dramatic landscape settings in Austria. Shooting from the meadows above the gorge gives you dark ridgelines against the Milky Way arch in a way that feels genuinely remote, even though access from the east is straightforward.
Best for: Photographers willing to push east into Styria for some of the legitimately darkest sky in the European Alps. Exceptional for high-resolution bodies that need maximum exposure ceiling.
8. Silvretta High Alpine Road / Bieler Höhe, Vorarlberg-Tirol (Austria)
The Silvretta Hochalpenstraße climbs to 2032m at the Bieler Höhe, on the Vorarlberg-Tirol border. The reservoir lake here sits in an open mountain bowl with minimal horizon obstruction, and the road is regularly cited in astrophotography communities across Germany and Austria as one of the best accessible high-altitude shooting locations in the western Alps. From the long-stay parking area, the view to the south is uninterrupted mountain darkness. Note: the road is toll-operated and open June to October only. A night parking restriction applies on most of the road, but the long-term parking area at the Bieler Höhe is permitted for overnight stays.
Best for: Photographers who want high-altitude Vorarlberg darkness combined with a lake reflection foreground and no hiking required. Particularly strong for September shoots when the autumn air is at its clearest.
9. Tre Cime di Lavaredo, Dolomites (Italy)
The most iconic astrophotography location in continental Europe. The three vertical limestone towers rise to over 2900m and create an unmistakeable silhouette when the Milky Way arc rises directly above them in late summer — August and September are the peak months for this specific alignment. The area around Rifugio Locatelli faces south with a direct view of the northern faces of the peaks and the open sky behind. Bortle class is typically 3 here, helped by the distance from major settlements. Access is by toll road to Rifugio Auronzo (2320m), then a 30–40 minute walk. Be aware that this location is heavily visited in daylight — arrive late afternoon and wait for the crowds to clear.
Best for: The strongest single foreground subject in the European Alps for Milky Way timelapse. The Tre Cime silhouette against the galactic core is a genuinely iconic composition that has genuine stock and editorial market value.
10. Lago di Braies (Pragser Wildsee), South Tyrol (Italy)
A high-altitude lake in South Tyrol at 1496m, surrounded by steep Dolomite peaks and fed by glacial springs — the water is a distinctive emerald-green in daylight that turns into a near-perfect dark mirror at night. The still lake surface gives Milky Way reflections that are the strongest single feature of this location: the galactic arc above and its reflection below create a vertical composition that’s difficult to achieve anywhere else in the region. Bortle class is 3–4. Access is straightforward by road, though the car park has limited capacity and fills early on summer weekends. Come mid-week and arrive by late afternoon to secure a position on the east shore.
Best for: Reflection shots. If you want the Milky Way mirrored in still water with dramatic Dolomite peaks as the frame, this is the best accessible location in northern Italy for that specific composition.
Post-Processing: What to Do With 400 RAW Files
Shooting is half the work. Here’s a fast, clean workflow.
Import your sequence into Lightroom Classic and cull before touching a single slider. Flag and reject any frame affected by aircraft lights, passing clouds, or focus drift. A clean 280-frame sequence produces a better result than a flickering 400-frame one – every time. Sort by capture time and scan the histogram column in Grid view: frames hit by a passing light source show an obvious spike. Delete them now.
Step 2 — Develop One Frame, Sync All
Work on your sharpest, best-exposed frame first. Lift shadows carefully – the Milky Way structure lives in the lowest quarter of the tonal range, and pushing too hard introduces colour noise. Pull highlights back by 30–50 points. Set white balance manually to match what the sky actually looked like: 3800K for a cool, natural result; 4200K if you want the core to read slightly warmer. Once the frame looks right at 100% zoom, select all remaining frames, click Sync Settings, and apply – making sure Tone Curve, White Balance, and Noise Reduction are all checked.
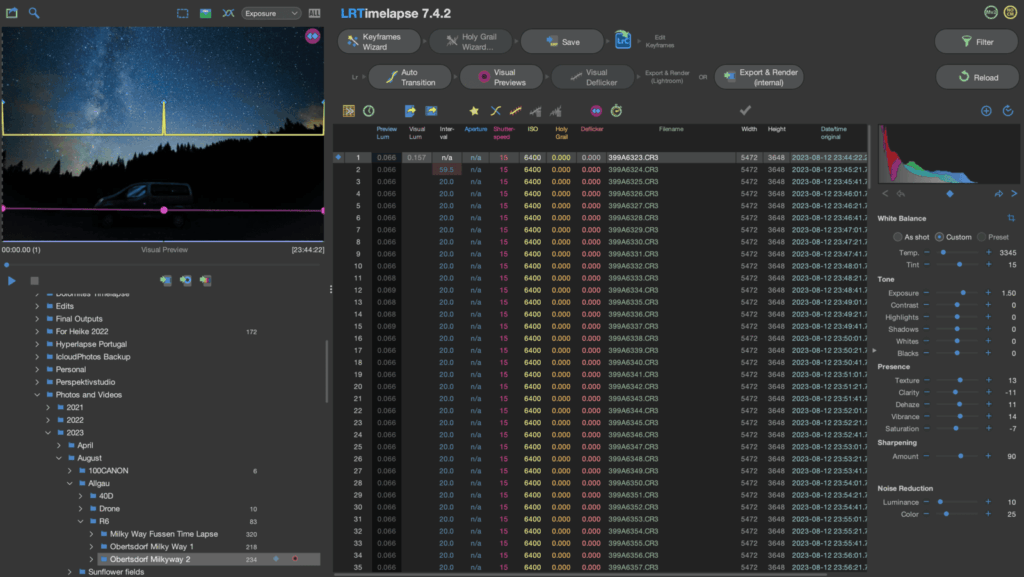
Step 3 — Deflicker in LRTimelapse
Even with manually locked settings, the atmosphere changes transparency between frames, and that variation pulses in the final video. LRTimelapse reads your sequence, generates a smooth luminance and colour correction curve, and writes the values back into Lightroom as metadata. The workflow is: open LRTimelapse → load your folder → run Holy Grail Wizard or the standard smooth wizard for fixed-setting sequences → reload metadata in Lightroom → re-export. The free version handles up to 400 frames — enough for a full single-night sequence at a 30-second interval.
Export from Lightroom as 16-bit TIFF files into a dedicated output folder – not JPEG, which compresses shadow detail irreversibly. Import the TIFF sequence into DaVinci Resolve as a clip (File → Import Media → select the first frame → check "Use as sequence"). Apply a subtle S-curve in the Colour page: lift blacks to around 15–20, compress highlights slightly. This prevents the sequence from looking flat without crushing the faint Galactic core structure. Render at 4K 25fps minimum for stock platforms. For Shutterstock, Pond5, or Adobe Stock, use a metadata generator to format your keywords and description before uploading – platform-specific keyword limits differ and submitting without them delays approval.
Read Next on Aero Timelapse
- The Ultimate Timelapse Photography & Videography Guide — the complete parent resource covering every technique on this site
- Timelapse Interval Guide — how to choose the right interval for any subject
- 7 Timelapse Mistakes Beginners Make — the errors that ruin sequences before post even begins
- Milky Way Exposure Calculator — NPF Rule: your exact shutter speed in under a minute
- Timelapse Interval Calculator — calculate your interval, frame count, and session length
Frequently Asked Questions
What are the best camera settings for a Milky Way timelapse?
Manual mode, widest aperture your lens allows (f/1.8–f/2.8), shutter speed from the NPF Rule (use the Milky Way Exposure Calculator for your exact value), ISO 3200 on full-frame or 1600–3200 on crop, white balance fixed at 3800–4200K, RAW format. Lock every setting manually — any drift between frames creates flicker that is difficult to remove in post.
Why shouldn't I use the 500 Rule for Milky Way timelapse?
The 500 Rule was designed for 35mm film and only uses focal length as its input — it has no awareness of your sensor’s pixel density. On any modern camera above roughly 20MP, it consistently allows too long an exposure and produces visibly elongated stars at full resolution, particularly in the frame corners. The NPF Rule accounts for your specific sensor and gives you an accurate ceiling for your exact body. On a Canon R5 at 24mm, the difference between the two rules is nearly 8 seconds.
What is the best lens for Milky Way timelapse?
A wide-angle prime at f/1.8–f/2.8 between 14mm and 24mm (full-frame equivalent). The Samyang 14mm f/2.8 is the best-value option under €300 — built for astrophotography, sharp corner to corner, and the fixed aperture eliminates the flicker between timelapse frames that zoom lenses produce. Avoid zoom lenses for night timelapse: they’re slower, more prone to coma on stars, and the aperture ring can introduce micro-variation between shots.
How many frames do I need for a Milky Way timelapse?
250 frames for a 10-second clip at 25fps, 500 frames for a 20-second clip. With a 30-second interval, 500 frames means approximately 4 hours of continuous shooting. Plan to start before the galactic core rises and run through until dawn brightens the horizon. Use the Timelapse Interval Calculator to work backwards from your target clip length to your exact session duration.
How do I plan a Milky Way timelapse shoot?
Lock five variables before leaving home: new moon window (within 3 days of new moon), galactic core visibility (April–September in Central Europe, rising after 22:00 CEST at peak), location darkness (Bortle class 4 or lower), atmospheric transparency (use Clearoutside or Meteoblue, not just cloud cover), and composition (preview in PhotoPills before you drive). The Moon Check tab in the Milky Way Exposure Calculator shows your date’s suitability and the next four optimal dark nights in one step.
Do I need a star tracker for Milky Way timelapse?
Not required, but it makes a significant difference on high-resolution bodies and APS-C sensors where the NPF shutter ceiling is tight. The Sky-Watcher Star Adventurer Mini (~€200) removes the shutter speed limit for the sky, letting you drop ISO and collect far more detail in the Galactic core. If you’re shooting a Canon R5 or similar high-resolution body, it’s the single biggest quality upgrade after a fast lens.
How do I fix flicker in a Milky Way timelapse?
Flicker is almost always caused before the shoot, not during post. The three most common sources are: auto white balance enabled (fix: always manual, 3800–4200K locked), aperture micro-variation from a zoom lens (fix: use a manual prime, or tape the aperture ring closed after you set it), and power fluctuations on long sessions that cause the intervalometer to miss a frame (fix: use an external intervalometer on fresh batteries, not the camera’s built-in timer). If your sequence still flickers after fixing all three, the cause is atmospheric – transparency changes between frames – and that requires LRTimelapse to correct in post. It can’t be fixed by re-shooting.
One Thing to Do Right Now
Open the Milky Way Exposure Calculator, select your camera, enter your lens — you have your exact shutter speed in 60 seconds. Then check the Moon tab and find the next new moon window.
Date, location, settings. Everything in this guide follows from those three decisions.
The sky you’re imagining is up there every clear moonless night. You just need to be standing under it with the right number locked in.

Dipon is a drone and timelapse cinematographer based in Ulm, Germany, with over 15 years of experience turning real spaces and projects into cinematic visuals. With a background in digital marketing, every shot is planned with a clear purpose — where it will appear, who will see it, and what it should help them decide.
You May Also Like

Best Timelapse Cameras Under €1,000 in 2026

Best Time to Fly a Drone for Photography
Timelapse for Social Media: Instagram, YouTube & TikTok Settings
Holy Grail Timelapse: Complete Day-to-Night Settings & Workflow
How to Plan Storage for Drone Footage — The Complete Pre-Flight Guide
How to Make a Star Trail Timelapse: From Camera Settings to Online Stacking
How to Shoot a Hyperlapse on Foot: Step-by-Step Guide
Timelapse Flicker Fix: Causes, Prevention & Post-Processing Solutions

Cloud Timelapse Photography: How to Capture Dramatic Moving Skies
The Complete Drone Videography Guide (2026)
Best ND Filters for Timelapse: Strength Guide & Picks

Stock Footage Metadata for Timelapse Contributors: How to Title, Tag & Describe Your Clips
Need help capturing professional timelapse for your next project but not ready to invest in the gear yet? Check out our Timelapse Video Production service to see how Aero Timelapse Studio can help elevate your production.