Drone Flying Tutorial: Beginner to Confident Pilot Masterclass
Dipon | February 2026
Table of Contents
Affiliate Disclosure
This guide contains affiliate links. Purchases made through these links support Aero Timelapse Studio at no additional cost to you. I only recommend products I personally use or carefully research. As an Amazon Associate I earn from qualifying purchases.
If you’re nervous about crashing, confused by the rules, and disappointed by wobbly footage – you’re not alone, and you’re in the right place.
I’ve been flying drones for 15 years, first as a hobbyist, then professionally for timelapse and aerial cinematography projects across Germany and Europe. In that time I’ve made most of the mistakes in this guide myself, usually in the first month. This tutorial is built around what actually builds confident, safe piloting – not what sounds impressive in a YouTube thumbnail.
By the end you’ll be able to take off, hover, fly patterns, land smoothly, handle the most common “oh no” moments, and record cleaner, more stable video – without shortcuts that get drones crashed or pilots fined.
Quick Answer (TL;DR)
Learn in this order: safe takeoff/hover/landing, orientation control, basic patterns, emergency habits, then smooth camera moves.
Practice in a wide, open field with short grass, clear line of sight, and no people, animals, cars, water, or power lines nearby.
Configure these 3 settings first: confirm Home Point, check Return-to-Home (RTH) behavior/altitude concept, set a conservative low-battery warning action (per your drone’s app/manual).
Avoid these 3 mistakes: launching in gusty wind, trusting obstacle avoidance as “crash proof,” and flying behind trees/buildings where signal can drop.
Your first “win” is boring: a stable hover and a calm landing in the same spot, repeated 10 times.
Most beginners feel noticeably calmer after 3–7 practice sessions; “confident pilot” usually takes 2–6 weeks of short sessions (not one long day).
Who This Tutorial Is For
For: first-time camera-drone owners who want safe handling, smoother video, and repeatable training drills. Not sure which drone to buy yet? See the Best Drones for Beginners 2026 guide. If you want the short answer: the DJI Mini 4 Pro is the safest starting point for most beginners in the EU.
For: creators (travel, real estate, YouTube) who need consistent, cinematic movement—not just “it flies.”
Not for: FPV racing/freestyle (those drones often fly in manual/acro mode without GPS position-hold, and the training path is different).
Not for: long-range or “beyond sight” flying, this masterclass stays conservative and skill-based.
Safety First: The 60-second rule
If you can’t answer these 5 questions, don’t take off yet.
Is the wind (including gusts) within your comfort level right now at treetop height, not just at ground level?
Are there uninvolved people/animals who could wander into your flight zone or landing area?
Is your battery level healthy enough for the plan plus a conservative return buffer?
Do you have a confirmed Home Point, and do you understand what your drone will do on RTH or lost link?
Are you allowed to fly here today (airspace/local restrictions/privacy), and are you willing to land immediately if conditions change?
Safety logic (the mindset that prevents crashes):
Wind, people, and battery are the “big three” that turn small mistakes into expensive incidents.
If anything feels uncertain, you don’t need courage—you need a smaller plan (lower, closer, simpler) or a no-go decision.
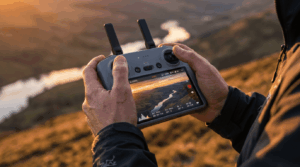
Understanding the Controls: Drone flying tutorial basics
Good piloting is not “fast thumbs.” It’s clean inputs, good orientation, and knowing what the drone is trying to do (and when it can’t).
Before you start:
Prefer a real controller if your drone supports it; phone-only control often feels less precise and makes smooth movement harder.
If you must fly phone-only, keep flights extra conservative: lower, closer, slower, and with bigger safety margins.
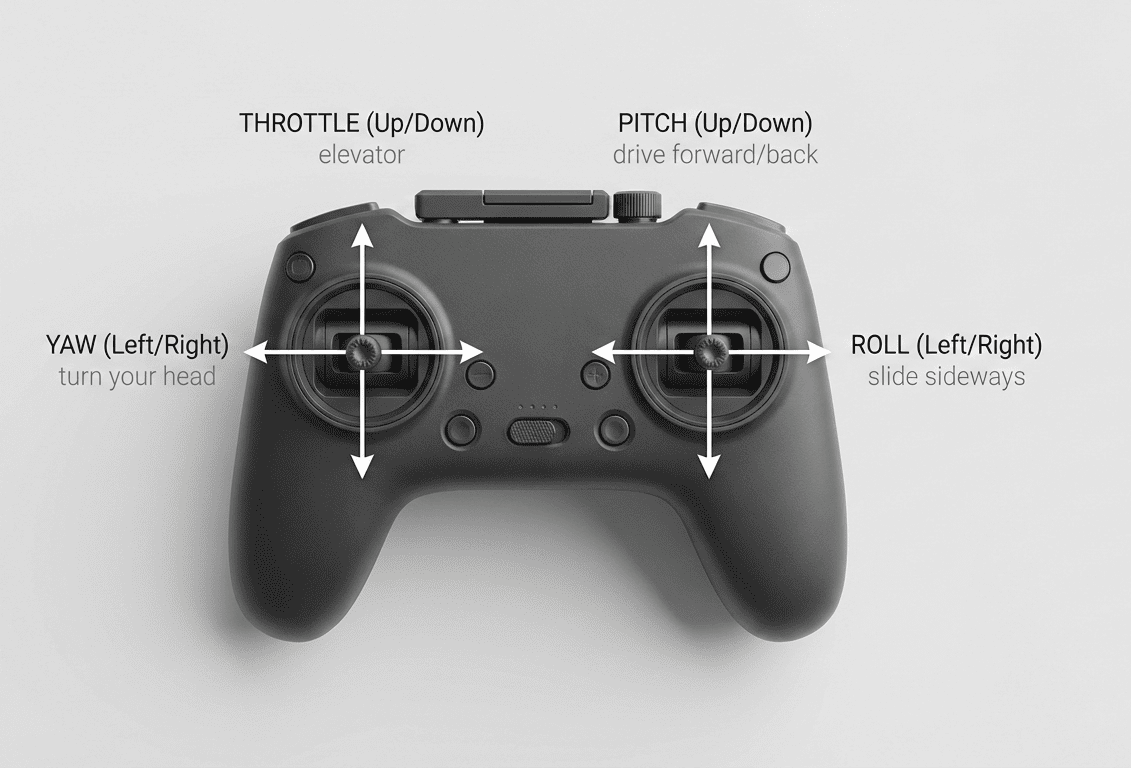
The 4 stick inputs
You only control four things; everything else is a combination.
Throttle: up/down. Mental model: “elevator.” Smooth throttle prevents bounce and helps stable landings.
Yaw: rotate left/right. Mental model: “turn your head.” Yaw is the #1 source of jerky video if you spin too fast.
Pitch: forward/back. Mental model: “drive forward/back.” Pitch controls motion through space; it’s how you create reveals and pull-backs.
Roll: left/right strafe. Mental model: “slide sideways.” Roll is how you do parallax and smooth arcs.
Beginner drill (2 minutes, no takeoff):
Hold the drone (motors off) and imagine the nose as an arrow.
Move each stick and say out loud what the drone would do.
Repeat until you stop hesitating on yaw vs roll.
What “Cine/Normal/Sport” really changes
These modes don’t change physics—they change how aggressively the drone responds and how hard it brakes.
Beginner mode: typically limits speed, distance, and/or responsiveness so you can’t get into trouble as quickly.
Cine mode: typically smooths acceleration/deceleration and reduces stick sensitivity for cleaner video (but can feel “weak” in wind).
Sport mode: typically increases responsiveness and speed and may reduce braking distance comfort (great for wind authority, bad for beginner panic inputs).
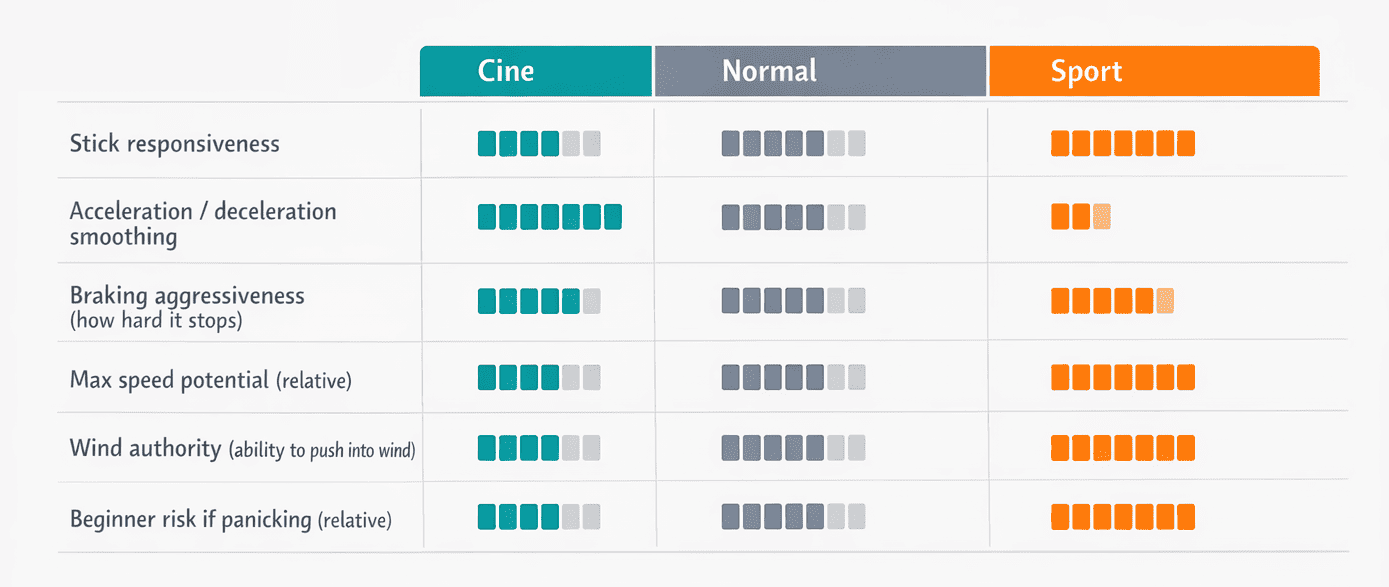
Rule of thumb:
Train in Cine/Normal until your patterns and landings are boring.
Use Sport only when you have a reason (wind authority or positioning), and you’ve rehearsed how you’ll slow down and stop.
Yaw vs pan: how to avoid “robot turns”
A pure yaw spin often looks robotic because the camera pivots without traveling through space.
Try this mini drill (5 minutes):
Hover at safe height.
Pick a distant object (tree/building) as your subject.
Yaw slowly while adding a tiny amount of roll in the same direction to create an arc.
Keep altitude constant; stop gently (no “snap” stop).
What you’re learning:
“Yaw sets direction, roll draws the curve.”
Smooth footage often comes from curved paths, not spins.
The Core Settings Beginners Must Set
Before your first real flight, set up Home Point and RTH behavior, confirm warning actions, and choose beginner-friendly limits, then you’ll spend your brainpower on flying, not troubleshooting.
Important: exact labels vary by brand/app, so check your drone manual/app for exact wording.
Prioritize safety systems, slow practice, and a calm first month, your confidence will grow faster than any spec upgrade.
Core entities
GPS/GNSS: satellite navigation used to hold position and return home; GNSS is the broader term (GPS is one system inside GNSS).
Home Point: the recorded “return location” the drone uses for RTH.
Return-to-Home (RTH): an automated return sequence (often climb → travel → descend) triggered by you, low battery, or lost link.
Settings to check (in this order)
Home Point confirmation
Wait for a clear “Home Point updated” style message before you fly far.
If the Home Point is wrong, RTH can be worse than manual flight.
RTH altitude concept
Set RTH altitude high enough to clear local obstacles on the route home (trees, light poles, buildings).
Don’t guess blindly: if you don’t know your obstacle heights, fly closer and lower until you do.
Low-battery behavior (and why beginners get surprised)
Many drones warn first, then escalate to “return soon,” then may initiate an automatic landing or RTH.
Don’t wait for the drone to decide: you decide early, while you still have options.
Max distance / max altitude limits (within legal constraints)
Set conservative limits for training so you can’t accidentally drift far away while learning.
As your skill grows, your limits can grow, but only with a reason and a plan.
Units + map orientation
Choose meters/feet and a map orientation you understand quickly under stress.
Confusion here causes slow reactions when wind or battery pressure hits.
Camera basics (minimum needed for smoother motion)
Use a stable frame rate (e.g., 24/30 fps) and avoid “random settings” day to day.
Learn the shutter angle concept at a high level: faster shutter looks crisp but can feel jittery; slower shutter can look smoother but needs stabilization and often ND filters in bright light.
Compliance reminder
Before you fly in the EU, read and follow your local requirements and airspace restrictions. Check the EASA Open Category Guide for the official framework. If you’re in Germany, the Best Drones Under 500 Euro guide covers the sub-250g weight class rules and CE marking requirements that affect which drone you can legally fly where.
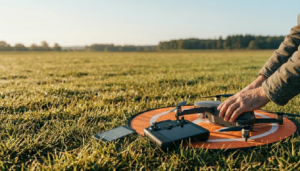
Pre-Flight Checklist (Print this)
A consistent pre-flight checklist prevents most beginner crashes because it catches the predictable stuff: wind surprises, wrong Home Point, prop damage, and rushed decisions.
Use this table until you no longer need it, then keep using it anyway.
| Step | What to check | Why it matters | Beginner tip |
|---|---|---|---|
| 1 | Weather: wind + gusts + precipitation | Wind at height can be stronger than at your feet | If trees are “shimmering,” you’re already in wind territory |
| 2 | Takeoff/landing spot | Tall grass, sand, gravel cause tip-overs and debris | Use a landing pad or firm ground |
| 3 | People/animals nearby | Uninvolved people change risk instantly | Choose a place where you can control your bubble |
| 4 | Propellers | Chips/bends cause vibration and unstable footage | If in doubt, swap props—cheap fix |
| 5 | Arms/locks/frame | Loose parts fail in flight | Gentle wiggle check before powering on |
| 6 | Gimbal cover removed | Common “why is my gimbal stuck?” issue | Make it a ritual: cover off before power |
| 7 | Battery health + seating | Poor contact can cause sudden power loss | Push until it clicks; don’t fly swollen packs |
| 8 | Controller + phone + cables | Low controller battery = lost link risk | Start every session with “full enough” devices |
| 9 | GPS/GNSS lock quality | Position-hold needs satellites | Don’t take off in panic—wait for stable status |
| 10 | Home Point set | RTH depends on it | Confirm message + map position makes sense |
| 11 | Compass/IMU warnings | Calibration is not “daily maintenance” | Calibrate only when the app/manual indicates or after major changes/repairs |
| 12 | Signal + interference check | Buildings, power lines, metal can degrade link | Don’t stand next to cars, fences, or big metal |
| 13 | Planned flight path | Prevents “where am I going now?” drift | Say the plan out loud: “up, hover, square, land” |
| 14 | Planned return path | Wind can make the return harder than outbound | Fly into the wind first so you return with tailwind |
| 15 | Emergency readiness | You react how you trained | Decide now: where will you land if anything feels off? |
The 14-Day Drone Flying Training Plan
Practice beats talent; do this plan and you’ll improve fast.
I designed this plan around sessions I’d give to someone flying for the first time. The first three days feel almost too simple – that’s intentional. The goal in week one is not skill, it’s calm. You can’t build smooth inputs while your heart rate is at 140.
Rules of the plan:
10–20 minutes only (quit while you’re still calm).
Same location if possible (reduces variables).
Log 1–2 notes after each day (what felt scary, what improved, what you’ll repeat).
| Day | Goal | Drill (10–20 min) | Success criteria | Common mistake |
|---|---|---|---|---|
| 1 | Takeoff / hover / landing | Takeoff to 2–3 m, hover 30 sec, land; repeat 8–10x | Smooth liftoff, no bounce landing, stays centered | Over-correcting altitude (“yo-yo” hover) |
| 2 | Square pattern | Fly a slow square: forward, right, back, left; stop at corners | Stops are clean; altitude stays consistent | Turning with yaw too aggressively |
| 3 | Figure-8 | Big, slow figure-8 using roll + pitch; minimal yaw | Curves look round, not sharp | Flying too small/tight too soon |
| 4 | Nose-in orientation | Hover, yaw 180° so nose faces you; small left/right moves | You stop mixing left/right when nose-in | Panic yaw spins to “fix” orientation |
| 5 | Controlled descent + braking | Descend slowly from 10 m to 2 m; practice full stop from forward motion | No “drop” at the end; stops are repeatable | Cutting throttle too fast near ground |
| 6 | Orbit practice (wide, slow) | Orbit a cone/tree from far away: yaw + slight roll arc | Subject stays framed; motion feels smooth | Orbiting too close to subject |
| 7 | RTH rehearsal (safe, low-risk) | At short distance, trigger RTH, be ready to cancel, then land | You understand climb/route/descend behavior | Forgetting RTH altitude implications |
| 8 | Wind management basics | Fly a straight line into wind, then back; note ground speed changes | You can hold line without zig-zag | Letting wind drift you sideways |
| 9 | Smooth arcs (creator focus) | Fly a gentle curved path past a subject (parallax) | Curve is steady; no jerky yaw | Using yaw like a steering wheel |
| 10 | Constant altitude discipline | Pick altitude; fly patterns without altitude change | Altitude stays consistent within ~1 m | Throttle “fidgeting” |
| 11 | Mini mission planning | Plan 3 shots (reveal, pull-back, top-down) then fly them | You execute the plan without improvising | Changing plan mid-flight due to nerves |
| 12 | Battery discipline | Set a “land at X%” rule and obey it | You land early, not forced by warnings | “Just one more shot” syndrome |
| 13 | Mixed-mode control | Use Cine for shots, Normal for reposition; keep it deliberate | No mode changes while close to obstacles | Switching to Sport in stress |
| 14 | Real mission + review | Scout, set Home Point, fly a simple shot list, review footage | You identify 2 improvements for next time | Not reviewing footage (no feedback loop) |
Common Beginner Mistakes (and fixes)
These are common because they’re emotional mistakes: rushing, overconfidence in tech, and skipping boring basics. The one I see most often and made myself is over-trusting obstacle avoidance. The first time I flew near trees and the drone didn’t crash, I assumed the sensors would always catch it. They won’t. Thin branches, power lines, and anything low-contrast are invisible to most consumer obstacle detection systems. Treat the sensors as a backup, never as permission to fly close.
Taking off from tall grass → Use a landing pad or hand-launch only if your manual explicitly supports it and you’re trained. A landing pad costs under €15 and eliminates debris ingestion on every single flight.
Forgetting the gimbal cover → Make “cover off” part of the battery-in ritual.
Launching in gusty wind → Delay the flight or train lower/closer; wind is an advanced variable.
Over-trusting obstacle avoidance → Assume sensors can miss thin branches, wires, glass, and low-contrast surfaces.
Yawing too fast for video → Use Cine mode and add roll for arcs instead of spins.
Flying behind trees/buildings → Stay in front of obstacles to reduce signal interference and sudden RTH.
Not planning a return path → Fly into wind first; return should be easier than outbound.
Ignoring sun angle → Avoid pointing into harsh sun; plan for side-light or back-light when safe.
Flying too close to people/property → Increase distance; your comfort is not their consent.
Using Sport mode too early → Earn Sport mode by mastering stops and landings in calmer modes.
Climbing “just because” → Altitude is not safety if it increases wind and anxiety.
Draining battery too low → Land earlier; batteries sag under load and in cold.
Launching near metal/power sources → Move away from cars, fences, and power lines before takeoff.
Calibrating compass/IMU randomly → Calibrate only when prompted or after significant change; random calibrations can add errors.
Not reviewing footage → Review 2 minutes after every session; your footage is your coach.
Drone Flying for Better Video
Smooth video comes from slow inputs, stable altitude, and planned paths. This section is about piloting for camera movement, not camera-brand tricks.
The “smooth footage” foundations
Use Cine mode for most shots (slower response = fewer micro-jerks).
Fly gentle arcs instead of pure yaw spins (motion through space feels cinematic).
Hold constant speed and altitude (viewers feel “professional” consistency).
Keep subjects big and simple at first (single building, tree line, coastline), not busy scenes.
Smooth stick control is the foundation — but cinematic footage requires more than steady flying. The Complete Drone Videography Guide picks up exactly where this tutorial leaves off: shot types, camera settings, D-Log colour grading, gear selection, and how to turn your flights into stock income.
Gimbal stabilization
A gimbal stabilizes the camera, not your flight path; it can’t fix sudden yaw snaps or altitude bobbing.
If your horizon looks tilted, check for a “horizon level” option in your app and follow your manual for calibration steps.
Don’t chase perfection mid-flight: land, adjust, retest.
Beginner shot list
Pick 3 shots per session max.
Reveal: start low behind a safe foreground, rise slowly to reveal the subject.
Pull-back: fly backward away from subject while keeping it centered (gentle pitch).
Top-down: hover above a clear area, then slide slowly for motion.
Orbit: wide, slow orbit with consistent radius (avoid tight orbits near obstacles).
Parallax pass: fly sideways while facing the subject (roll + tiny yaw corrections).
ND filters
ND filters reduce light so you can use more natural shutter speeds for video motion. If your footage looks overly crisp and jittery on sunny days, ND filters can help — once your piloting is already smooth. The Neewer ND Filter Set ND8-64 covers most outdoor shooting conditions and fits the Mini series. Use the ND Filter Calculator to find the right strength for your shutter speed and frame rate.
Frequently Asked Questions
Where is the best place to practice?
A large, open area with short grass, minimal obstacles, no uninvolved people/animals, and a clear return/landing spot is ideal.
How high should I set RTH altitude?
Set it high enough to clear obstacles on the route home; if you don’t know obstacle heights, fly closer and keep the mission simple until you do.
Why is my drone drifting?
Wind, weak GPS/GNSS conditions, or a switch into a mode without strong position-hold can all cause drift; treat it as a signal to slow down and land in an open area.
Do I need to calibrate compass/IMU?
Not routinely—calibrate when the app/manual prompts you or after significant changes (repairs, major travel, unusual warnings), not as a daily habit.
How windy is too windy?
Too windy is when you can’t hold position comfortably, your return speed into wind is poor, or gusts make your inputs feel “late”—beginners should stay conservative.
How do I avoid jerky footage?
Use Cine mode, make slower stick inputs, avoid fast yaw spins, and fly gentle arcs with consistent altitude and speed.
What’s the safest first “real shoot”?
A simple shot list in a wide-open area: one reveal, one pull-back, one top-down—then land early and review footage.
Do I need ND filters?
Only if you’re filming in bright light and want more natural motion blur — they won’t fix jerky piloting, but they improve video once your movement is smooth. The Neewer ND Filter Set ND8-64 is what I use on the Mini series. See the complete guide to drone camera settings for exact starting points by scene and light condition, or use the ND Filter Calculator for a quick answer.
What should I do if I lose signal?
Don’t chase the drone—watch for RTH behavior, move to a clearer spot for reconnection, and be ready to take over calmly when the link returns.
Why does my drone stop or refuse to move near objects?
Obstacle sensing can brake or block movement; treat it as assistance, not permission to fly close, back away and replan with more space.
Next Steps
Becoming a confident pilot is not about flying more hours, it’s about flying the right hours. Short, focused sessions with a clear goal and an honest review afterward build skill faster than long, anxious flights where you just hope nothing goes wrong.
The 14-day plan in this guide is the fastest path I know from nervous first flight to consistent, repeatable results. Follow it in sequence. Don’t skip the boring days – they are the ones that build the muscle memory you’ll rely on when something unexpected happens at 80 metres over an open field.
The three things that separate a confident pilot from a nervous one are always the same: safe habits before every flight, clean basic inputs on the sticks, and the discipline to land earlier than you think you need to. Everything else – cinematic moves, complex missions, faster flight – comes after those three are automatic.
Start with Day 1. A stable hover and a calm landing, ten times in a row. That’s the whole goal for now.
Related deep-dives
Use these guides as “pick your next step” depending on what you’re trying to improve:
Want the complete pre‑flight routine + emergency actions? Read Drone Pre‑Flight Checklist for Beginners.
- Ready to control your image, not just your flight path? Check Manual Drone Camera Settings: ISO, Shutter, Aperture Explained

Dipon is a drone and timelapse cinematographer based in Ulm, Germany, with over 15 years of experience turning real spaces and projects into cinematic visuals. With a background in digital marketing, every shot is planned with a clear purpose — where it will appear, who will see it, and what it should help them decide.
You May Also Like

Milky Way Timelapse: Settings, Gear & Locations

The Complete Drone Videography Guide (2026)
Best Drones Under 300 Euro 2026: Entry-Level Options That Actually Deliver

Stock Footage Metadata for Timelapse Contributors: How to Title, Tag & Describe Your Clips
Manual Drone Camera Settings: ISO, Shutter, Aperture Explained
Timelapse Interval Guide : Pick the Right Interval Fast
Drone Pre-flight Checklist for Beginners: Safety System for Confident Flights

Best Stock Platforms for Timelapse: Pond5 vs Shutterstock (2026 Guide)

What Timelapse Sells: Best Timelapse Subjects for Stock Footage
Best Drones for Beginners (2026): Safe, Easy Picks + Buying Guide
Timelapse Stock Footage Earnings: $3K/Month Case Study
Best Drones Under 500 Euro (2026) – Top 6 Budget Camera Drones
Need help capturing aerials for your next project but not ready to invest in the gear yet? Check out our Drone Videography to see how Aero Timelapse Studio can help elevate your production.